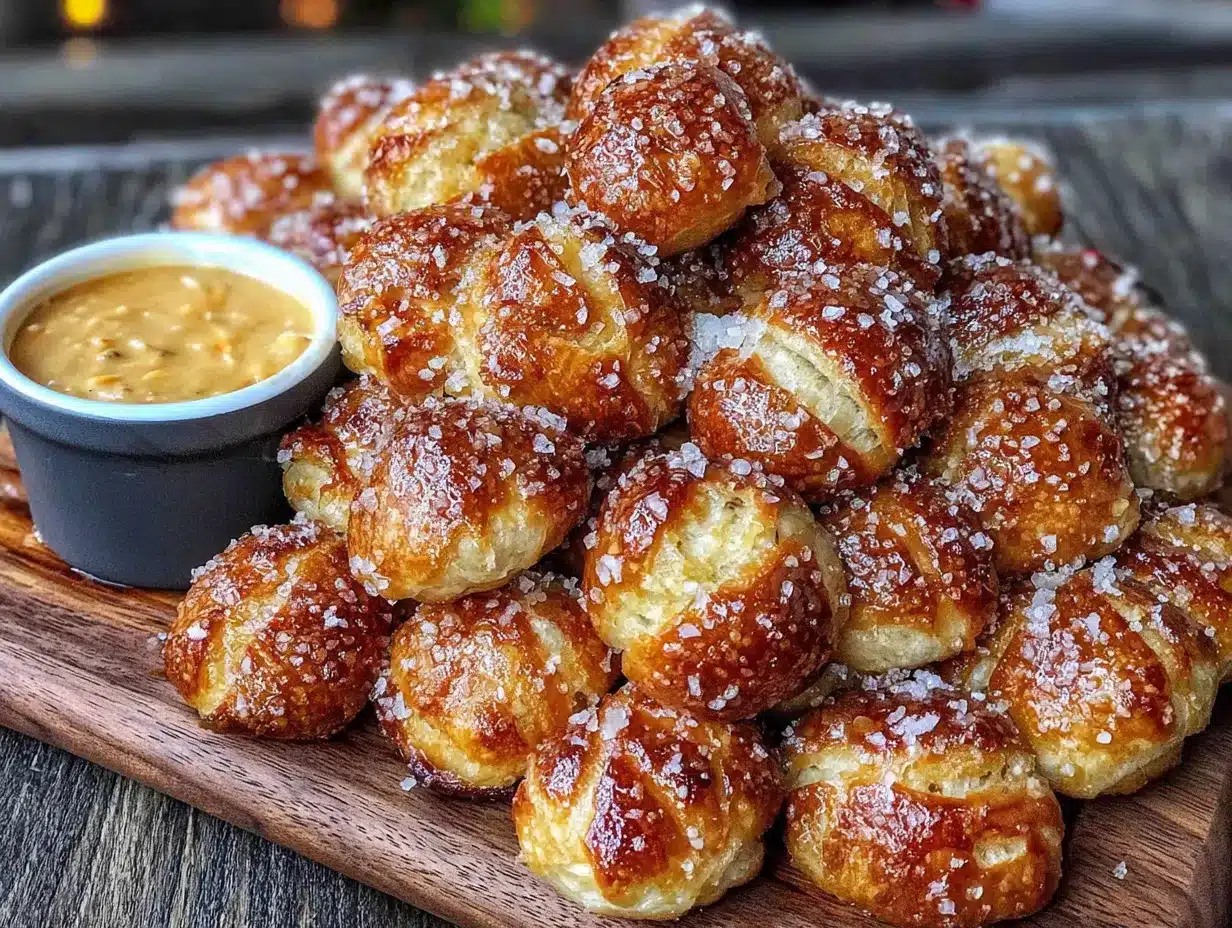
The clock is ticking down, the jerseys are on, and honestly, the only thing I care about right now is what’s coming out of the oven. It’s the third quarter of a game that’s way too close for comfort, and I’m standing in my kitchen, flour dusted across my favorite worn-out sweatshirt, shaping these tiny little footballs out of soft, golden pretzel dough. There’s a hum of crowd noise from the living room, the occasional yell at the TV, and the smell of warm, yeasty dough filling the air. That’s my happy place. Not the end zone, but the countertop, where these Game Day Mini Football Pretzel Bites with Beer Cheese Dip are about to become the real MVP of the afternoon.
I didn’t set out to make the world’s cutest snack. I set out to make something that felt like a real celebration. Something you could grab with one hand while still holding your drink, something that didn’t require a fork, and something that would make people stop mid-sentence and just say, “Wow, these are good.” These little pretzel bites are all of that and more. They’re soft on the inside with that signature chewy, salty exterior, and they’re shaped like actual footballs. It’s not just food. It’s a whole vibe.
And the dip. Oh, the dip. A creamy, sharp, and impossibly smooth beer cheese that comes together in minutes. It clings to every nook and cranny of those warm pretzels. This isn’t a fussy, complicated recipe. It’s the kind of thing you make when you want to show up for the party without spending the whole party in the kitchen. It’s the kind of recipe that becomes a tradition. I’ve made these for Super Bowl parties, for Monday Night Football, and even for a quiet Saturday when I just wanted a snack that felt a little bit special. They never disappoint. So, let’s get our hands a little bit doughy and make the best game day snack you’ll ever have.
Why You’ll Love This Recipe
I’ve tested this recipe more times than I can count. I’ve tried different ratios of baking soda to water for the bath, different shaping techniques, and a whole lot of cheese combinations. This is the version that works every single time. It’s not just a recipe; it’s a system for game day success.
- Perfect for Game Day: These mini football pretzel bites are the ultimate party food. They’re portable, dippable, and absolutely adorable. Plus, they’re a guaranteed conversation starter.
- Surprisingly Simple Dough: Don’t be intimidated by homemade pretzels. This dough comes together with simple pantry staples and requires no fancy equipment. I promise, if you can stir and knead, you can make these.
- Best Beer Cheese Dip: We’re not skimping here. This dip is creamy, tangy, and deeply flavorful. It’s made with sharp cheddar and your favorite lager, creating a rich, velvety texture that’s perfect for dipping.
- Crowd-Pleasing Fun: Kids love the cute shape, and adults love the sophisticated flavor of the beer cheese. It’s a snack that truly appeals to everyone at the party.
- Make-Ahead Friendly: You can prep the pretzel bites ahead of time and bake them right before the game starts. This takes all the stress out of party hosting, letting you actually enjoy the game.
This isn’t just another pretzel recipe. It’s the one I reach for when I want to impress without the stress. It’s the one that disappears from the platter in minutes. It’s the one that makes you look like a rockstar in the kitchen, even if you’re just a fan who loves a good snack. The first time I made these, my brother-in-law, who is notoriously hard to please, ate a dozen before the halftime show even started. That’s the kind of power we’re talking about here.
What Ingredients You Will Need
This recipe uses a handful of simple ingredients to create something truly special. Most of these are probably already in your pantry and fridge, which is exactly how game day cooking should be. Let’s break down what you’ll need for both the pretzel bites and the beer cheese dip.
For the Mini Football Pretzel Bites
- 1 ½ cups warm water (110°F-115°F): This is crucial for activating the yeast. Water that’s too hot will kill it, and water that’s too cold won’t wake it up. Think bathwater temperature.
- 1 packet (2 ¼ teaspoons) active dry yeast: The magic ingredient that makes our dough rise and gives pretzels their soft, airy texture. I always use the standard supermarket brand, and it works perfectly.
- 1 tablespoon brown sugar: This feeds the yeast and adds a subtle depth of flavor that white sugar just can’t match. It also helps with browning.
- 3 ½ cups all-purpose flour: The backbone of our dough. No need for bread flour here; all-purpose gives us the perfect chewy-but-tender texture. (plus extra for dusting)
- 2 tablespoons unsalted butter, melted: Adds richness and tenderness to the dough. It also makes the dough a dream to work with.
- 1 ½ teaspoons salt: Essential for flavor. Don’t skip it, or your pretzels will taste flat.
- ½ cup baking soda: This is for the boiling water bath. It’s what gives pretzels their signature dark, shiny crust and distinctive flavor. It’s non-negotiable!
- 1 large egg, beaten with 1 tablespoon water: This egg wash is what gives the pretzels that beautiful, glossy, golden-brown finish. (for egg wash)
- Coarse sea salt or pretzel salt: For that final, perfect salty crunch on top. Don’t use regular table salt, as it’s too fine and will just dissolve.
For the Beer Cheese Dip
- 2 tablespoons unsalted butter: The foundation of our roux, which thickens the cheese sauce beautifully.
- 2 tablespoons all-purpose flour: Works with the butter to create a smooth, lump-free base for the cheese sauce.
- 1 cup whole milk: Provides the creamy base. Whole milk is best for the richest, most luxurious texture. (adds richness)
- ½ cup your favorite lager or pale ale: This is the star of the show. I recommend a light lager like a Coors or Budweiser, or a slightly hoppy pale ale. Don’t use a dark, bitter stout, as it will overpower the cheese.
- 2 cups sharp cheddar cheese, freshly grated: Pre-shredded cheese has anti-caking agents that prevent it from melting smoothly. Grating your own block of cheese is the single most important tip for a silky, creamy dip. I cannot stress this enough.
- 1 teaspoon Dijon mustard: Adds a little tang and complexity that cuts through the richness of the cheese and beer.
- ¼ teaspoon garlic powder: A subtle savory note that rounds out the flavor.
- Pinch of cayenne pepper (optional): For a tiny hint of heat. I always add it, because I love a little kick.
Equipment Needed
You don’t need a professional bakery setup for this. Just a few standard kitchen tools that you probably already own. Here’s what you’ll need to get the job done.
- Large Mixing Bowl: For mixing and kneading the dough. A sturdy glass or ceramic bowl works best.
- Measuring Cups and Spoons: Accuracy is key in baking, so make sure you have a good set.
- Wooden Spoon or Dough Hook: For the initial mixing. If you’re using a stand mixer, a dough hook is a lifesaver.
- Clean Kitchen Towel or Plastic Wrap: To cover the dough while it rises. A towel feels more rustic, but plastic wrap is great for keeping moisture in.
- Large Pot (at least 6 quarts): For boiling the water and baking soda. You need enough room for the pretzels to float freely.
- Slotted Spoon: To gently lift the pretzels out of the boiling water bath without damaging their shape.
- Baking Sheet: Lined with parchment paper or a silicone baking mat. This is essential for easy cleanup and preventing sticking.
- Small Saucepan: For making the beer cheese dip. A non-stick one is easiest for cleanup.
- Whisk: For creating a smooth, lump-free cheese sauce. A good whisk is your best friend here.
If you don’t have a stand mixer, don’t worry. You can absolutely knead this dough by hand. It takes a little more elbow grease, but it’s a great way to feel the dough come together. I actually prefer doing it by hand sometimes. It feels more connected to the process. Just turn the dough out onto a floured surface and knead for about 8-10 minutes until it’s smooth and elastic.
Preparation Method
Alright, let’s get to the fun part. We’re going to make these adorable little footballs. Follow these steps closely, and you’ll have a platter of perfect pretzel bites in no time. The process is incredibly satisfying.
Making the Pretzel Dough
- Activate the Yeast: In your large mixing bowl, combine the warm water, brown sugar, and active dry yeast. Give it a gentle stir and let it sit for about 5-10 minutes until it becomes frothy and bubbly. This means your yeast is alive and happy. If it doesn’t foam, your water might have been too hot or too cold, and you’ll need to start over.
- Mix the Dough: Add the melted butter, salt, and 2 cups of the flour to the yeast mixture. Stir with a wooden spoon until a shaggy dough forms. Then, gradually add the remaining 1 ½ cups of flour, one half cup at a time, until the dough starts to pull away from the sides of the bowl. It should feel soft but not overly sticky.
- Knead the Dough: Turn the dough out onto a lightly floured surface. Knead for about 6-8 minutes, pushing the dough away from you with the heel of your hand, then folding it back over itself. It should become smooth, elastic, and slightly tacky to the touch. If it’s too sticky, add a tiny bit more flour, a tablespoon at a time.
- First Rise: Place the dough in a lightly greased bowl (I just use the same one, wiped clean). Turn the dough over once to coat it in the oil. Cover the bowl with a clean kitchen towel or plastic wrap and let it rise in a warm, draft-free place for about 1 hour, or until it has doubled in size. The top of my fridge is my go-to spot for this.
Shaping the Football Pretzel Bites
- Preheat and Prep: Preheat your oven to 425°F (220°C). Line a large baking sheet with parchment paper or a silicone baking mat. Set aside.
- Punch Down the Dough: Once the dough has doubled, punch it down gently to release the air. Turn it out onto a clean, lightly floured surface.
- Shape the Footballs: Divide the dough into 4 equal pieces. Roll each piece into a long rope, about 12-14 inches long. Then, using a sharp knife or a bench scraper, cut each rope into 1-inch pieces. You’ll have about 40-50 little dough pillows. Now, the fun part. Take each little piece and gently pinch the ends to form a point, creating a mini football shape. Don’t worry about making them perfect. The slight imperfections just make them look more homemade and charming.
The Boiling Water Bath
- Prepare the Bath: Fill your large pot with about 6 cups of water and bring it to a rolling boil. Once boiling, carefully add the ½ cup of baking soda. It will fizz up vigorously, so be careful! Give it a stir to dissolve.
- Boil the Pretzels: Reduce the heat to a gentle simmer. Working in batches of 5-6 footballs at a time, use a slotted spoon to carefully lower them into the simmering water. Let them boil for about 20-30 seconds on each side. They will puff up slightly. This step is what gives them that iconic pretzel chewiness.
- Transfer to Baking Sheet: Using the slotted spoon, carefully lift the boiled pretzels out of the water, letting the excess water drip off, and place them on your prepared baking sheet, leaving a little space between each one.
Baking the Pretzels
- Egg Wash and Salt: In a small bowl, whisk together the egg and 1 tablespoon of water. Using a pastry brush, gently brush each football with the egg wash. This is what gives them that gorgeous, glossy, golden-brown finish. Sprinkle generously with coarse sea salt or pretzel salt.
- Bake: Place the baking sheet in the preheated oven and bake for 12-15 minutes, or until the pretzel bites are a deep, beautiful golden brown. The smell in your kitchen at this point is absolutely incredible.
- Cool Slightly: Let them cool on the baking sheet for about 5 minutes. They are best served warm, straight from the oven.
Making the Beer Cheese Dip
- Make the Roux: While the pretzels are baking, make the dip. In a small saucepan over medium heat, melt the 2 tablespoons of butter. Once melted, whisk in the 2 tablespoons of flour. Cook for about 1 minute, whisking constantly, until the mixture is bubbly and golden. This cooks out the raw flour taste.
- Add the Liquid: Slowly pour in the milk and the beer, whisking constantly to prevent lumps. Continue to whisk until the mixture is smooth and begins to thicken, about 2-3 minutes.
- Melt the Cheese: Reduce the heat to low. Add the freshly grated cheddar cheese in handfuls, whisking after each addition until it is completely melted and smooth. Do not let the sauce boil, or it can become grainy.
- Season: Stir in the Dijon mustard, garlic powder, and a pinch of cayenne pepper, if using. Taste and adjust seasonings with a little salt and black pepper. Keep the dip warm on the lowest possible heat while you serve the pretzels.
Cooking Tips & Techniques
I’ve made a lot of mistakes in the kitchen, and I’m happy to share them so you don’t have to. Here are a few things I’ve learned about making these pretzel bites perfectly every time.
Don’t Overboil the Pretzels. This is the most common mistake. The baking soda bath is crucial, but you only need 20-30 seconds per side. If you leave them in too long, the dough can get a weird, alkaline flavor, and the pretzels can become tough instead of chewy. Trust me on this one. I once left a batch in while I answered the phone, and they came out tasting like a chemistry experiment.
Freshly Grated Cheese is Non-Negotiable. For the love of all that is holy, do not use pre-shredded cheese for the dip. It is coated in cellulose and potato starch to prevent clumping, which also prevents it from melting into a smooth, creamy sauce. You will end up with a grainy, clumpy mess. Spend the two minutes grating a block of sharp cheddar. Your taste buds will thank you. It’s the difference between a good dip and a great one.
Keep the Dough Warm. Yeast is a living thing, and it likes to be cozy. If your kitchen is drafty, find a warm spot for the dough to rise. I sometimes turn my oven on to the lowest setting for just a minute, then turn it off and place the covered bowl inside with the door slightly ajar. It creates the perfect, warm, draft-free environment.
Multitask Like a Pro. While the dough is rising for its first hour, you can prep all your other ingredients. Grate the cheese, measure out the flour, get your beer ready. This makes the final assembly a breeze. It also frees you up to watch the pre-game show, which is obviously the most important part of the day.
Shaping is a Team Sport. If you have kids or friends hanging out in the kitchen, put them to work shaping the footballs! It’s a fun, hands-on activity that gets everyone involved. My niece loves rolling the little dough ropes and pinching the ends. It makes the whole process feel like less of a chore and more of a party.
Variations & Adaptations
This recipe is a fantastic base, and I love playing around with different flavors. Here are a few of my favorite variations that I’ve tried over the years.
- Spicy Buffalo Twist: Before baking, brush the shaped footballs with a mixture of melted butter and your favorite buffalo wing sauce. Bake as directed, and then serve with the beer cheese dip spiked with a little extra cayenne and some crumbled blue cheese. It’s a flavor explosion.
- Everything Bagel Bites: After the egg wash, skip the coarse salt and sprinkle the pretzels with a generous amount of everything bagel seasoning. The sesame seeds, poppy seeds, garlic, and onion create a savory, crunchy crust that is just divine. I made these for a brunch party, and they were gone in seconds.
- Jalapeño Popper Pretzel Bites: For a truly decadent twist, after shaping the footballs, use your finger to poke a small indent in the center. Fill the indent with a small cube of cream cheese and a sliver of pickled jalapeño. Pinch the dough back together to seal the filling inside. Proceed with the boiling and baking. The creamy, spicy surprise inside is incredible.
- Gluten-Free Adaptation: You can substitute the all-purpose flour with a good quality 1-to-1 gluten-free baking flour blend. The dough will be a bit stickier, so you may need to dust your hands with more flour. The texture will be slightly different, but they are still delicious and satisfying. I’ve had great luck with the Bob’s Red Mill brand.
- Dairy-Free Beer Cheese: For a dairy-free version of the dip, use a high-quality plant-based butter and unsweetened oat milk or cashew milk. You’ll also need a dairy-free cheddar-style shred that melts well. The flavor profile will change, but it’s a great option for those with dietary restrictions. Look for a brand that specifically says it melts well.
Serving & Storage Suggestions
These pretzel bites are best enjoyed fresh and warm, right after they come out of the oven. That’s when they are at their peak of chewy, salty, golden perfection. But I know life happens, and sometimes you have leftovers. Here’s how to handle them.
Serving: Arrange the warm pretzel bites on a large platter or a wooden cutting board. Place a small bowl of the warm beer cheese dip right in the center. For an extra touch, you can garnish the dip with a sprinkle of fresh chives or a dash of smoked paprika. They are fantastic alongside other game day favorites like these flavorful buffalo chicken dip stuffed mini peppers for an easy tailgate spread.
Storage: Store any leftover pretzel bites in an airtight container at room temperature for up to 2 days. I do not recommend storing them in the refrigerator, as it will dry them out and make them hard. Store the beer cheese dip separately in an airtight container in the refrigerator for up to 4 days.
Reheating: The best way to reheat the pretzel bites is in the oven. Preheat your oven to 350°F (175°C). Spread the pretzels on a baking sheet and bake for 5-7 minutes, until they are warm and slightly crisp on the outside again. You can also reheat them in an air fryer at 350°F for 2-3 minutes. The microwave will work in a pinch, but they will be soft and a bit chewy, not crisp. Reheat the beer cheese dip in a small saucepan over low heat, stirring frequently, or in the microwave in 15-second intervals, stirring between each, until smooth and warm.
Flavor Development: Honestly, the pretzels are best the day they are made. The cheese dip, however, gets even better after a day in the fridge. The flavors of the beer, cheese, and mustard meld together beautifully. Just give it a good stir and a gentle reheat.
Nutritional Information & Benefits
Let’s be real. This is a game day snack, not a health salad. But that doesn’t mean we can’t be smart about it. Here’s a rough breakdown and some things to keep in mind. The values below are estimates for one serving (about 4-5 pretzel bites with a generous portion of dip).
- Calories: Approximately 350-400 per serving.
- Fat: 18-22g
- Carbohydrates: 35-40g
- Protein: 12-15g
Health Benefits: The main nutritional win here is the protein from the cheese and the flour. Cheese is a great source of calcium and phosphorus, which are important for bone health. The yeast and whole-grain potential (if you use a blend of white and whole wheat flour) can provide some B vitamins and fiber. The beer, in moderation, contains some B vitamins and antioxidants, but let’s be honest, we’re here for the flavor.
Dietary Considerations: This recipe is not gluten-free, low-carb, or dairy-free in its standard form. However, I’ve included some great substitutions in the Variations section above to accommodate those needs. The main allergens are wheat (gluten) and dairy (milk, cheese, butter).
My personal take? I don’t make these every day. They are a special treat for a special occasion. And on that occasion, I don’t worry about the numbers. I focus on the joy of sharing something delicious with the people I care about. That’s a kind of wellness that doesn’t show up on a nutrition label.
Conclusion
So there you have it. The ultimate game day snack that’s as fun to make as it is to eat. These Game Day Mini Football Pretzel Bites with Beer Cheese Dip are more than just food. They’re a little bit of edible team spirit, a warm, salty, cheesy hug in the middle of a tense fourth quarter. They’re the kind of snack that makes people gather around the coffee table instead of just staring at the screen.
I really hope you give this recipe a try. Don’t be afraid to get your hands dirty and make the shapes your own. Maybe you’ll make them perfectly pointed, or maybe they’ll look a little more like potatoes. It doesn’t matter. What matters is the taste, the fun, and the memories you make in the kitchen. If you love a good, hearty snack, you might also enjoy these crispy baked chicken nuggets with easy honey mustard for another crowd-pleasing option.
I’d absolutely love to hear how they turn out for you! Did you add any fun twists? Did your team win? Drop a comment below and let me know. And if you loved them, please share this recipe with a fellow football fan. Until next time, happy snacking and enjoy the game!
Frequently Asked Questions
Can I use instant yeast instead of active dry yeast?
Yes, you can! If using instant yeast, you don’t need to activate it in the warm water first. Simply mix it directly with the flour and other dry ingredients. You can also skip the first rise and let the shaped pretzels rise for about 30 minutes before boiling. The result will be very similar.
Can I make the pretzel dough ahead of time?
Absolutely. You can make the dough, let it do its first rise, then punch it down and wrap it tightly in plastic wrap. Store it in the refrigerator for up to 24 hours. When you’re ready to bake, let it sit at room temperature for about 20 minutes to take the chill off before shaping and boiling.
Why did my beer cheese dip turn out grainy?
This is almost always caused by using pre-shredded cheese or by overheating the sauce. Pre-shredded cheese has anti-caking agents that prevent smooth melting. Also, make sure you keep the heat on low when adding the cheese and never let the sauce boil. Patience is key for a silky smooth dip.
Can I freeze the unbaked pretzel bites?
Yes! After shaping the footballs and giving them the baking soda bath, let them dry on the baking sheet for a few minutes. Then, place the baking sheet in the freezer for about 1 hour, or until the pretzels are frozen solid. Transfer the frozen pretzels to a freezer-safe bag. When ready to bake, place them frozen on a baking sheet, brush with egg wash, sprinkle with salt, and bake for an extra 2-3 minutes.
What is the best beer to use for the cheese dip?
I recommend using a beer that you actually enjoy drinking. A light lager like Coors, Budweiser, or Miller is a safe and classic choice. A pale ale will give a slightly hoppier, more assertive flavor. Avoid dark stouts, porters, or very bitter IPAs, as they can overwhelm the delicate cheese flavor and make the dip taste bitter.
Pin This Recipe!
Game Day Mini Football Pretzel Bites with Beer Cheese Dip
These adorable mini football-shaped pretzel bites are soft, chewy, and salty, paired with a creamy, sharp beer cheese dip. They’re the ultimate game day snack that’s fun to make and even better to eat.
- Prep Time: 30 minutes
- Cook Time: 15 minutes
- Total Time: 1 hour 45 minutes
- Yield: 4 servings 1x
- Category: Appetizer
- Cuisine: American
Ingredients
- 1 ½ cups warm water (110°F-115°F)
- 1 packet (2 ¼ teaspoons) active dry yeast
- 1 tablespoon brown sugar
- 3 ½ cups all-purpose flour (plus extra for dusting)
- 2 tablespoons unsalted butter, melted
- 1 ½ teaspoons salt
- ½ cup baking soda
- 1 large egg, beaten with 1 tablespoon water (for egg wash)
- Coarse sea salt or pretzel salt
- 2 tablespoons unsalted butter (for dip)
- 2 tablespoons all-purpose flour (for dip)
- 1 cup whole milk
- ½ cup lager or pale ale
- 2 cups sharp cheddar cheese, freshly grated
- 1 teaspoon Dijon mustard
- ¼ teaspoon garlic powder
- Pinch of cayenne pepper (optional)
Instructions
- Activate the Yeast: In a large mixing bowl, combine warm water, brown sugar, and active dry yeast. Let sit for 5-10 minutes until frothy.
- Mix the Dough: Add melted butter, salt, and 2 cups of flour to the yeast mixture. Stir until a shaggy dough forms. Gradually add remaining 1 ½ cups flour until dough pulls away from bowl sides.
- Knead the Dough: Turn dough onto a floured surface and knead for 6-8 minutes until smooth and elastic.
- First Rise: Place dough in a greased bowl, cover, and let rise in a warm place for 1 hour until doubled in size.
- Preheat and Prep: Preheat oven to 425°F (220°C). Line a baking sheet with parchment paper.
- Shape the Footballs: Punch down dough. Divide into 4 pieces. Roll each into a 12-14 inch rope. Cut into 1-inch pieces. Pinch ends of each piece to form a football shape.
- Prepare the Bath: Bring 6 cups of water to a boil in a large pot. Add ½ cup baking soda (it will fizz). Reduce to a simmer.
- Boil the Pretzels: Working in batches, boil shaped pretzels for 20-30 seconds per side. Transfer to prepared baking sheet.
- Egg Wash and Salt: Brush each football with egg wash. Sprinkle generously with coarse salt.
- Bake: Bake for 12-15 minutes until deep golden brown. Let cool 5 minutes.
- Make the Beer Cheese Dip: In a saucepan over medium heat, melt 2 tablespoons butter. Whisk in 2 tablespoons flour and cook 1 minute. Slowly whisk in milk and beer. Cook until thickened, 2-3 minutes. Reduce heat to low. Add cheese in handfuls, whisking until melted. Stir in mustard, garlic powder, and cayenne. Keep warm.
Notes
Do not overboil pretzels (20-30 seconds per side max). Use freshly grated cheese for smooth dip. Keep dough warm for rising. Shaping is fun to do with others.
Nutrition
- Serving Size: 4-5 pretzel bites wi
- Calories: 375
- Sugar: 3
- Sodium: 800
- Fat: 20
- Saturated Fat: 12
- Carbohydrates: 38
- Fiber: 1
- Protein: 14
Keywords: game day, pretzel bites, football, beer cheese dip, snack, party food


