Standing at the counter at 7:12 AM on a Tuesday, staring at a half-eaten block of cream cheese and a package of tortillas that were about to expire. My youngest had just announced she was “bored of sandwiches” — her exact words, delivered with the kind of dramatic sigh only a seven-year-old can pull off. I had five minutes before the bus came, a fridge full of odds and ends, and absolutely no time to negotiate.
So I did what any reasonable, slightly sleep-deprived parent would do. I grabbed the turkey slices, a handful of cheese, and started smearing cream cheese on a tortilla like my life depended on it. I rolled it tight — maybe too tight — sliced it into rounds, and tossed them into a lunchbox with a handful of grapes and a silent prayer.
That afternoon, the lunchbox came back empty. Not just the pinwheels — everything. The grapes, the baby carrots, even the yogurt tube she’d been ignoring for weeks. She asked for them again the next day. And the day after that. These Easy Turkey & Cheese Pinwheel Lunchbox Roll-Ups became the unsung hero of our school mornings, the thing that finally broke the sandwich boredom cycle without requiring me to become a short-order cook at sunrise.
They’re not fancy. They’re not complicated. But honestly? That’s exactly the point. Sometimes the best recipes come from a moment of pure desperation and a fridge that’s running low on ideas. These little spirals of turkey, cheese, and creamy goodness have saved more school mornings than I can count — and they might just save yours too.
Why You’ll Love This Recipe
Let me tell you why these little spirals have become a staple in our house. I’ve tested this recipe through three different school years, two picky eaters, and one particularly rough week where grocery shopping just wasn’t happening.
- Ready in 10 Minutes : No joke — from fridge to lunchbox in under ten minutes. That’s faster than making a sandwich if you’re being honest about it.
- Simple Ingredients : You probably have everything already. Tortillas, cream cheese, turkey, and cheese. That’s it. No fancy trips to specialty stores.
- Perfect for Lunchboxes : They hold up beautifully. No soggy bread, no squished edges. Just perfect little spirals that stay intact until lunchtime.
- Crowd-Pleaser : My kids devour these, but so do the adults at playdates. I’ve brought them to potlucks and watched them disappear before the main dishes.
- Endlessly Customizable : Swap the turkey for ham, the cream cheese for hummus, the tortilla for a wrap — they adapt to whatever you have on hand.
What makes these different from every other roll-up recipe out there? It’s the cream cheese. Most recipes use mayo or mustard, but cream cheese gives you that perfect spreadable texture that holds everything together without making the tortilla soggy. It’s a game-changer, honestly. And the ratio? I’ve nailed it after too many experiments — just enough cream cheese to bind without overwhelming the turkey and cheese.
These Easy Turkey & Cheese Pinwheel Lunchbox Roll-Ups are the kind of recipe that makes you feel like you’ve got your life together, even when you absolutely don’t. They’re comfort food for busy mornings — simple, satisfying, and somehow just right.
What Ingredients You Will Need
This recipe uses such simple ingredients that you might already have everything in your fridge. The beauty is in how they come together — each component plays a specific role in creating that perfect little spiral.
- Large flour tortillas (10-inch) — Burrito-sized works best. You want enough surface area to get a good spiral. I prefer Mission or Guerrero brands for their flexibility. If you use smaller tortillas, you’ll get fewer pinwheels per roll, and they’ll be harder to slice neatly.
- 8 oz cream cheese, softened — This is non-negotiable for the perfect texture. Philadelphia is my go-to, but any block-style cream cheese works. Let it sit out for 15-20 minutes before spreading, or microwave for 10 seconds if you’re in a hurry. (Pro tip: don’t use whipped cream cheese — it’s too airy and won’t hold the roll together.)
- 8-10 slices deli turkey breast — Oven-roasted, smoked, honey — whatever you prefer. I like Hillshire Farm or Boar’s Head for consistent quality. You want thin slices that lay flat without tearing. Thick-cut turkey makes rolling harder and the pinwheels less uniform.
- 4-6 slices provolone or Swiss cheese — Provolone gives you that mild, melty flavor that kids love. Swiss adds a slightly nutty note. Cheddar works too but can be a bit sharp for some little ones. Use thin slices — again, easier to roll.
- Salt and pepper to taste — Just a pinch. The turkey and cheese are already salty, so go easy here.
- Optional add-ins : Thinly sliced cucumber adds crunch. A few spinach leaves sneak in some greens. A smear of mustard or honey adds a flavor kick for older kids or adults.
For the cream cheese base, I sometimes mix in a teaspoon of ranch seasoning or everything bagel seasoning for extra flavor. It’s completely optional but adds a nice touch if you’re packing these for grown-up lunches too.
One thing I learned the hard way — make sure your tortillas are at room temperature. Cold tortillas crack when you roll them, and nobody wants a cracked pinwheel. Just let them sit on the counter for a few minutes while you get the cream cheese ready.
Equipment Needed
You don’t need much for these Easy Turkey & Cheese Pinwheel Lunchbox Roll-Ups. That’s part of the appeal — minimal cleanup, maximum payoff.
- Butter knife or offset spatula — For spreading the cream cheese evenly. An offset spatula gives you the smoothest coverage, but a regular butter knife works fine.
- Cutting board — A stable surface for rolling and slicing. Wood or plastic, doesn’t matter.
- Sharp chef’s knife or serrated knife — A sharp knife is crucial for clean slices. A serrated knife works surprisingly well because it grips the tortilla without squishing it. I’ve used both and honestly prefer the serrated for these.
- Plastic wrap or parchment paper — For wrapping the rolls before slicing. This helps them hold their shape and makes slicing easier. If you’re in a rush, you can skip this step, but the pinwheels won’t be as neat.
- Toothpicks (optional) — For securing the pinwheels in lunchboxes. Not necessary if you’re serving them at home, but helpful for keeping them from unrolling on the go.
If you don’t have plastic wrap, you can use beeswax wraps or even a clean kitchen towel. The key is just to give the roll something to hold its shape against while it rests. I’ve also used a damp paper towel in a pinch — not ideal, but it worked.
Preparation Method
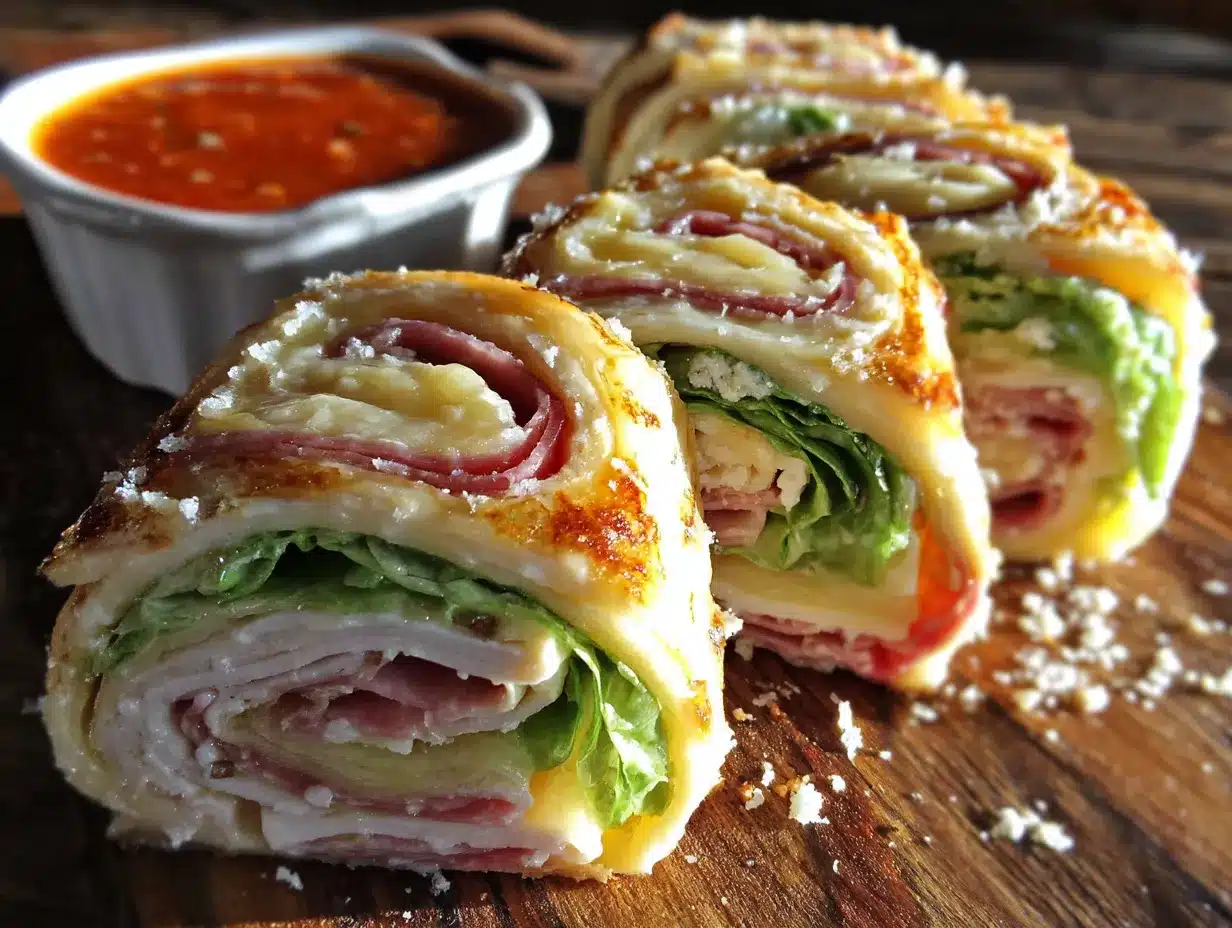
Let me walk you through exactly how I make these. I’ve done this so many times now that I could do it in my sleep, but I remember how frustrating it was the first few times when my pinwheels came out lopsided or fell apart. So here’s every detail you need.
- Soften the cream cheese. Take it out of the fridge about 15-20 minutes before you start. If you forgot (I forget all the time), microwave it for 10-15 seconds on low power. You want it spreadable but not melted. Trust me on this — cold cream cheese will tear your tortillas.
- Lay out your tortilla on a clean cutting board. If it’s been in the fridge, let it sit at room temperature for a few minutes. Cold tortillas crack when you roll them.
- Spread the cream cheese evenly over the entire surface of the tortilla. Leave about a half-inch border around the edges — this prevents the filling from squeezing out when you roll. Use the back of a spoon or an offset spatula for the smoothest layer. You want a thin, even layer — about 1/8 inch thick. Too much cream cheese and the pinwheels will be messy.
- Layer the turkey slices over the cream cheese. Overlap them slightly so there are no gaps. You want full coverage from edge to edge. Press them down gently so they stick to the cream cheese.
- Add the cheese slices on top of the turkey. Again, overlap slightly for even coverage. If you’re using provolone, trim the edges so they don’t hang over the tortilla.
- Season lightly with salt and pepper if desired. This step is optional but adds a little depth. My kids don’t notice the pepper, so I sneak it in.
- Roll it up tightly — and I mean tightly. Start at one edge and roll toward the other, keeping even pressure. Use your fingers to tuck and tighten as you go. The tighter the roll, the neater the pinwheels. This is the step that makes or breaks your pinwheels. A loose roll = messy pinwheels.
- Wrap the roll tightly in plastic wrap or parchment paper. Twist the ends like a candy wrapper to secure it. This helps the roll hold its shape while it rests.
- Refrigerate for at least 15-20 minutes — or up to overnight. This step is crucial. The chilling allows the cream cheese to firm up, which makes slicing much cleaner. If you skip this, your pinwheels will be a squished mess. I know it’s tempting to skip, but don’t. Even 10 minutes in the freezer helps.
- Slice into pinwheels using a sharp serrated knife. Cut off the uneven ends first (about 1/2 inch from each end) — these are the chef’s snack. Then slice the rest into 1-inch thick rounds. Use a gentle sawing motion rather than pressing down. A sharp knife and gentle pressure are your best friends here.
- Arrange in lunchboxes or on a serving platter. If packing for later, use toothpicks to keep them from unrolling. They’ll stay fresh in the fridge for up to 3 days.
You should end up with about 6-8 pinwheels per tortilla, depending on how tightly you rolled and how thick you sliced them. If some come out a bit uneven, don’t stress — they all taste the same.
Cooking Tips & Techniques
After making these Easy Turkey & Cheese Pinwheel Lunchbox Roll-Ups more times than I can count, I’ve collected a few tricks that make a real difference. Some I learned from failures, some from happy accidents.
The cream cheese temperature thing is real. I cannot stress this enough. Cold cream cheese tears tortillas. Warm cream cheese makes everything slippery. Room temperature — about 65-70°F — is the sweet spot. If you’re in a rush, microwave it in 5-second bursts, checking between each one. You want it soft enough to spread like butter, not soft enough to drip.
Don’t overfill. It’s tempting to pile on the turkey and cheese, especially if your kids are hungry. But too much filling makes rolling difficult and the pinwheels fall apart. Think of it as a thin, even layer — enough to taste in every bite, but not so much that it bulges.
The chilling step is non-negotiable. I’ve tried skipping it. Twice. Both times I ended up with squished, uneven pinwheels that looked more like scrambled tortilla salad than neat little spirals. Even 10 minutes in the freezer makes a noticeable difference. The cream cheese firms up just enough to hold everything together during slicing.
Use a serrated knife for slicing. This was a game-changer for me. A serrated knife grips the tortilla instead of squishing it, giving you cleaner cuts. If you only have a chef’s knife, make sure it’s razor-sharp and use a gentle sawing motion.
Wipe your knife between cuts. The cream cheese builds up on the blade and makes subsequent cuts messier. A quick wipe on a damp paper towel between each slice keeps everything clean.
Make ahead and store. These actually taste better after a few hours in the fridge — the flavors meld together. You can make them the night before and slice them in the morning. Just wrap the whole roll tightly and refrigerate, then slice fresh before packing.
One mistake I made early on — I used flavored tortillas thinking they’d add variety. Spinach tortillas, tomato basil wraps, sun-dried tomato ones. They looked pretty but the flavors clashed with the turkey and cheese. Plain flour tortillas really are the best canvas here.
Variations & Adaptations
One of the best things about these Easy Turkey & Cheese Pinwheel Lunchbox Roll-Ups is how adaptable they are. I’ve tried so many variations over the years, and here are the ones that actually worked.
Ham and Swiss variation — Swap the turkey for thinly sliced ham and use Swiss cheese instead of provolone. Add a thin layer of honey mustard for extra flavor. This is my husband’s favorite version for his work lunches.
Veggie-packed version — Spread the cream cheese, then add a layer of fresh spinach leaves, thinly sliced cucumber, and shredded carrots before the turkey. The veggies add crunch and color without making the roll too bulky. My kids don’t even notice the spinach.
Gluten-free option — Use gluten-free tortillas or large lettuce leaves. Butter lettuce works surprisingly well — just be extra gentle when rolling and use toothpicks to secure. The flavor is lighter and fresher, perfect for summer lunches.
Low-carb adaptation — Swap the flour tortillas for large collard green leaves or low-carb wraps. Collard greens need to be blanched first (30 seconds in boiling water, then ice bath) to make them pliable. They hold up beautifully and add a subtle earthy flavor.
Breakfast version — Replace the turkey with crispy bacon and use a smear of maple cream cheese (mix cream cheese with a tablespoon of maple syrup). It sounds weird but it’s amazing for brunch or breakfast-for-dinner nights.
Spicy adult version — Add a thin layer of sriracha or chipotle mayo under the cream cheese, use pepper jack cheese instead of provolone, and add some pickled jalapeños. These are fantastic for game day snacks or grown-up lunchboxes.
If you love the idea of pinwheels as much as I do, you should definitely try our savory sun-dried tomato pesto pinwheels for a more elevated appetizer option. They use a completely different flavor profile but the same rolling technique.
Serving & Storage Suggestions
These Easy Turkey & Cheese Pinwheel Lunchbox Roll-Ups are incredibly versatile when it comes to serving. Here’s what I’ve learned about getting the most out of them.
Serving temperature — They’re best served cold or at room temperature. Straight from the fridge is fine, but letting them sit out for 5-10 minutes takes the chill off and makes the flavors more pronounced. If you’re packing for lunch, they’ll be perfect by the time lunch rolls around.
Presentation ideas — For lunchboxes, arrange them in a single layer with a small container of dip (ranch, honey mustard, or even ketchup for the kids). For parties or playdates, arrange them on a platter in a spiral pattern with toothpicks sticking out of each one. Add some grape tomatoes and cucumber slices around the edges for color.
What to serve with them — These pair beautifully with fresh fruit, veggie sticks, yogurt tubes, or a small side salad. For a full lunch, add some easy chewy 4-ingredient peanut butter protein balls for a balanced meal that keeps everyone full until snack time.
Storage instructions — Store the whole roll (unsliced) wrapped tightly in plastic wrap in the refrigerator for up to 3 days. Slice just before serving for the neatest pinwheels. If you’ve already sliced them, store them in an airtight container with a paper towel at the bottom to absorb any moisture. They’ll stay good for 2 days.
Freezer tips — You can freeze the whole roll! Wrap it tightly in plastic wrap, then foil, and freeze for up to 1 month. Thaw overnight in the refrigerator, then slice and serve. The texture is slightly softer after freezing, but still delicious. I wouldn’t recommend freezing already-sliced pinwheels — they get mushy.
Flavor development — Here’s something interesting — these actually taste better after a few hours in the fridge. The flavors meld together, the cream cheese firms up perfectly, and everything just comes together. So don’t feel bad about making them the night before. In fact, I prefer them that way.
If you’re packing these for school lunches, I highly recommend using a bento-style lunchbox with compartments. The pinwheels stay separate from the fruit and veggies, which keeps everything fresh and prevents sogginess.
Nutritional Information & Benefits
These Easy Turkey & Cheese Pinwheel Lunchbox Roll-Ups are surprisingly balanced for such a simple recipe. Here’s the breakdown for one serving (about 4-5 pinwheels, made with one 10-inch tortilla).
| Nutrient | Amount per serving |
|---|---|
| Calories | 320-380 |
| Protein | 22-28g |
| Fat | 18-22g |
| Carbohydrates | 22-26g |
| Fiber | 1-2g |
| Sugar | 3-5g |
| Sodium | 800-1000mg |
Health benefits — Turkey is a lean protein source that keeps kids full and focused through the school day. Cream cheese provides calcium for growing bones, and the tortilla offers carbohydrates for energy. If you use whole wheat tortillas, you’ll add fiber and B vitamins.
Dietary considerations — This recipe is naturally nut-free (always check your specific brands), making it school-safe. For a lower-sodium option, look for reduced-sodium turkey and cream cheese. For a lower-fat version, use reduced-fat cream cheese and low-fat cheese slices.
Potential allergens — Contains dairy (cream cheese, cheese) and gluten (tortillas). For dairy-free, use vegan cream cheese and dairy-free cheese slices. For gluten-free, use gluten-free tortillas or lettuce wraps.
I personally love that these pinwheels give my kids a good balance of protein, carbs, and fat without being heavy. They come home with empty lunchboxes, which tells me everything I need to know about how satisfying they are.
Conclusion
These Easy Turkey & Cheese Pinwheel Lunchbox Roll-Ups started as a desperate morning solution and became a family favorite that I genuinely look forward to making. They’re not fancy. They’re not complicated. But they work — and honestly, isn’t that what we all need sometimes?
The best part? You can make them your own. Swap the fillings, change the cheese, add some veggies, experiment with different spreads. The basic technique stays the same, and once you’ve got it down, the possibilities are endless.
I’d love to hear how these turn out for you. Did your kids love them? Did you try a fun variation? Drop a comment below and let me know — I read every single one and I’m always looking for new ideas to try. And if you’re feeling generous, share this recipe with a friend who’s tired of the same old sandwich routine. We could all use a little less stress in the morning.
Here’s to happy lunchboxes and empty containers at the end of the day. You’ve got this.
Frequently Asked Questions
Can I make these pinwheels ahead of time?
Absolutely! In fact, they taste better after a few hours in the fridge. Make the whole roll, wrap it tightly in plastic wrap, and refrigerate overnight. Slice them fresh in the morning before packing. They’ll stay good for up to 3 days in the fridge.
How do I keep pinwheels from getting soggy in lunchboxes?
The cream cheese actually helps prevent sogginess because it creates a barrier between the tortilla and the wetter ingredients. Just make sure your turkey isn’t dripping with moisture (pat it dry with a paper towel if needed) and store them in an airtight container with a paper towel at the bottom to absorb any excess moisture.
Can I use different types of cheese?
Yes! Provolone and Swiss are my go-to choices, but cheddar, mozzarella, pepper jack, or even cream cheese with herbs all work great. Just make sure whatever cheese you use is thinly sliced so the roll stays tight and even.
What’s the best way to slice pinwheels without squishing them?
Use a sharp serrated knife and a gentle sawing motion. Chill the roll for at least 15-20 minutes before slicing — this firms up the cream cheese and makes clean cuts much easier. Wipe your knife clean between each slice for the best results.
Are these pinwheels school-safe for nut allergies?
Yes, as long as you check the labels on your specific ingredients. Most cream cheese, turkey, and cheese brands are nut-free, but always verify the packaging. This recipe doesn’t contain nuts, making it a great option for nut-free classrooms and lunchboxes.
Pin This Recipe!

Easy Turkey & Cheese Pinwheel Roll-Ups: Best Kid-Approved Recipe

These Easy Turkey & Cheese Pinwheel Lunchbox Roll-Ups are a quick, kid-approved solution to sandwich boredom. Made with simple ingredients like tortillas, cream cheese, turkey, and cheese, they come together in 10 minutes and hold up perfectly in lunchboxes.
- Prep Time: 10 minutes
- Cook Time: 0 minutes
- Total Time: 10 minutes (plus 15-20 minutes chilling)
- Yield: 4 servings 1x
- Category: Lunch
- Cuisine: American
Ingredients
- Large flour tortillas (10-inch)
- 8 oz cream cheese, softened
- 8–10 slices deli turkey breast
- 4–6 slices provolone or Swiss cheese
- Salt and pepper to taste
- Optional add-ins: thinly sliced cucumber, spinach leaves, mustard or honey
Instructions
- Soften the cream cheese by letting it sit at room temperature for 15-20 minutes or microwaving for 10-15 seconds on low power.
- Lay out a tortilla on a clean cutting board. Let it come to room temperature if refrigerated.
- Spread the cream cheese evenly over the entire surface of the tortilla, leaving a half-inch border around the edges.
- Layer the turkey slices over the cream cheese, overlapping slightly for full coverage.
- Add the cheese slices on top of the turkey, overlapping slightly.
- Season lightly with salt and pepper if desired.
- Roll the tortilla up tightly, starting at one edge and rolling toward the other, keeping even pressure.
- Wrap the roll tightly in plastic wrap or parchment paper, twisting the ends like a candy wrapper.
- Refrigerate for at least 15-20 minutes, or up to overnight, to firm up the cream cheese.
- Slice into 1-inch thick pinwheels using a sharp serrated knife. Cut off the uneven ends first.
- Arrange in lunchboxes or on a serving platter. Use toothpicks to keep them from unrolling if packing for later.
Notes
Cream cheese must be at room temperature to avoid tearing tortillas. Chilling the roll before slicing is crucial for neat pinwheels. Use a serrated knife for clean cuts. These taste better after a few hours in the fridge. Store unsliced roll wrapped in plastic wrap for up to 3 days. Freeze whole roll for up to 1 month.
Nutrition
- Serving Size: 4-5 pinwheels
- Calories: 320380
- Sugar: 35
- Sodium: 8001000
- Fat: 1822
- Saturated Fat: 1014
- Carbohydrates: 2226
- Fiber: 12
- Protein: 2228
Keywords: turkey pinwheels, cheese pinwheels, lunchbox roll-ups, kid-friendly lunch, easy lunch recipe, no-cook lunch


