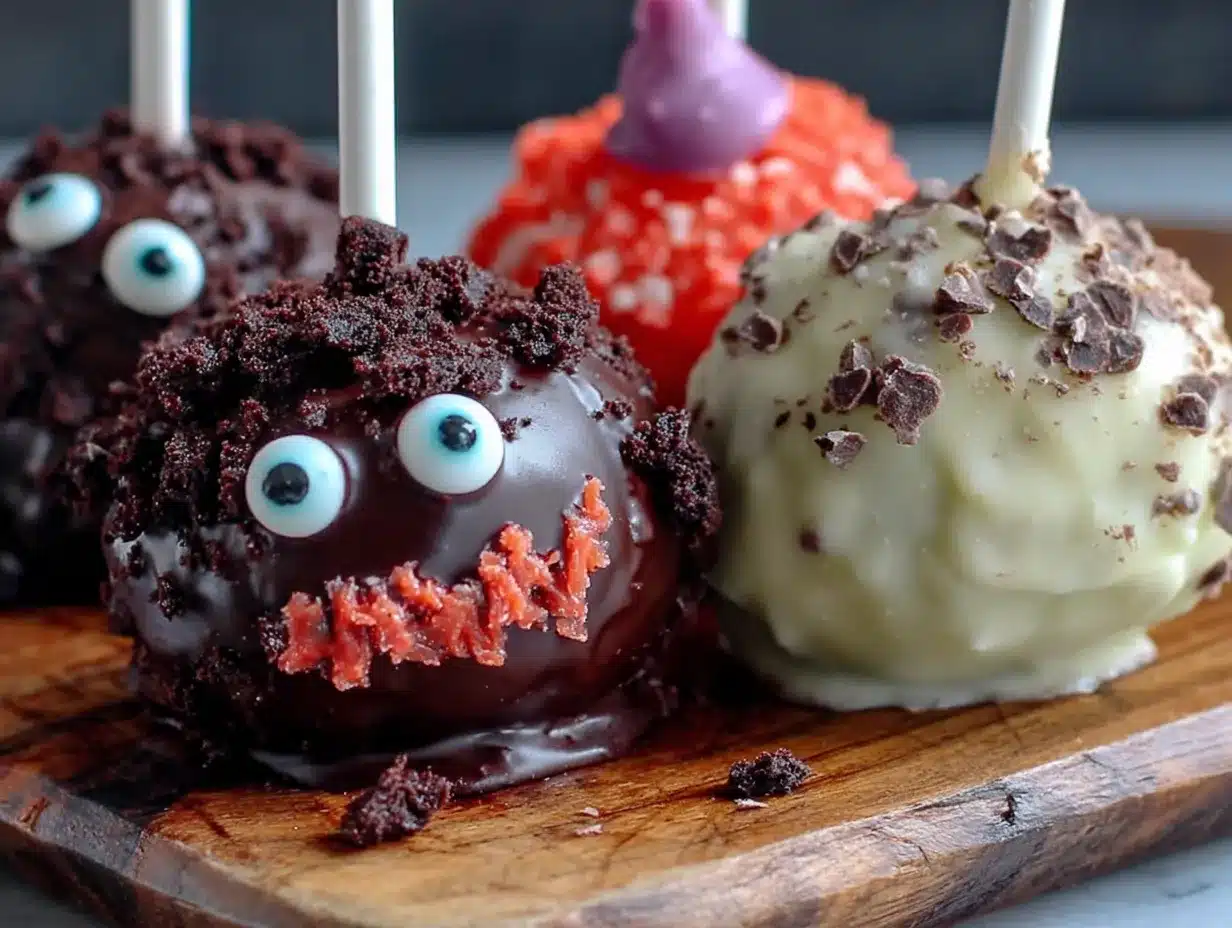
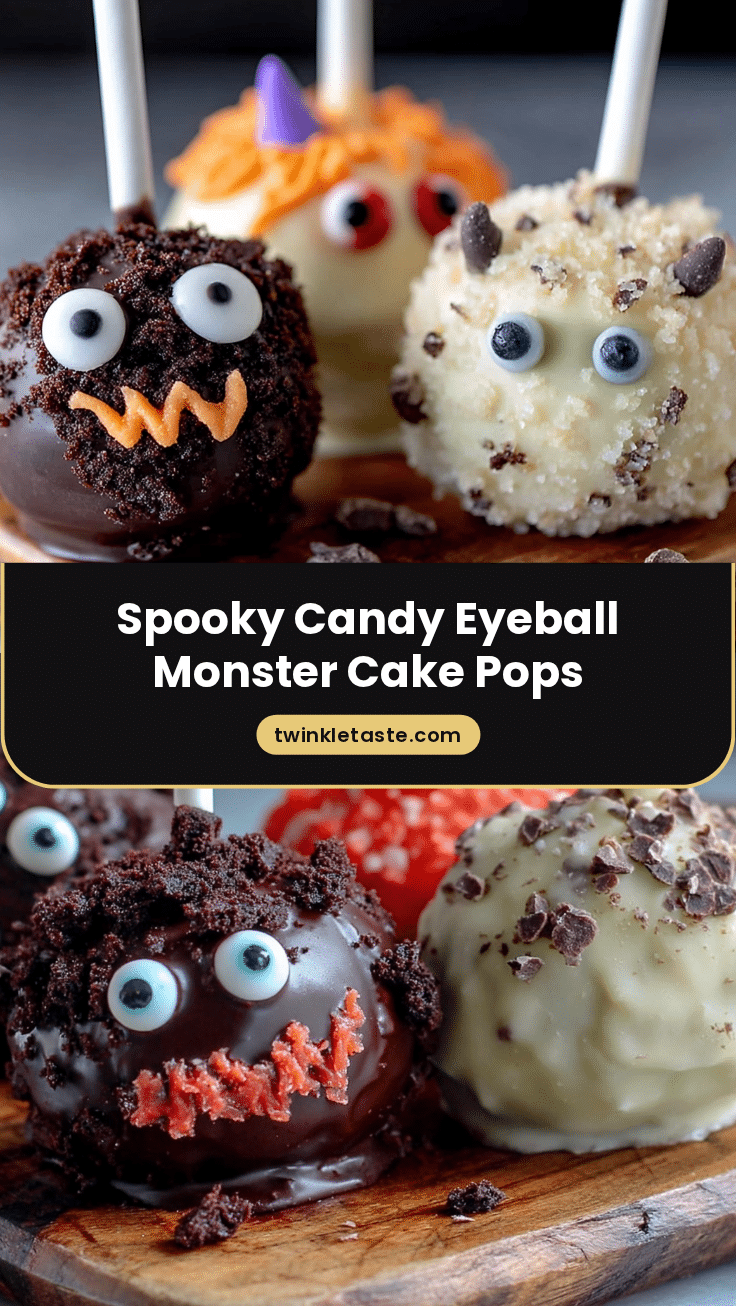
That one candy eyeball, slightly off-center, staring up at you from a dark chocolate shell—and that’s the whole point. I made these spooky monster cake pops with candy eyeballs for my nephew’s Halloween party last year, and honestly, everything else on the dessert table was secondary. The kids didn’t care about the perfectly frosted cupcakes or the store-bought cookies. They wanted the monsters. The ones with the googly eyes that seemed to follow you around the room.
It started as a bit of a disaster, if I’m being honest. I had this vision of perfectly round, uniformly decorated cake pops, like the ones you see on fancy bakery websites. But then my four-year-old niece grabbed a lollipop stick and plunged it into a still-warm ball of cake mixture, and it crumbled right in her hand. She looked at me, looked at the crumbs, and said, “It’s broken, Auntie.” And I thought, “You know what? Broken is better.” That’s when the monsters were born. The uneven shapes, the slightly lopsided eyes, the drippy chocolate fangs—they all became features, not flaws.
These aren’t just any cake pops. They’re the kind that make you smile before you even take a bite. The kind that make adults forget they’re supposed to be sophisticated and just grab one. And honestly, that’s what I love about them. They’re messy, they’re fun, and they’re absolutely perfect for a Halloween party. There’s something about a cake pop that looks back at you that just feels right for spooky season.
Why You’ll Love These Spooky Monster Cake Pops with Candy Eyeballs
I’ve tested this recipe about four times now, and each batch taught me something new. The first batch was too dry. The second was too wet. The third, I finally got the texture right. And the fourth? That was the one where I realized the monsters didn’t need to be perfect—they just needed to be fun. Here’s why these are going to become your new go-to Halloween treat:
- No Baking Skills Required: If you can crumble a cake and melt some chocolate, you can make these. Seriously. There’s no piping, no fondant, no royal icing drama.
- Kid-Friendly Activity: This is the perfect recipe to make with little hands. My nephew spent a solid twenty minutes just placing candy eyeballs on cake pops, and he was so proud of his “monster family.”
- Customizable Monsters: Every single cake pop can look different. One can have three eyes, another can have fangs made from broken pretzel sticks. The possibilities are endless.
- Perfect for Halloween Parties: These are the first thing to disappear at any gathering. They’re portable, they’re individual-sized, and they’re just so darn cute.
- Simple Ingredients: You probably already have most of what you need in your pantry. No fancy extracts or hard-to-find decorations.
What makes these different from other cake pop recipes is the texture. Instead of using a dry cake that crumbles into dust, I use a slightly denser cake base that holds together beautifully when mixed with the right amount of frosting. And the coating? It’s a thin layer of dark chocolate or candy melts that sets up hard and shiny, giving you that perfect snap when you bite in. It’s not just another cake pop recipe—it’s the one that finally works.
These are the kind of treats that make you feel like a rockstar parent or host without the stress. You can make them ahead of time, they freeze beautifully, and they always, always get a reaction. Plus, there’s something deeply satisfying about biting the head off a monster made of cake. Don’t pretend you haven’t thought about it.
What Ingredients You Will Need
This recipe uses simple, everyday ingredients to create something that looks like it came from a professional bakery. The magic isn’t in fancy components—it’s in how you put them together. Here’s everything you’ll need to make these spooky monster cake pops with candy eyeballs:
For the Cake Base
- 1 box chocolate cake mix (I prefer Duncan Hines or Betty Crocker for consistent results)
- 3 large eggs, room temperature
- 1/2 cup vegetable oil (or melted coconut oil for a slightly different flavor)
- 1 cup water (or substitute with brewed coffee for a deeper chocolate flavor)
For the Binding Mixture
- 1/2 cup cream cheese frosting, store-bought or homemade (adds richness and helps the cake hold together)
- 2 tablespoons unsalted butter, softened (for extra creaminess)
For the Coating and Decoration
- 16 oz dark chocolate candy melts (or white chocolate if you want colorful monsters—I use Wilton brand for the smoothest melt)
- 1 tablespoon coconut oil (helps thin the chocolate for a smoother coating)
- 2 bags candy eyeballs (the kind with the black pupils—you can find them at most craft stores or online)
- Black decorating gel (for drawing mouths, eyebrows, and silly expressions)
- Orange and green candy melts (optional, for making colorful monster details)
- Pretzel sticks, broken into small pieces (for making monster horns or fangs)
For the Sticks and Stand
- 20-25 lollipop sticks (the paper ones work best, but plastic is fine too)
- A block of styrofoam or a cake pop stand (for drying the pops upright)
Ingredient Selection Tips: When choosing your cake mix, look for one that specifically says “moist” on the box. The extra moisture helps the cake pops hold together better. For the candy melts, I’ve found that the Wilton brand melts the smoothest and sets up the hardest, which gives you that satisfying snap when you bite in. If you’re using white chocolate, add a tiny bit of orange or green food coloring to make your monsters extra spooky.
Substitution Guidance: If you’re gluten-free, use a gluten-free chocolate cake mix and gluten-free candy melts. For a dairy-free version, swap the cream cheese frosting for a dairy-free alternative and use coconut oil instead of butter. And if you can’t find candy eyeballs? No worries—you can pipe little circles with black and white frosting. They won’t wiggle, but they’ll still look adorable.
Equipment Needed
You don’t need a professional bakery setup to make these, but having the right tools makes the process so much smoother. Here’s what you’ll need:
- A 9×13 baking pan (or two 8-inch round pans—whatever you have on hand)
- Large mixing bowls (one for the cake, one for the crumb mixture)
- A hand mixer or stand mixer (for mixing the cake batter—though you can do it by hand if you’re feeling strong)
- A fork or your hands (for crumbling the cake—honestly, your hands work best)
- A cookie scoop or tablespoon (for portioning the cake mixture into even balls)
- A baking sheet lined with parchment paper (for chilling the cake balls)
- A microwave-safe bowl (for melting the candy coating)
- A deep, narrow cup or mug (for dipping the cake pops—this is a game-changer)
- A styrofoam block or cake pop stand (for drying the finished pops upright)
I’ve made these with and without a cake pop maker, and honestly, I prefer the traditional baked cake method. The cake pop maker tends to dry out the cake, which makes it harder to shape. A regular baked cake gives you that moist, tender crumb that holds together beautifully. Also, a tip from my third failed batch: don’t skip the chilling step. Those cake balls need to be firm before you dip them, or you’ll end up with a chocolate-covered mess.
Preparation Method
Alright, let’s get to the fun part. Here’s how to make these spooky monster cake pops with candy eyeballs, step by step. I’ve included all the little details I wish someone had told me before my first attempt.
Step 1: Bake the Cake
Preheat your oven to 350°F (175°C). Grease your 9×13 baking pan with butter or non-stick spray. In a large bowl, combine the chocolate cake mix, eggs, vegetable oil, and water. Mix on medium speed for about 2 minutes, until the batter is smooth and well-combined. Pour the batter into the prepared pan and bake for 28-32 minutes, or until a toothpick inserted in the center comes out clean. Let the cake cool completely in the pan—this is crucial. A warm cake will turn into mush when you try to crumble it.
Step 2: Crumble the Cake
Once the cake is completely cool (I usually wait at least an hour), use your hands to crumble it into a large bowl. You want fine, even crumbs—no large chunks. This takes about 5 minutes of dedicated crumbling. Think of it as stress relief after a long day. The crumbs should look like damp sand when you’re done.
Step 3: Make the Binding Mixture
In a separate small bowl, mix together the cream cheese frosting and softened butter until smooth. You can use a fork or a small whisk for this. The mixture should be creamy and spreadable, not runny. If it’s too stiff, add a teaspoon of milk to loosen it up.
Step 4: Combine and Shape
Add the frosting mixture to the cake crumbs and mix thoroughly. Use your hands—it’s the most effective way. The mixture should hold together when you squeeze it in your fist, but it shouldn’t be sticky. If it’s too dry, add a tablespoon more frosting. If it’s too wet, add a tablespoon more cake crumbs. Roll the mixture into 1-inch balls (about the size of a walnut) and place them on a parchment-lined baking sheet. You should get about 20-25 balls. Pop them in the refrigerator for at least 30 minutes, or until they’re firm to the touch.
Step 5: Melt the Coating
While the cake balls are chilling, melt your candy melts. Place them in a microwave-safe bowl and heat in 30-second intervals, stirring after each, until completely smooth. Add the coconut oil and stir until combined. The oil helps thin the chocolate so it coats the cake pops evenly. If you’re using multiple colors, melt each color separately in small bowls.
Step 6: Insert the Sticks
Take the chilled cake balls out of the fridge. Dip the tip of a lollipop stick into the melted chocolate, then insert it about halfway into a cake ball. This little bit of chocolate acts like glue, holding the stick in place. Repeat with all the cake balls, then return them to the fridge for another 10 minutes to set the stick.
Step 7: Dip and Decorate
Now for the fun part. Hold a cake pop by the stick and dip it into the melted chocolate, making sure it’s completely submerged. Gently tap the stick against the side of the bowl to let the excess chocolate drip off. Don’t tap too hard, or the cake ball will fall off the stick—I learned that the hard way. Before the chocolate sets, press two candy eyeballs into the front of the cake pop. Add a third eye for an extra-spooky monster. Use the black decorating gel to draw a mouth, eyebrows, or any silly expression you like. If you want horns, press a small piece of broken pretzel stick into the top of the cake pop before the chocolate sets.
Step 8: Let Them Set
Stand the decorated cake pops upright in your styrofoam block or cake pop stand. Let them set at room temperature for about 30 minutes, or until the chocolate is completely hard. If you’re in a hurry, you can pop them in the fridge for 15 minutes, but room temperature setting gives you a shinier finish.
Cooking Tips & Techniques
After making about five batches of these spooky monster cake pops with candy eyeballs, I’ve collected a few hard-won lessons. Here are the tips that will save you from my mistakes:
Don’t Overmix the Cake Crumbs: When you’re combining the cake crumbs with the frosting, stop as soon as everything comes together. Overmixing makes the mixture gummy and dense, which leads to heavy cake pops that fall off the sticks.
The Chill Factor: Chilling is not optional. I tried skipping the second chill after inserting the sticks, and the cake balls started sliding off the sticks when I dipped them. Cold cake balls hold their shape and stay put. Trust the process.
Thin Your Coating: If your candy melts are too thick, your cake pops will end up with a heavy, lumpy coating. The coconut oil is your friend here. Add it a little at a time until the melted chocolate runs off the spoon in a smooth ribbon. It should coat the back of a spoon evenly.
Work in Small Batches: Don’t try to dip all 25 cake pops at once. The melted chocolate will start to thicken as it cools, and your last few pops will look rough. Melt your coating in small batches and work with 5-6 pops at a time.
Tap, Don’t Twirl: When you’re letting the excess chocolate drip off, tap the stick against the side of the bowl. Don’t twirl the pop around—that creates air bubbles and uneven coating. A gentle tap-tap-tap is all you need.
My Biggest Failure: The time I tried to use white chocolate chips instead of candy melts. They seized up, turned grainy, and I ended up with a sad pile of lumpy, uncoated cake balls. Candy melts are specifically formulated to melt smoothly and set hard. Don’t substitute with regular chocolate chips unless you know what you’re doing.
Variations & Adaptations
One of the best things about these spooky monster cake pops with candy eyeballs is how easy they are to customize. Here are some variations I’ve tried and loved:
Colorful Monsters
Instead of dark chocolate, use white candy melts and color them with orange, green, or purple food coloring. Orange monsters with purple eyes are a huge hit with kids. Just make sure you use gel food coloring, not liquid, to avoid seizing the chocolate.
Gluten-Free Version
Use a gluten-free chocolate cake mix and gluten-free candy melts. The process is exactly the same, and no one will be able to tell the difference. I’ve made these for a friend with celiac disease, and they disappeared just as fast as the regular ones.
Mummy Cake Pops
Instead of decorating with candy eyeballs, dip the cake pops in white chocolate, then drizzle melted dark chocolate over the top in a zigzag pattern to look like mummy wrappings. Add two tiny candy eyes peeking out from the “wrappings.”
Spider Cake Pops
After dipping in dark chocolate, press eight pretzel stick pieces into the sides of the cake pop to look like spider legs. Add two candy eyes on top. These are perfect for a Halloween party and pair wonderfully with my spooky witch finger pretzel rods for a full spooky snack table.
Pumpkin Patch Monsters
Use orange candy melts for the coating, then add a green candy melt “stem” on top. Use the black gel to draw a jack-o’-lantern face. These are a fun twist and go great with my iced pumpkin sugar cookie bars for a fall-themed dessert spread.
Serving & Storage Suggestions
These spooky monster cake pops with candy eyeballs are best served at room temperature. The chocolate coating has a satisfying snap, and the cake inside is soft and tender. I like to arrange them on a platter with the eyes facing outward so everyone can see the silly expressions. They’re perfect for Halloween parties, classroom treats, or just a fun weekend baking project with the kids.
For storage, place the finished cake pops in an airtight container in the refrigerator. They’ll stay fresh for up to 5 days. If you’re stacking them, put a layer of parchment paper between each layer to prevent the decorations from smudging. You can also freeze them for up to 3 months—just wrap each cake pop individually in plastic wrap, then place them in a freezer-safe bag. Thaw them in the refrigerator overnight before serving.
The flavors actually develop over time. The cake absorbs a bit more moisture from the frosting, and the chocolate coating sets up even harder. I actually prefer them the day after they’re made—they’re somehow even better. Just make sure to let them sit at room temperature for about 15 minutes before serving so the chocolate isn’t too hard.
These also make fantastic party favors. Wrap each cake pop in a clear cellophane bag tied with a ribbon, and you’ve got a take-home treat that guests will love. I’ve done this for my nephew’s birthday party, and the parents were just as excited as the kids.
Nutritional Information & Benefits
Let’s be real—these are a treat, not a health food. But here’s the estimated nutritional breakdown per cake pop (based on a standard recipe yielding 24 pops):
- Calories: 220-250 per pop
- Fat: 12-15g
- Carbohydrates: 28-32g
- Protein: 3-4g
- Sugar: 18-22g
That said, there are some redeeming qualities. Dark chocolate is rich in antioxidants and contains flavonoids that can support heart health. The eggs in the cake provide a good source of protein, and the cream cheese frosting adds a small amount of calcium. Plus, the portion control is built in—each cake pop is a single serving, which makes it easier to enjoy without overdoing it.
If you’re looking for a slightly healthier option, you can use a sugar-free cake mix and sugar-free candy melts. I’ve tried this, and while the texture is a bit different, the taste is still great. Just be aware that sugar-free chocolate can seize more easily, so add the coconut oil a little at a time.
These cake pops are not suitable for those with gluten sensitivities (unless you use gluten-free ingredients), and they contain dairy and eggs. If you’re serving them at a party, it’s always a good idea to label them so guests with allergies know what they’re eating.
Conclusion
These spooky monster cake pops with candy eyeballs are more than just a Halloween treat—they’re an experience. There’s something magical about watching a kid’s face light up when they see a cake pop staring back at them. And honestly, adults love them just as much. I’ve lost count of how many times I’ve seen a grown-up sneak one from the dessert table when they thought no one was looking.
What I love most about this recipe is how forgiving it is. Your monsters don’t have to be perfect. In fact, the wonky ones are usually the most charming. The one with the eye sliding down the side? That’s my favorite. The one with three eyes and a crooked smile? That’s the one that always gets picked first. So don’t stress about making them look like they came from a bakery. Embrace the chaos. Let your monsters be as weird and wonderful as they want to be.
If you try these, I’d love to hear about your monster creations. Drop a comment below and tell me what faces you came up with. Did you make a three-eyed cyclops? A two-headed monster? A cake pop that looks suspiciously like your boss? Share your photos, your tips, and your happy accidents. And if you’re looking for more Halloween inspiration, check out my spooky black velvet cupcakes or these easy mummy sausage bites for a savory option. Happy haunting, and happy baking!
Frequently Asked Questions
Can I use a different cake flavor?
Absolutely! Vanilla, red velvet, or even lemon cake work great. Just make sure the cake is moist enough to hold together. If you’re using a lighter cake like vanilla, you might need a bit more frosting to bind the crumbs.
Why did my cake pops fall off the sticks?
This usually happens when the cake balls aren’t chilled enough before dipping. Make sure they’re completely firm, and don’t skip the step where you dip the stick in chocolate before inserting it. That chocolate acts like glue.
Can I make these ahead of time?
Yes! You can make the cake balls up to 2 days in advance and keep them in the fridge. Dip and decorate them the day you plan to serve. They’ll stay fresh in the fridge for up to 5 days after decorating.
How do I get the candy eyeballs to stick?
Press them into the coating while it’s still wet. If the coating has already set, dab a tiny bit of melted chocolate on the back of the eye and press it onto the cake pop. It’ll hold firmly once the chocolate sets.
Can I use homemade frosting instead of store-bought?
Definitely! Homemade cream cheese frosting or buttercream works beautifully. Just make sure it’s not too runny—you want a thick, spreadable consistency that will hold the cake crumbs together without making them soggy.
Pin This Recipe!
Easy Spooky Monster Cake Pops with Candy Eyeballs
These spooky monster cake pops with candy eyeballs are a fun and forgiving Halloween treat. Made with a moist chocolate cake base and decorated with googly eyes and silly expressions, they’re perfect for parties and kid-friendly baking.
- Prep Time: 30 minutes
- Cook Time: 30 minutes
- Total Time: 1 hour 30 minutes (plus chilling time)
- Yield: 20-25 cake pops 1x
- Category: Dessert
- Cuisine: American
Ingredients
- 1 box chocolate cake mix (e.g., Duncan Hines or Betty Crocker)
- 3 large eggs, room temperature
- 1/2 cup vegetable oil (or melted coconut oil)
- 1 cup water (or brewed coffee for deeper flavor)
- 1/2 cup cream cheese frosting, store-bought or homemade
- 2 tablespoons unsalted butter, softened
- 16 oz dark chocolate candy melts (e.g., Wilton brand)
- 1 tablespoon coconut oil
- 2 bags candy eyeballs (with black pupils)
- Black decorating gel
- Orange and green candy melts (optional)
- Pretzel sticks, broken into small pieces (optional)
- 20–25 lollipop sticks
- A block of styrofoam or a cake pop stand
Instructions
- Preheat oven to 350°F (175°C). Grease a 9×13 baking pan. Combine cake mix, eggs, oil, and water; mix on medium speed for 2 minutes. Pour into pan and bake 28-32 minutes until a toothpick comes out clean. Cool completely.
- Crumble the cooled cake into fine crumbs in a large bowl using your hands.
- In a small bowl, mix cream cheese frosting and softened butter until smooth.
- Add frosting mixture to cake crumbs and mix thoroughly with your hands until the mixture holds together when squeezed. Roll into 1-inch balls (about 20-25) and place on a parchment-lined baking sheet. Refrigerate for at least 30 minutes until firm.
- Melt candy melts in a microwave-safe bowl in 30-second intervals, stirring after each, until smooth. Stir in coconut oil to thin the coating.
- Dip the tip of a lollipop stick into melted chocolate, then insert it halfway into a chilled cake ball. Return to fridge for 10 minutes to set.
- Hold a cake pop by the stick and dip it into the melted chocolate, completely submerging. Gently tap the stick against the bowl to remove excess. Before the chocolate sets, press candy eyeballs into the front. Use black decorating gel to draw a mouth, eyebrows, or other expressions. Add pretzel pieces for horns if desired.
- Stand the decorated cake pops upright in a styrofoam block or cake pop stand. Let set at room temperature for 30 minutes until the chocolate is hard.
Notes
Chilling is crucial to prevent cake pops from falling off sticks. Use candy melts, not regular chocolate chips, for smooth coating. Work in small batches to avoid coating thickening. For gluten-free, use gluten-free cake mix and candy melts. For dairy-free, use dairy-free frosting and coconut oil instead of butter.
Nutrition
- Serving Size: 1 cake pop
- Calories: 220250
- Sugar: 1822
- Fat: 1215
- Carbohydrates: 2832
- Protein: 34
Keywords: Halloween cake pops, monster cake pops, candy eyeballs, spooky treats, easy cake pops, kid-friendly Halloween dessert


