My nephew showed up at my door at 4 PM on a Saturday, fully costumed as a tiny vampire, two hours before the Halloween party I had completely forgotten about. The fridge held a pack of cocktail sausages, some crescent roll dough I’d bought on a whim, and mustard. That’s it. No elaborate dips, no themed platters, nothing that said “I planned this.”
I stood there staring at those ingredients, and something clicked. Kids love anything wrapped in dough. Kids also love anything that looks like a monster. So I cut the crescent dough into thin strips, wrapped them around the sausages like bandages, left two little gaps for eyes, and baked them. I used tiny dots of mustard for the eyes—honestly, because I had nothing else. They came out of the oven looking ridiculous and perfect. The little vampire ate nine of them before his mom could pull him away.
That’s the thing about these easy mummy sausage bites. They’re not fancy. They’re not complicated. But they save you when you need a Halloween appetizer that actually gets eaten. I’ve made them for three Halloweens since that night, and they never last past the first 20 minutes of any party. There’s something about those little dough-wrapped sausages with their mustard eyes that makes everyone smile. And honestly? That’s the whole point.
Why You’ll Love This Recipe
Let me tell you why these little guys have become my most-requested Halloween recipe. I’ve tested them every which way—different doughs, different sausages, different eye options—and this version wins every single time.
- Quick & Easy : These come together in under 25 minutes from start to finish. No marinating, no chilling, no complicated steps. Perfect for those “oh no, the party starts in an hour” moments.
- Simple Ingredients : You need exactly four things—cocktail sausages, crescent roll dough, mustard, and an egg for wash. That’s it. No specialty stores, no weird ingredients you’ll never use again.
- Perfect for Halloween Parties : Kids devour them. Adults sneak them when kids aren’t looking. They’re the appetizer that disappears before the main event even starts.
- Crowd-Pleaser : I’ve brought these to potlucks, classroom parties, and grown-up Halloween gatherings. The reaction is always the same—laughter first, then silence as everyone eats them.
- Unbelievably Fun : Let’s be honest—food that looks like mummies is just more fun. The mustard eyes make people smile. That’s worth something.
What makes these different from every other sausage appetizer out there? It’s the texture. The crescent dough gets flaky and golden while the sausage stays juicy inside. The mustard adds this tiny pop of tang that cuts through the richness. And the presentation—those little bandaged mummies—makes them instantly recognizable. This isn’t just another appetizer. It’s the one people remember.
I’ve made these for my nephew’s Halloween party every year since that first accidental batch. He’s nine now and still requests them. That’s the kind of staying power you want in a recipe. It’s comfort food dressed up in a costume—fun, fast, and satisfying.
What Ingredients You Will Need
This recipe uses the simplest ingredients to create something that looks way more impressive than it actually is. Everything here is a pantry staple or a quick grocery run away.
- Cocktail sausages (1 package, about 14 ounces) : These are the base of our mummies. I prefer the beef or pork cocktail links—they’re already bite-sized and perfectly juicy. Look for the fully cooked ones in the refrigerated section near hot dogs. My go-to brand is Hillshire Farm, but any brand works. You want them small enough that one strip of dough wraps around them completely. If you can only find full-size sausages, just cut them into thirds—it works fine.
- Crescent roll dough (1 can, 8 ounces) : This is the secret weapon. The flaky, buttery layers bake up golden and perfect around the sausages. I use Pillsbury Original Crescents, but any brand works. Don’t get the seamless sheet version—you want the perforated triangles because they’re easier to cut into strips. Let the dough sit at room temperature for about 5 minutes before you unroll it. Cold dough cracks when you try to cut it, and warm dough gets too sticky. Room temperature is the sweet spot.
- Yellow mustard (for the eyes) : This is where the mummy face comes alive. Regular yellow mustard gives the perfect pop of color and a tangy bite. You can use Dijon for a more sophisticated flavor, but kids prefer the classic yellow. If you’re out of mustard, sriracha works for a spicy version, or use tiny dots of ketchup for a different look. I’ve also used black sesame seeds pressed into the dough before baking—they stay put better and look like creepy little eyes.
- Egg wash (1 egg + 1 tablespoon water) : This gives the dough that beautiful golden-brown finish. Without it, the crescent dough bakes up pale and sad. Whisk the egg and water together until smooth. A milk wash works too, but egg wash gives a richer color. If you’re out of eggs, brush the dough with melted butter instead—it won’t be as shiny, but it’ll still look good.
- Optional: Everything bagel seasoning or sesame seeds : I sometimes sprinkle these on before baking for extra texture. The sesame seeds look like little mummy dirt or sand, which adds to the Halloween vibe. Totally optional, but fun if you have them.
- Optional: Dipping sauces : Ketchup, honey mustard, or ranch dressing for serving. The tangy sauces complement the savory sausage and buttery dough perfectly. I always set out a little dish of honey mustard because the sweetness balances the saltiness.
One thing I’ve learned—don’t use the low-fat crescent dough. It doesn’t brown as nicely and the texture is off. Full-fat crescent rolls give you that flaky, golden exterior that makes these so good. Trust me on this one.
Equipment Needed
You don’t need much for this recipe. That’s part of the beauty.
- Baking sheet : A standard half-sheet pan works perfectly. Line it with parchment paper or a silicone baking mat for easy cleanup. I’ve used foil in a pinch, but parchment gives better browning on the bottom.
- Sharp knife or pizza cutter : You need something to cut the crescent dough into strips. A pizza cutter makes quick work of it. A sharp chef’s knife works too. Don’t use a dull knife—it’ll drag through the dough and mess up the strips.
- Small bowl and whisk : For the egg wash. A fork works if you don’t have a whisk.
- Pastry brush : For brushing the egg wash onto the dough. A silicone brush is easiest to clean. If you don’t have one, use the back of a spoon or just dip your fingers—it’s not fancy, it’s Halloween.
- Toothpicks : These help hold the dough in place if the strips start to unravel during baking. Stick one through the center of each mummy before baking. I learned this the hard way after my first batch unwrapped itself in the oven.
- Cutting board : For cutting the dough strips. Any clean surface works.
That’s literally it. No stand mixer, no food processor, no special gadgets. This is a recipe you can make in a tiny kitchen with minimal tools. I’ve made them in a friend’s apartment with a butter knife and a coffee mug for whisking—still turned out great.
Preparation Method

Let me walk you through this step by step. I’ve made these so many times I could do it in my sleep, but I’ll share every detail so yours turn out perfect the first time.
- Preheat your oven to 375°F (190°C) . Line a baking sheet with parchment paper. Getting the oven hot before you start wrapping is crucial—you want that dough to start baking immediately so it gets flaky, not soggy.
- Open the crescent roll dough . Unroll it onto a cutting board. You’ll see perforations where the triangles are supposed to separate. Don’t separate them yet. You want the whole rectangle intact. If the dough cracks a little at the perforations, just press it back together with your fingers. No big deal.
- Cut the dough into strips . Using your pizza cutter or knife, cut the dough lengthwise into thin strips—about 1/4 to 1/2 inch wide. You should get 8 to 10 strips from each rectangle. The strips don’t have to be perfectly even. In fact, uneven strips make the mummies look more authentic—like real bandages wrapped by a clumsy monster. Don’t overthink this part.
- Prepare your sausages . Pat them dry with a paper towel. This helps the dough stick better. If they’re wet, the dough slides around and unravels. I learned this after my first batch came out looking like doughy blobs instead of mummies.
- Wrap the mummies . Take one strip of dough and wrap it around a sausage, starting at one end and working your way to the other. Leave a small gap in the middle for the eyes. Don’t wrap too tightly—the dough needs room to expand as it bakes. If you wrap too tight, the dough tears and the sausage peeks through. Leave the ends of the dough slightly loose so they look like unraveling bandages. This is what gives them that mummy look.
- Secure with toothpicks . Stick a toothpick through the center of each wrapped sausage. This holds the dough in place while baking. Trust me on this one. I skipped it once and ended up with naked sausages and a pile of dough on the pan.
- Place on the baking sheet . Arrange the mummies about an inch apart. They don’t spread much, but you want air circulation for even browning.
- Brush with egg wash . Using your pastry brush, lightly coat each mummy with the egg wash. Don’t soak them—just a light, even coat. This gives them that beautiful golden color. If you skip this step, they’ll look pale and sad.
- Sprinkle with seasoning (optional) . If you’re using everything bagel seasoning or sesame seeds, sprinkle a little on top now. I like sesame seeds because they look like little mummy dust.
- Bake for 12-15 minutes . Start checking at 12 minutes. You want the dough to be golden brown and puffy. The sausages are already cooked, so you’re really just baking the dough. If your oven runs hot, check earlier. My oven takes exactly 13 minutes, but yours might be different.
- Add the eyes . Remove the toothpicks immediately after baking. Let the mummies cool for 2-3 minutes on the baking sheet. Then use a toothpick or the tip of a knife to dab a tiny dot of mustard in the gap you left for the eyes. Two dots per mummy. Don’t add the mustard before baking—it dries out and loses that bright yellow color.
- Serve warm . These are best served within 15 minutes of coming out of the oven. The dough is flaky, the sausage is warm, and the mustard eyes are still bright and fresh.
One more thing—if you’re making a big batch, keep the finished mummies warm in a 200°F oven while you bake the rest. They stay good for about 30 minutes this way. After that, the dough starts to soften.
Cooking Tips & Techniques
I’ve made enough mistakes with these little mummies to fill a horror movie. Let me save you the trouble.
Don’t overwork the dough. Crescent roll dough is delicate. The more you handle it, the tougher it gets. Cut your strips quickly and wrap gently. If the dough starts feeling sticky or warm, pop it in the fridge for 5 minutes. Cold dough is easier to work with.
The toothpick trick is non-negotiable. I know I’ve said this already, but I’m saying it again because it matters. Without toothpicks, the dough unravels during baking. You end up with sausages wearing dough necklaces instead of full mummy costumes. Stick a toothpick through the center of each one. Remove them after baking. Easy.
Leave the eye gap wide enough. You need room for two mustard dots. If the gap is too small, the eyes look squished. If it’s too wide, it doesn’t look like a mummy. Aim for about a half-inch gap in the center of the sausage.
Don’t crowd the pan. Give each mummy breathing room. If they’re touching, they steam instead of browning. You want golden, flaky dough, not pale, soggy dough.
Work in batches if needed. A standard baking sheet holds about 16-20 mummies comfortably. If you’re making a double batch, bake them in two rounds. Don’t try to cram them all on one pan.
Make ahead tip: You can assemble these up to 4 hours ahead. Just arrange the wrapped mummies on the baking sheet, cover with plastic wrap, and refrigerate. Brush with egg wash right before baking. The cold dough actually holds its shape better during baking.
I once tried making these with puff pastry instead of crescent dough. Don’t do it. Puff pastry is too flaky—it falls apart during wrapping and doesn’t hold its shape. Crescent dough is the perfect texture for this. It’s pliable enough to wrap, sturdy enough to hold, and flaky enough to be delicious.
Variations & Adaptations
These mummies are surprisingly versatile. Here are some ways to switch them up.
Spicy Mummies: Use spicy Italian sausages or add a dash of cayenne to the egg wash. For extra heat, mix a little sriracha into the mustard before dotting the eyes. These are great for adult parties where kids aren’t the main audience.
Cheese-Stuffed Mummies: Cut a slit in each sausage before wrapping and stuff it with a small cube of cheddar or mozzarella. The cheese melts into the sausage as it bakes. This is my personal favorite variation—the gooey cheese adds another layer of deliciousness.
Veggie Mummies: Swap the sausages for vegetarian cocktail sausages or even cooked carrot sticks. The dough wrapping works the same way. For a completely plant-based version, use vegan crescent dough (check the label—some brands are accidentally vegan) and vegan butter for the wash.
Breakfast Mummies: Use breakfast sausages instead of cocktail links. These are perfect for a Halloween morning brunch. Serve with maple syrup for dipping—the sweet and savory combo is incredible. I made these for a Halloween brunch last year and they were gone in 10 minutes.
Gluten-Free Mummies: Use gluten-free crescent dough or puff pastry. The texture is slightly different, but the look is the same. Just be extra gentle when wrapping because gluten-free dough is more fragile.
If you’re looking for more Halloween appetizer ideas, check out these savory sun-dried tomato pesto pinwheels that are perfect for any fall gathering. They’re not as fun as mummies, but they’re just as delicious.
Serving & Storage Suggestions
These mummies are best served warm, right after the mustard eyes go on. The contrast between the warm, flaky dough and the cool, tangy mustard is perfect. Arrange them on a platter with a little bowl of extra mustard or ketchup for dipping. I like to scatter some black olives around the platter to look like creepy eyeballs—it adds to the Halloween vibe.
For a Halloween party spread, pair these with a creamy slow cooker chicken tortilla soup for a complete meal. The soup is warm and comforting, and the mummies are the perfect finger food to snack on while the soup simmers.
Storage: Leftover mummies (if you have any—I rarely do) can be stored in an airtight container in the refrigerator for up to 3 days. The dough will soften, but they’re still tasty.
Reheating: Pop them in a 350°F oven for 5-7 minutes to crisp up the dough again. The microwave works in a pinch, but the dough gets chewy. I don’t recommend it. If you’re reheating a large batch, spread them on a baking sheet and warm them in the oven—they’ll taste almost as good as fresh.
Freezing: You can freeze the assembled, unbaked mummies. Arrange them on a baking sheet and freeze until solid, then transfer to a freezer bag. They’ll keep for up to 2 months. Bake straight from frozen, adding 3-5 minutes to the baking time. Don’t thaw them first—the dough gets soggy.
The flavors actually develop a bit overnight. I’ve eaten cold mummies straight from the fridge the next day and they’re still good—the mustard mellows out and blends with the sausage. Not as good as fresh, but definitely not bad.
Nutritional Information & Benefits
Let’s be real—these are Halloween appetizers, not health food. But here’s what you’re looking at per mummy (based on a batch of 16):
- Calories: Approximately 110-130 per mummy
- Protein: 5-6 grams
- Carbohydrates: 8-10 grams
- Fat: 7-9 grams
- Sodium: 300-350 mg
These numbers are estimates and vary based on the specific brands you use. The crescent dough and sausages are the main contributors to calories and sodium.
Health benefits (such as they are): The sausages provide a decent amount of protein, which helps keep you full. The mustard contains turmeric, which has anti-inflammatory properties. And honestly, sometimes you need a fun, indulgent treat. Halloween is one of those times.
Dietary considerations: This recipe contains gluten (from the crescent dough) and eggs (from the wash). It’s not suitable for vegans or vegetarians unless you use the substitutions I mentioned earlier. The sausages are typically made from pork or beef, so they’re not kosher or halal unless you use certified alternatives.
If you’re watching your sodium, look for low-sodium cocktail sausages. The crescent dough is harder to find in a low-sodium version, but the portion size is small enough that it shouldn’t be a major concern for most people.
These mummies are a treat, not a staple. Enjoy them on Halloween and don’t stress about the numbers. One night of fun food won’t derail your healthy habits.
Conclusion
These easy mummy sausage bites are the Halloween appetizer you didn’t know you needed. They’re fun, fast, and foolproof. The ingredients are simple, the technique is forgiving, and the result is always a crowd-pleaser. Kids love the mummy look. Adults love the taste. Everyone wins.
I’ve made these for three Halloweens now, and they’ve never let me down. They’ve saved me from a forgotten party, impressed my nephew’s friends, and become a tradition I actually look forward to. That’s the magic of a good recipe—it becomes part of your story.
Don’t be afraid to customize these. Use different sausages, try different eye options, add cheese or spice. Make them your own. That’s what cooking is all about.
If you make these, I’d love to hear how they turned out. Drop a comment below and let me know if your guests loved them as much as mine do. And if you have any questions, ask away—I’m always happy to help a fellow Halloween enthusiast.
Now go make some mummies! They’re waiting to come to life in your kitchen.
Frequently Asked Questions
Can I use hot dogs instead of cocktail sausages?
Absolutely. Just cut each hot dog into thirds or quarters. The baking time stays the same because the sausages are already cooked. Mini hot dogs work perfectly too.
What can I use instead of mustard for the eyes?
You’ve got options. Ketchup works well and gives a red, bloody look. Sriracha adds heat and color. Black sesame seeds pressed into the dough before baking look like creepy little eyes. I’ve even used tiny dots of cream cheese mixed with black food coloring for a spooky effect.
Can I make these in an air fryer?
Yes! Air fry at 350°F for 8-10 minutes, checking at 8 minutes. The dough gets extra crispy in the air fryer. Just make sure you still use toothpicks to hold the dough in place. The air fryer’s fan can blow loose dough strips off.
How far in advance can I make these?
You can assemble them up to 4 hours ahead and keep them refrigerated. Brush with egg wash right before baking. For longer storage, freeze the assembled, unbaked mummies for up to 2 months. Bake from frozen, adding a few extra minutes to the cooking time.
My dough keeps tearing when I wrap it. What am I doing wrong?
Your dough might be too cold or too warm. Cold dough cracks, warm dough tears. Let the dough sit at room temperature for 5-10 minutes before cutting. If it gets too warm and sticky, pop it in the fridge for 5 minutes. Also, make sure you’re not wrapping too tightly—gentle pressure is all you need.
Pin This Recipe!
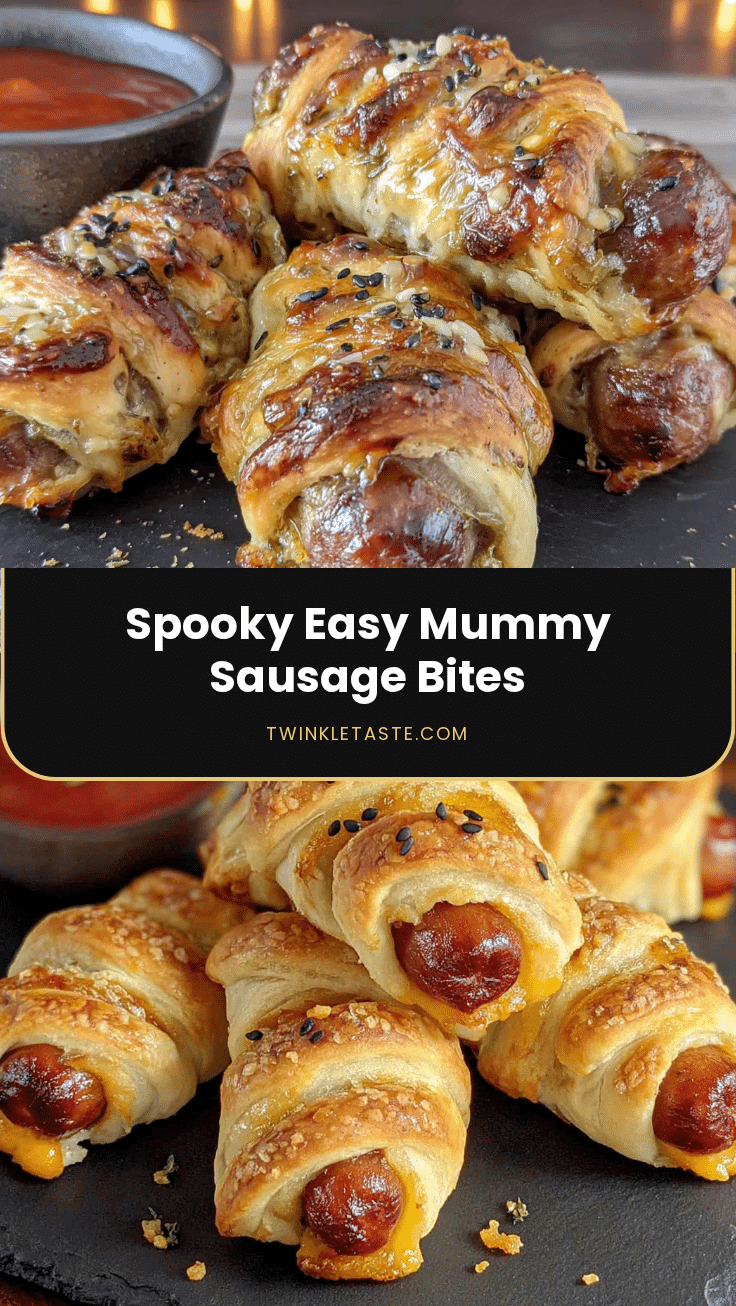
Easy Mummy Sausage Bites: Best Halloween Appetizer Recipe

These easy mummy sausage bites are a fun, fast, and foolproof Halloween appetizer made with cocktail sausages wrapped in crescent roll dough, baked until golden, and finished with mustard eyes. Perfect for parties, they disappear within minutes and are a guaranteed crowd-pleaser.
- Prep Time: 10 minutes
- Cook Time: 15 minutes
- Total Time: 25 minutes
- Yield: 16 servings 1x
- Category: Appetizer
- Cuisine: American
Ingredients
- 1 package (14 ounces) cocktail sausages
- 1 can (8 ounces) crescent roll dough
- Yellow mustard (for the eyes)
- 1 egg + 1 tablespoon water (for egg wash)
- Optional: Everything bagel seasoning or sesame seeds
- Optional: Dipping sauces (ketchup, honey mustard, or ranch dressing)
Instructions
- Preheat your oven to 375°F (190°C). Line a baking sheet with parchment paper.
- Open the crescent roll dough and unroll it onto a cutting board. Keep the rectangle intact; press any cracks together.
- Cut the dough lengthwise into thin strips, about 1/4 to 1/2 inch wide, to get 8 to 10 strips.
- Pat the cocktail sausages dry with a paper towel.
- Take one strip of dough and wrap it around a sausage, starting at one end and working to the other, leaving a small gap in the middle for the eyes. Do not wrap too tightly.
- Secure each wrapped sausage with a toothpick through the center.
- Place the mummies on the prepared baking sheet about an inch apart.
- Brush each mummy lightly with the egg wash.
- If desired, sprinkle with everything bagel seasoning or sesame seeds.
- Bake for 12-15 minutes, until the dough is golden brown and puffy.
- Remove toothpicks immediately after baking. Let cool for 2-3 minutes.
- Use a toothpick or knife tip to dab a tiny dot of mustard in the eye gap for each mummy (two dots per mummy).
- Serve warm.
Notes
Don’t overwork the dough; handle gently. The toothpick trick is essential to prevent unraveling. Leave the eye gap about half an inch wide. Don’t crowd the pan. Assemble up to 4 hours ahead and refrigerate; brush with egg wash before baking. For freezing, freeze assembled unbaked mummies for up to 2 months; bake from frozen, adding 3-5 minutes.
Nutrition
- Serving Size: 1 mummy
- Calories: 120
- Sugar: 1
- Sodium: 325
- Fat: 8
- Saturated Fat: 2.5
- Carbohydrates: 9
- Protein: 5
Keywords: Halloween appetizer, mummy sausage bites, easy appetizer, cocktail sausages, crescent roll dough, party food, kid-friendly