The butternut squash had been sitting on my counter for over a week, staring at me every time I walked past. I bought it with grand plans—maybe a soup, maybe a roast—but life got busy and that squash became a silent accusation every time I grabbed my keys. Then my sister texted saying she was dropping by in an hour, and I had exactly one box of elbow macaroni, half a block of sharp cheddar, and that stubborn squash. I started roasting it on impulse, not sure where I was going, and then I spotted the sage plant on my windowsill that was somehow still alive despite my neglect. Twenty minutes later, I was stirring roasted squash into a cheese sauce and it turned this gorgeous golden color—like fall had melted right into the pan. I topped it with sage leaves that crackled in butter and honestly, I ate my first bite standing at the counter before my sister even walked in. This Creamy Roasted Butternut Squash Mac and Cheese with Crispy Sage is exactly that kind of recipe—the one you don’t plan for but somehow can’t stop thinking about after.
It’s not trying to be fancy or complicated. It’s just really, really good comfort food that happens to have a vegetable hiding in it (which, let’s face it, is the best kind of comfort food). The squash gets all caramelized and sweet in the oven, then gets blended right into the cheese sauce so it’s silky and smooth without being heavy. And those crispy sage leaves on top? They add this little pop of herbiness that cuts through all that richness. I’ve made this three times in the last two weeks and I’m not even sorry.
Why You’ll Love This Recipe
I’ve tested this recipe more times than I care to admit, tweaking the squash-to-cheese ratio and experimenting with different pasta shapes. Here’s why I keep coming back to it—and why I think you will too.
- Quick & Easy: From start to table in about 45 minutes, and most of that is hands-off roasting time. Perfect for those weeknights when you want something cozy but don’t have hours to spend.
- Simple Ingredients: You probably have most of this already—pasta, cheese, butter, milk, garlic. The squash and sage are the only “special” items, and they’re easy to find at any grocery store.
- Perfect for Fall: This is the ultimate autumn comfort dish. It’s great for a cozy dinner at home, a Thanksgiving side dish that steals the show, or even a potluck where everyone asks for the recipe.
- Crowd-Pleaser: I’ve served this to picky kids, skeptical adults, and even my brother-in-law who “doesn’t like squash.” Every single person went back for seconds. It’s that good.
- Unbelievably Delicious: The roasted squash adds this natural sweetness and creamy texture that makes the cheese sauce taste richer than it actually is. And the crispy sage? It’s the kind of topping you’ll want to put on everything.
What makes this different from other squash mac and cheese recipes is the roasting step. A lot of recipes just boil or steam the squash, but roasting concentrates the flavor and adds a subtle caramelization that you can really taste. Plus, blending it into the sauce means you get all that flavor without any weird chunks. It’s comfort food that feels a little bit fancy but is actually really simple.
What Ingredients You Will Need
This recipe uses simple, wholesome ingredients that come together to create something truly special. Most of these are pantry staples, and the fresh ingredients are easy to find at any grocery store.
- Butternut Squash: 1 medium (about 2-3 pounds). Look for one that feels heavy for its size with smooth, firm skin. You’ll peel, seed, and cube it into 1-inch pieces. (I’ve used pre-cut squash from the store in a pinch and it works fine—just make sure the pieces are roughly the same size for even roasting.)
- Olive Oil: 2 tablespoons, for roasting the squash. A good quality extra virgin olive oil adds nice flavor, but regular works too.
- Garlic: 4 cloves, smashed but not chopped. Roasting whole cloves with the squash mellows them out and makes them sweet and spreadable.
- Elbow Macaroni: 12 ounces (about 3 cups dry). I prefer classic elbows, but any small pasta shape works—cavatappi, shells, or rotini are all great options.
- Unsalted Butter: 3 tablespoons, divided. 2 tablespoons for the roux and 1 tablespoon for the crispy sage.
- All-Purpose Flour: 2 tablespoons, for thickening the cheese sauce.
- Whole Milk: 2 cups. Whole milk gives the creamiest sauce, but 2% works too. I wouldn’t go lower than that for the best texture.
- Sharp Cheddar Cheese: 8 ounces, freshly shredded (about 2 cups). Pre-shredded cheese has anti-caking agents that prevent smooth melting, so shred your own—it makes a real difference.
- Parmesan Cheese: 1/2 cup, freshly grated. Adds a salty, nutty depth to the sauce.
- Salt: 1 teaspoon, plus more to taste.
- Black Pepper: 1/2 teaspoon, freshly ground.
- Nutmeg: 1/4 teaspoon, freshly grated if possible. It sounds weird, but nutmeg and squash are best friends—it brings out the sweetness without being noticeable.
- Fresh Sage Leaves: 12-15 leaves. Look for bright green leaves without any brown spots. The smaller ones get crispier faster.
Equipment Needed
You don’t need anything fancy for this recipe—just some basic kitchen tools you probably already have.
- Baking Sheet: A rimmed baking sheet for roasting the squash. I use a half-sheet pan (18×13 inches) and line it with parchment paper for easy cleanup.
- Large Pot: For boiling the pasta. Any 5-6 quart pot works.
- Medium Saucepan: For making the cheese sauce. A heavy-bottomed saucepan prevents scorching.
- Blender or Food Processor: To puree the roasted squash into a smooth sauce. I prefer a high-speed blender for the silkiest texture, but a food processor works too. An immersion blender can work if you’re careful, but it takes a bit more effort.
- Wooden Spoon or Silicone Spatula: For stirring the roux and sauce.
- Cheese Grater: For shredding the cheddar and parmesan. A box grater or microplane both work.
- Small Skillet: For frying the sage leaves. A non-stick skillet is ideal but not required.
- 9×13 Inch Baking Dish: If you want to bake the mac and cheese after assembling. This step is optional—you can serve it straight from the pot.
If you don’t have a blender, you can mash the roasted squash with a fork or potato masher until smooth. It won’t be as silky, but it’ll still taste amazing. And if you don’t have a baking dish, just serve it straight from the pot—no one will complain.
Preparation Method
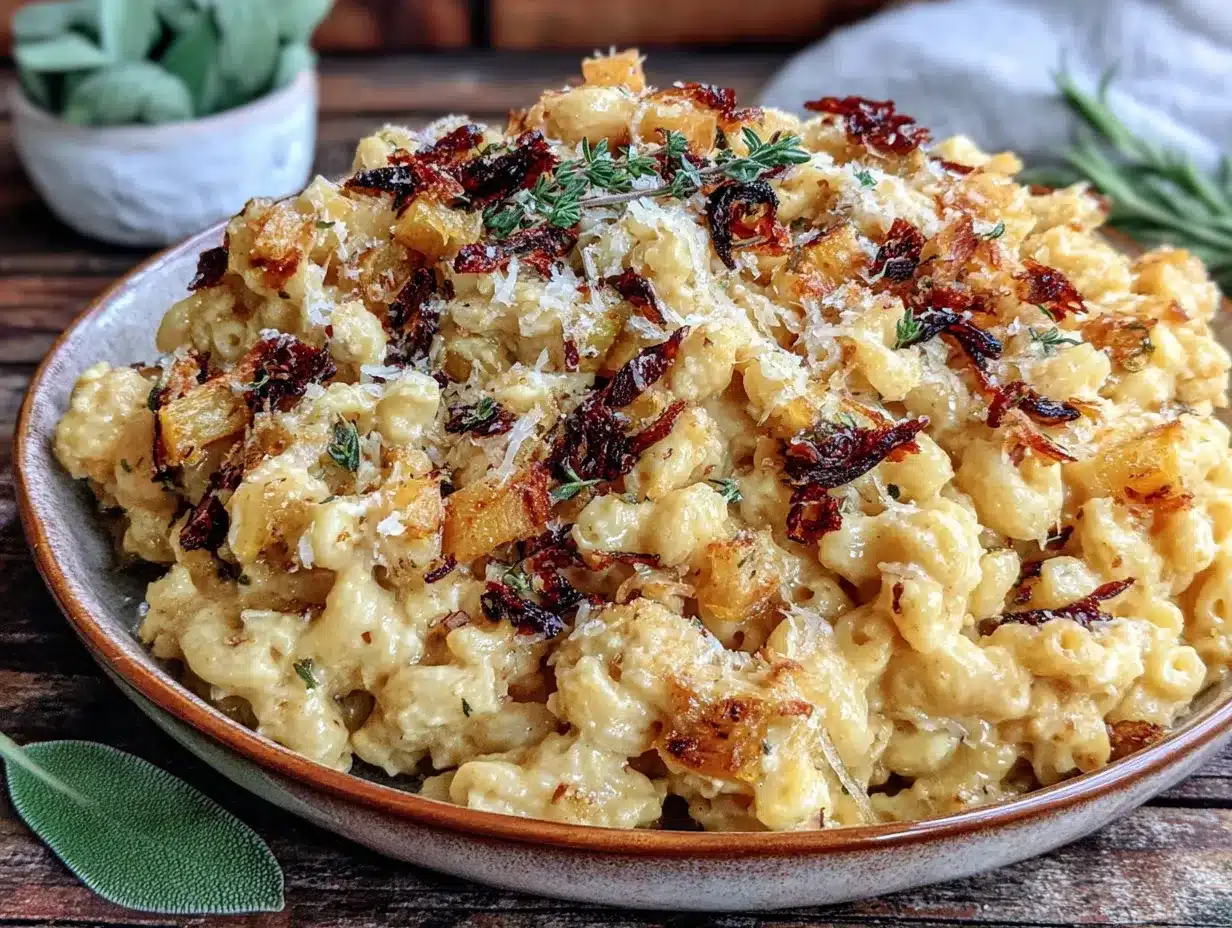
Let’s get cooking! This recipe comes together in a few simple steps, and I’ll walk you through each one.
- Preheat your oven to 400°F (200°C). Line a rimmed baking sheet with parchment paper for easy cleanup.
- Prepare the butternut squash. Peel the squash with a vegetable peeler, cut it in half lengthwise, and scoop out the seeds with a spoon. Cut the flesh into 1-inch cubes—try to make them roughly the same size so they roast evenly. You should have about 4-5 cups of cubed squash.
- Roast the squash. Spread the cubed squash on the prepared baking sheet. Add the smashed garlic cloves, drizzle with 2 tablespoons of olive oil, and sprinkle with 1/2 teaspoon of salt and 1/4 teaspoon of black pepper. Toss everything together with your hands until the squash is evenly coated. Spread it in a single layer—don’t overcrowd, or it’ll steam instead of roast. Roast for 25-30 minutes, flipping halfway through, until the squash is tender and starting to caramelize at the edges. The garlic should be soft and golden.
- Cook the pasta. While the squash roasts, bring a large pot of salted water to a boil. Add the elbow macaroni and cook according to package directions until al dente—usually about 8-9 minutes. Reserve 1 cup of pasta water before draining, then drain the pasta and set it aside.
- Puree the roasted squash. Transfer the roasted squash and garlic to a blender or food processor. Add 1/2 cup of the reserved pasta water (or regular water if you forgot to save it—I’ve done that before). Blend until completely smooth and creamy. You might need to scrape down the sides once or twice. Set the puree aside.
- Make the cheese sauce. In a medium saucepan, melt 2 tablespoons of butter over medium heat. Add the flour and whisk constantly for 1-2 minutes—this cooks out the raw flour taste. The mixture will look like a thick paste. Slowly pour in the milk while whisking continuously to prevent lumps. Keep whisking until the sauce thickens, about 3-4 minutes. It should be smooth and coat the back of a spoon.
- Add the squash puree and cheese. Reduce the heat to low. Stir in the squash puree until fully combined. The sauce will turn a beautiful golden-orange color. Add the shredded cheddar, grated parmesan, remaining 1/2 teaspoon of salt, 1/4 teaspoon of black pepper, and the nutmeg. Stir until the cheese is completely melted and the sauce is smooth. Taste and adjust seasoning if needed.
- Combine the pasta and sauce. Add the drained pasta to the saucepan with the cheese sauce. Stir gently until every piece of pasta is coated. If the sauce seems too thick, add a splash of the reserved pasta water to loosen it up. The sauce will continue to thicken as it sits.
- Make the crispy sage. In a small skillet, melt 1 tablespoon of butter over medium heat. Add the sage leaves in a single layer—don’t overcrowd. Cook for 30-60 seconds per side until they turn bright green and start to crisp up. They’ll bubble and sizzle a bit. Transfer to a paper towel-lined plate to drain. The leaves will crisp up more as they cool.
- Serve immediately. Spoon the mac and cheese into bowls, top with the crispy sage leaves, and enjoy while it’s hot and creamy. If you want a baked version, transfer everything to a 9×13 baking dish, top with extra shredded cheese and breadcrumbs, and bake at 375°F for 15-20 minutes until bubbly and golden.
Cooking Tips & Techniques
After making this recipe more times than I can count, I’ve picked up a few tricks that make a real difference.
Don’t skip the roasting step. I know it’s tempting to just boil the squash to save time, but roasting is where the magic happens. The high heat caramelizes the natural sugars in the squash, giving it a depth of flavor you just can’t get from boiling. Plus, roasting concentrates the flavor, so you need less cheese to get that creamy, satisfying taste.
Shred your own cheese. I know, I know—bagged shredded cheese is so convenient. But it’s coated with cellulose and other anti-caking agents that prevent it from melting smoothly. Freshly shredded cheddar melts into a silky, luscious sauce. Trust me on this one—I learned the hard way when my sauce turned grainy.
Watch your heat when making the sauce. Keep the heat at medium or medium-low when you’re making the roux and adding the milk. If the heat is too high, the flour will burn before it thickens, and you’ll end up with a lumpy, scorched sauce. Low and slow is the way to go.
Reserve that pasta water. The starchy water is liquid gold for thinning out your sauce without diluting the flavor. It helps the sauce cling to the pasta better too. I always save at least a cup before draining, even if I think I won’t need it.
Don’t overcook the sage. Sage leaves go from perfectly crispy to burnt in about 15 seconds. Keep a close eye on them when they’re in the butter. They should turn bright green and start to curl at the edges—that’s your cue to take them out. They’ll continue crisping as they cool on the paper towel.
Make it ahead if you want. This mac and cheese actually gets better after sitting for a day. The flavors meld together and the sauce thickens up nicely. Just reheat it in the oven or on the stovetop with a splash of milk to loosen it up.
Variations & Adaptations
One of the best things about this recipe is how flexible it is. Here are some ways to make it your own.
- Make it gluten-free: Use gluten-free pasta and substitute the all-purpose flour with a 1:1 gluten-free flour blend or cornstarch. For the cornstarch option, mix 1 tablespoon of cornstarch with 2 tablespoons of cold water to make a slurry, then stir it into the milk mixture instead of the flour roux.
- Add some protein: Stir in cooked, crumbled bacon, shredded rotisserie chicken, or crispy prosciutto for a heartier meal. I’ve added leftover crispy baked parmesan pork chops chopped into pieces and it was incredible—the salty, crunchy pork against the creamy pasta was a perfect combo.
- Change up the cheese: Feel free to experiment with different cheese combinations. Gruyère adds a nutty, melty quality. Smoked gouda gives it a subtle smoky flavor. Or try a mix of fontina and parmesan for extra richness. Just make sure at least half of your cheese is a good melting cheese.
- Make it dairy-free: Use plant-based butter, unsweetened oat milk or cashew milk, and your favorite dairy-free shredded cheese. The sauce won’t be quite as creamy, but it’s still delicious. Add an extra tablespoon of nutritional yeast for a cheesy flavor boost.
- Add some veggies: Stir in sautéed mushrooms, wilted spinach, or roasted broccoli right before serving. The earthy flavors pair beautifully with the sweet squash and rich cheese sauce.
- Spice it up: Add a pinch of cayenne pepper, red pepper flakes, or smoked paprika to the cheese sauce for a little heat. A dash of hot sauce stirred in at the end works too.
Serving & Storage Suggestions
This mac and cheese is best served hot and fresh, but it’s also great for leftovers—if you have any.
Serving: Spoon the mac and cheese into warm bowls and top with the crispy sage leaves right before serving so they stay crunchy. I like to add a little extra sprinkle of parmesan on top and maybe a crack of fresh black pepper. It pairs beautifully with a simple green salad dressed with lemon vinaigrette to cut through the richness. For a heartier meal, serve it alongside crispy one-pan garlic butter herb chicken thighs or a simple roasted vegetable like asparagus or Brussels sprouts.
Storage: Let any leftovers cool completely, then transfer to an airtight container. It will keep in the refrigerator for up to 4 days. The sauce will thicken as it sits, so don’t be alarmed—it’s normal.
Reheating: The best way to reheat is on the stovetop over medium-low heat. Add a splash of milk or reserved pasta water and stir gently until heated through. You can also reheat individual portions in the microwave, stirring every 30 seconds. If you’re reheating a larger batch, pop it in a 350°F oven for 15-20 minutes, covered with foil, with a little milk stirred in.
Freezing: This mac and cheese freezes surprisingly well. Transfer it to a freezer-safe container and freeze for up to 3 months. Thaw overnight in the refrigerator, then reheat on the stovetop or in the oven. The sage leaves won’t survive the freezer, so make a fresh batch when you’re ready to serve.
Flavor development: Honestly, this mac and cheese tastes even better the next day. The flavors have time to meld together, and the squash and cheese get all cozy and delicious. I sometimes make it a day ahead on purpose.
Nutritional Information & Benefits
While I wouldn’t call this a health food, it’s definitely a more nutritious twist on classic mac and cheese. Here’s a rough estimate per serving (based on 6 servings):
- Calories: Approximately 480-520
- Protein: 18-20g
- Fat: 22-25g
- Carbohydrates: 52-56g
- Fiber: 5-7g
- Vitamin A: Over 200% of your daily needs (thanks to the squash!)
- Calcium: About 30% of your daily needs
The butternut squash is the real star here from a nutritional standpoint. It’s packed with vitamin A (in the form of beta-carotene), vitamin C, potassium, and fiber. The beta-carotene is a powerful antioxidant that supports eye health and immune function. Plus, roasting the squash makes these nutrients more bioavailable, so your body can actually use them.
Using whole milk and real cheese adds protein and calcium, which are great for bone health. And the sage leaves aren’t just for show—sage has anti-inflammatory properties and is rich in antioxidants.
If you’re looking for a lighter option, you can use 2% milk and reduce the cheese by a quarter cup. But honestly, this recipe is about comfort and satisfaction, and sometimes that means not skimping on the good stuff.
Conclusion
This Creamy Roasted Butternut Squash Mac and Cheese with Crispy Sage is one of those recipes that feels special without being complicated. It’s the kind of dish that makes you slow down and actually enjoy your meal—the kind that fills your kitchen with the smell of roasting squash and sizzling sage and makes everyone wander in asking what’s for dinner.
I love that it’s flexible enough for a busy weeknight but impressive enough for company. I love that there’s a vegetable hiding in there that even the pickiest eaters will devour. But mostly, I love that first bite—when the creamy, cheesy, slightly sweet sauce coats every piece of pasta and the crispy sage crunches between your teeth. It’s pure comfort, and it never gets old.
I’d love to hear how this turns out for you! Did you add any fun variations? Did your family go back for seconds? Drop a comment below and let me know—I read every single one. And if you loved this, be sure to check out some of my other fall favorites like cozy pumpkin scones with maple glaze or perfect pumpkin roll with cream cheese filling for more seasonal inspiration.
Happy cooking, friends!
Frequently Asked Questions
Can I use frozen butternut squash instead of fresh?
Yes, you can use frozen cubed butternut squash. Just thaw it first, pat it dry with paper towels to remove excess moisture, and roast it as directed. It might not caramelize quite as much as fresh, but it still works great.
Can I make this recipe vegan?
Absolutely! Use plant-based butter, unsweetened oat milk or cashew milk, and your favorite vegan shredded cheese. Add a tablespoon of nutritional yeast to the sauce for extra cheesy flavor. The squash puree helps create a creamy texture even without dairy.
Why did my cheese sauce turn out grainy?
Grainy cheese sauce usually happens when the heat is too high or when you use pre-shredded cheese. Keep the heat on low when adding the cheese, and always shred your own from a block. If your sauce does get grainy, try whisking in a tablespoon of cold butter or a splash of milk to smooth it out.
Can I skip the crispy sage topping?
You can, but honestly, it’s one of the best parts! The crispy sage adds a wonderful texture and flavor that balances the richness of the mac and cheese. If you don’t have sage, you can substitute with fresh thyme leaves or even a sprinkle of smoked paprika.
How do I prevent the mac and cheese from drying out when reheating?
Add a splash of milk, cream, or reserved pasta water before reheating. Stir it in gently, then reheat on the stovetop over medium-low heat or in the microwave in 30-second bursts. The extra liquid helps restore the creamy texture.
Pin This Recipe!

Creamy Roasted Butternut Squash Mac and Cheese with Crispy Sage

This creamy mac and cheese features roasted butternut squash blended into a silky cheese sauce, topped with crispy sage leaves. It’s an easy, comforting fall dish that’s perfect for weeknights or special occasions.
- Prep Time: 15 minutes
- Cook Time: 30 minutes
- Total Time: 45 minutes
- Yield: 6 servings 1x
- Category: Main Course
- Cuisine: American
Ingredients
- 1 medium butternut squash (about 2–3 pounds), peeled, seeded, and cubed into 1-inch pieces
- 2 tablespoons olive oil
- 4 cloves garlic, smashed
- 12 ounces elbow macaroni (about 3 cups dry)
- 3 tablespoons unsalted butter, divided
- 2 tablespoons all-purpose flour
- 2 cups whole milk
- 8 ounces sharp cheddar cheese, freshly shredded (about 2 cups)
- 1/2 cup Parmesan cheese, freshly grated
- 1 teaspoon salt, divided
- 1/2 teaspoon black pepper, divided
- 1/4 teaspoon freshly grated nutmeg
- 12–15 fresh sage leaves
Instructions
- Preheat your oven to 400°F (200°C). Line a rimmed baking sheet with parchment paper.
- Prepare the butternut squash: Peel, halve lengthwise, scoop out seeds, and cut into 1-inch cubes (about 4-5 cups).
- Roast the squash: Spread cubed squash and smashed garlic on the baking sheet. Drizzle with olive oil, sprinkle with 1/2 teaspoon salt and 1/4 teaspoon pepper. Toss to coat, spread in a single layer, and roast for 25-30 minutes, flipping halfway, until tender and caramelized.
- Cook the pasta: Bring a large pot of salted water to a boil. Cook elbow macaroni according to package directions until al dente (about 8-9 minutes). Reserve 1 cup of pasta water, then drain.
- Puree the roasted squash: Transfer roasted squash and garlic to a blender or food processor. Add 1/2 cup reserved pasta water and blend until smooth. Set aside.
- Make the cheese sauce: In a medium saucepan, melt 2 tablespoons butter over medium heat. Whisk in flour and cook for 1-2 minutes. Slowly pour in milk while whisking continuously. Cook until thickened, about 3-4 minutes.
- Add squash puree and cheese: Reduce heat to low. Stir in squash puree until combined. Add shredded cheddar, grated Parmesan, remaining 1/2 teaspoon salt, 1/4 teaspoon pepper, and nutmeg. Stir until cheese is melted and sauce is smooth.
- Combine pasta and sauce: Add drained pasta to the sauce and stir until coated. Add a splash of reserved pasta water if needed to loosen the sauce.
- Make crispy sage: In a small skillet, melt 1 tablespoon butter over medium heat. Add sage leaves in a single layer and cook for 30-60 seconds per side until bright green and crispy. Transfer to a paper towel-lined plate.
- Serve immediately: Spoon mac and cheese into bowls, top with crispy sage leaves, and enjoy hot.
Notes
Don’t skip roasting the squash—it caramelizes the natural sugars for deeper flavor. Always shred your own cheese for a smooth sauce. Reserve pasta water to thin the sauce if needed. Watch the sage closely as it can burn quickly. This mac and cheese tastes even better the next day.
Nutrition
- Serving Size: 1 serving (about 1.5
- Calories: 500
- Sugar: 8
- Sodium: 680
- Fat: 24
- Saturated Fat: 12
- Carbohydrates: 54
- Fiber: 6
- Protein: 19
Keywords: butternut squash mac and cheese, roasted squash mac and cheese, creamy mac and cheese, fall comfort food, vegetarian mac and cheese, crispy sage


