Third batch in two days, and I finally stopped overworking the dough. That was the thing, you know? I kept treating these pumpkin scones like they were biscuits—firm, confident, no-nonsense handling. But pumpkin scones are softer, more forgiving, and they practically whisper at you to be gentle. The first batch came out tough, almost rubbery. The second batch? Better, but the glaze slid right off like it had somewhere better to be. By the third, I’d figured it out. The dough barely came together before I patted it into a circle, and the maple glaze went on while the scones were still warm, soaking into every tiny crack and crevice. That’s when the magic happened.
Honestly, I wasn’t even planning to make scones. I had a half-can of pumpkin puree staring at me from the fridge after making a batch of pumpkin banana bread, and I just couldn’t let it go to waste. Scones felt right. They’re not as fussy as pie crust, not as heavy as cake, and they make your whole kitchen smell like a bakery that only opens in October. The maple glaze is what really seals the deal. It’s not overly sweet—just enough to compliment the earthy pumpkin and warm spices without shouting over them. I used real maple syrup, the good stuff, because when you’re making something this cozy, you don’t cut corners.
These scones have that perfect texture. A little craggy on the outside, soft and tender on the inside, with a crumb that practically begs for a mug of coffee. They’re not trying to be fancy. They’re just honest, comforting, and exactly what you want on a crisp fall morning when the leaves are turning and the air has that first chill. I think that’s why I kept making them. Not because they were difficult to perfect, but because each time I got a little closer to that ideal balance of spice, sweetness, and texture. And now, I’m pretty sure I’ve nailed it.
Why You’ll Love This Recipe
I’ve tested this recipe more times than I care to count, and I can say with confidence that it delivers every single time. These pumpkin scones are not your average bakery knock-off. They’re better. Here’s why you’ll fall for them too:
- Quick & Easy: From start to finish, you’re looking at about 30 minutes. No yeast, no waiting, no complicated techniques. Just mix, shape, bake, and glaze.
- Simple Ingredients: You probably have most of these in your pantry right now. Flour, butter, sugar, pumpkin puree, and a few warm spices. No fancy extracts or hard-to-find items.
- Perfect for Fall Mornings: Whether it’s a lazy Saturday or a busy weekday, these scones make any morning feel special. They’re great for brunch, coffee dates, or just treating yourself.
- Crowd-Pleaser: I brought a batch to a neighborhood potluck, and they disappeared in minutes. Kids and adults both went back for seconds. The maple glaze is the star, no question.
- Unbelievably Delicious: The texture is where these scones shine. Tender, flaky, and not at all dry. The pumpkin keeps them moist, and the maple glaze adds a subtle caramel-like sweetness that lingers.
What sets this recipe apart is the technique. Most scone recipes tell you to cut in cold butter until it looks like coarse meal, but I take it a step further. I freeze my butter and grate it directly into the flour mixture. It’s a game-changer. The tiny shards of butter create steam pockets as they bake, giving you those flaky layers you usually only get from a bakery. And the maple glaze? I whisk it by hand, adding a pinch of salt to balance the sweetness. It’s a small detail, but it makes a big difference.
These scones aren’t just good—they’re the kind that make you close your eyes after the first bite. It’s comfort food reimagined. Quicker than pie, easier than cake, and with all the soul-soothing satisfaction of your favorite fall treat. Perfect for impressing guests without the stress, or for turning a quiet morning into something memorable.
What Ingredients You Will Need
This recipe relies on simple, wholesome ingredients that work together to create something truly special. Most of these are pantry staples, so you can whip up a batch whenever the craving hits. Let’s break it down.
- All-purpose flour: 2 cups (250g). The backbone of the scone. I use unbleached flour for a slightly better texture, but bleached works just fine.
- Granulated sugar: 1/3 cup (65g). Just enough to sweeten the dough without overpowering the pumpkin.
- Baking powder: 1 tablespoon. Make sure it’s fresh—old baking powder can ruin the rise.
- Pumpkin pie spice: 2 teaspoons. You can use store-bought or make your own with cinnamon, nutmeg, ginger, and cloves. I prefer my homemade blend (it’s less clove-heavy).
- Cinnamon: 1 teaspoon. Adds warmth and depth. I recommend Ceylon cinnamon if you can find it—it’s milder and sweeter than the standard Cassia.
- Salt: 1/2 teaspoon. Don’t skip it. Salt balances the sweetness and enhances the spices.
- Cold unsalted butter: 1/2 cup (1 stick, 113g). This is crucial. Freeze it for at least 15 minutes before grating. It makes all the difference in texture.
- Pumpkin puree: 1/2 cup (120g). Not pumpkin pie filling. Make sure you’re using 100% pure pumpkin. I like Libby’s for consistency.
- Heavy cream: 1/3 cup (80ml), plus more for brushing. The fat in the cream keeps the scones tender. You can substitute whole milk, but the texture won’t be as rich.
- Vanilla extract: 1 teaspoon. Pure vanilla, not imitation. It rounds out the flavors beautifully.
- Egg: 1 large, room temperature. Helps bind the dough and adds richness.
For the Maple Glaze:
- Powdered sugar: 1 cup (120g). Sifted to avoid lumps.
- Pure maple syrup: 3 tablespoons. Grade A dark amber is my go-to for a stronger maple flavor.
- Milk or heavy cream: 1-2 tablespoons, as needed. Adjust for your desired consistency.
- Pinch of salt: Just a tiny one. Trust me on this.
That’s it. No weird ingredients, no special trips to the store. If you’re out of heavy cream, you can use whole milk, but the scones won’t be quite as tender. And if you don’t have pumpkin pie spice, just mix 1 teaspoon cinnamon, 1/2 teaspoon nutmeg, 1/4 teaspoon ginger, and a pinch of cloves. Works like a charm.
Equipment Needed
You don’t need a professional pastry kitchen to make these scones. Here’s what I use:
- Baking sheet: A standard half-sheet pan works perfectly. Line it with parchment paper for easy cleanup.
- Box grater: For grating the frozen butter. It sounds weird, but it’s the best way to get those flaky layers without overworking the dough. A food processor with a grating disc also works if you have one.
- Pastry cutter or two forks: If you don’t want to grate the butter, you can use a pastry cutter to cut it into the flour. I’ve done both, and the grating method is faster and more consistent.
- Mixing bowls: One large bowl for dry ingredients, one medium bowl for wet ingredients.
- Whisk and wooden spoon: For mixing. A rubber spatula also helps scrape the bowl clean.
- Bench scraper or sharp knife: For cutting the scone dough into wedges. A bench scraper gives you cleaner edges, which helps the scones rise evenly.
- Pastry brush: For brushing the tops with cream before baking. A silicone brush is easier to clean.
- Cooling rack: Essential for letting the scones cool properly before glazing. If you glaze them on a hot baking sheet, the glaze will just run off.
If you don’t have a box grater, you can cube the cold butter and use a pastry cutter. It takes a little longer, but the results are still great. And if you’re really in a pinch, you can even freeze the butter and chop it into tiny pieces with a sharp knife. I’ve done that too, and it works fine.
Preparation Method
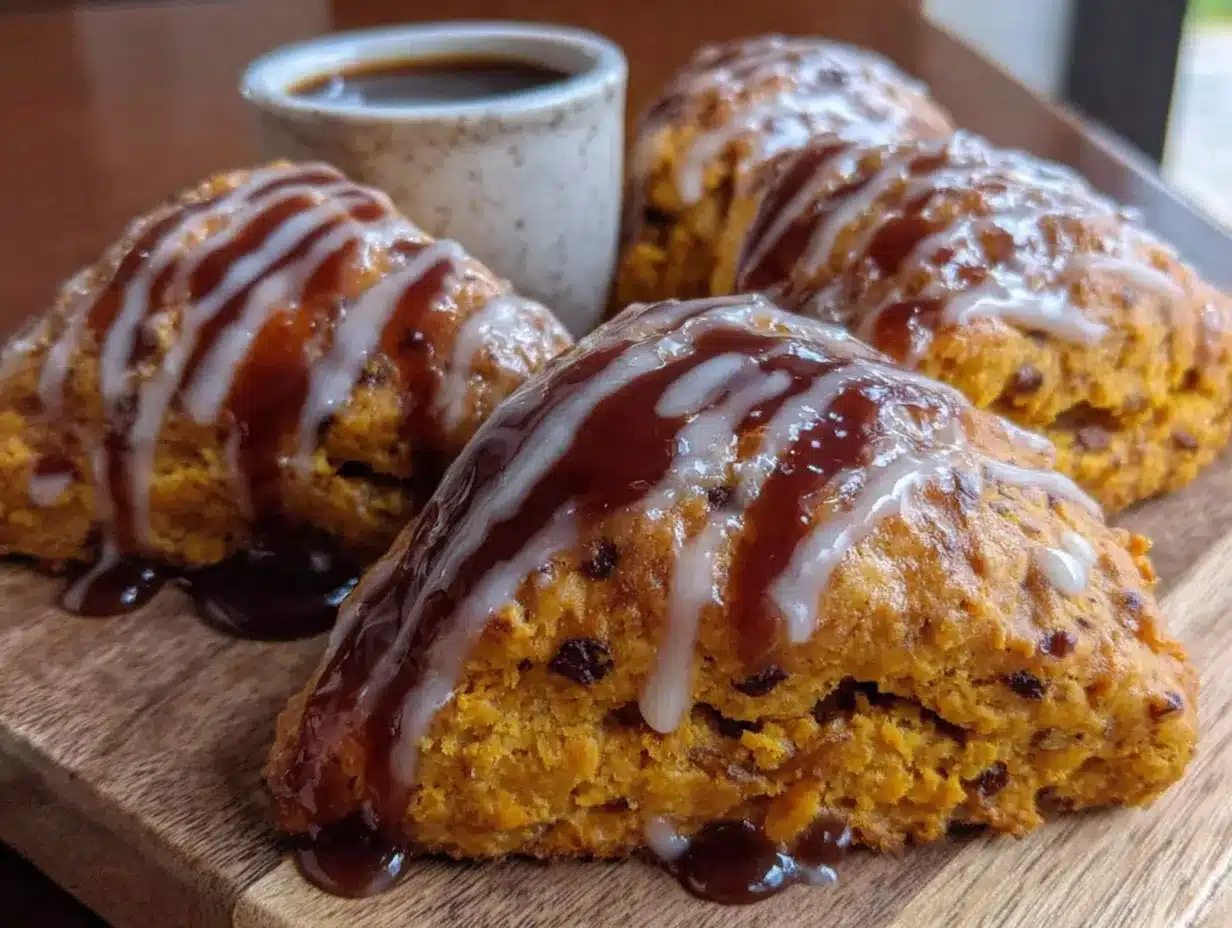
Alright, let’s get our hands dirty. This process is straightforward, but a few key steps make all the difference. Follow along, and you’ll have perfect pumpkin scones in no time.
- Preheat your oven to 400°F (200°C). Line a baking sheet with parchment paper. This is non-negotiable—parchment prevents sticking and makes cleanup a breeze.
- Freeze your butter. Cut the stick of butter into a few chunks and pop it in the freezer for at least 15 minutes. While that’s happening, measure out your dry ingredients.
- Mix the dry ingredients. In a large bowl, whisk together 2 cups of all-purpose flour, 1/3 cup of granulated sugar, 1 tablespoon of baking powder, 2 teaspoons of pumpkin pie spice, 1 teaspoon of cinnamon, and 1/2 teaspoon of salt. Make sure everything is evenly distributed.
- Grate the frozen butter. Take the butter out of the freezer and grate it using the large holes of a box grater. It will look like a pile of yellow cheese shavings. Toss the grated butter into the flour mixture and use your fingers to gently coat each piece with flour. Don’t overmix—you want visible butter pieces.
- Whisk the wet ingredients. In a separate bowl, combine 1/2 cup of pumpkin puree, 1/3 cup of heavy cream, 1 teaspoon of vanilla extract, and 1 large egg. Whisk until smooth. The mixture should be a deep orange color and smell like fall.
- Combine wet and dry. Pour the wet ingredients into the dry ingredients. Use a wooden spoon or rubber spatula to stir until just combined. The dough will look shaggy and a little dry—that’s exactly what you want. If it’s too dry to come together, add a tablespoon more cream.
- Shape the dough. Turn the dough out onto a lightly floured surface. Gently bring it together with your hands, forming a rough ball. Pat it into a circle about 3/4-inch thick. Don’t use a rolling pin—it overworks the dough and makes the scones tough.
- Cut the scones. Using a bench scraper or sharp knife, cut the circle into 8 wedges (like a pizza). Transfer the wedges to the prepared baking sheet, spacing them about 2 inches apart. They won’t spread much, but they need room to rise.
- Brush with cream. Lightly brush the tops of the scones with a little extra heavy cream. This helps them turn golden brown and gives a slight crunch to the top.
- Bake. Place the baking sheet in the preheated oven and bake for 14-16 minutes, or until the scones are golden brown on the bottom and edges. The tops should be firm to the touch. Let them cool on the baking sheet for 5 minutes, then transfer to a cooling rack.
- Make the glaze. While the scones are cooling, whisk together 1 cup of sifted powdered sugar, 3 tablespoons of pure maple syrup, and a pinch of salt. Add 1-2 tablespoons of milk or cream until you reach a pourable consistency. It should be thick enough to coat the back of a spoon but thin enough to drizzle.
- Glaze the scones. Once the scones are slightly warm (but not hot), drizzle the maple glaze over the top. A spoon works perfectly for this. Let the glaze set for about 10 minutes before serving. The warm scones will absorb some of the glaze, creating a lovely, slightly sticky top.
And that’s it. You’ve got a batch of cozy, maple-glazed pumpkin scones that taste like they came from a fancy bakery. But they came from your kitchen, which is way more satisfying.
Cooking Tips & Techniques
I’ve made enough scone mistakes to write a book. Here are the lessons I’ve learned so you don’t have to repeat them.
Don’t overwork the dough. This is the number one mistake. Scone dough should be handled as little as possible. The more you knead or mix, the more gluten develops, and the tougher your scones become. Stop mixing as soon as the dough comes together. It’s okay if it looks a little shaggy.
Keep everything cold. Cold butter is the secret to flaky scones. If the butter melts before it hits the oven, you lose those steam pockets that create layers. If your kitchen is warm, pop the shaped scones in the fridge for 10 minutes before baking. I’ve done this on hot summer days, and it makes a real difference.
Use a sharp cutter. When cutting the scones, use a clean, sharp knife or bench scraper. A dull cutter can press the edges together, preventing them from rising properly. Clean cuts = tall, even scones.
Watch the baking time. Ovens vary, so start checking at the 12-minute mark. The scones are done when the bottoms are golden brown and the tops are set. If you tap one gently, it should sound slightly hollow. Overbaking dries them out, so err on the side of underdone if you’re unsure.
Glaze while warm, not hot. If the scones are too hot, the glaze will just melt and run off. If they’re completely cool, the glaze will sit on top without soaking in. The sweet spot is about 5-10 minutes after they come out of the oven. That’s when the glaze adheres perfectly and creates that thin, crackly top.
Multitask like a pro. While the scones are baking, clean up your workspace and measure out your glaze ingredients. That way, as soon as they come out, you can whisk the glaze and have it ready to go. It makes the whole process feel effortless.
Variations & Adaptations
One of the best things about this recipe is how easy it is to adapt. Here are some of my favorite variations, all of which I’ve tested myself.
Pumpkin Chocolate Chip Scones: Fold in 1/2 cup of semi-sweet chocolate chips when you combine the wet and dry ingredients. The chocolate pairs beautifully with the pumpkin and spices. I’ve used both mini and regular chips, and both work great. Just don’t overmix—the chocolate should be evenly distributed but not melted into the dough.
Vegan Pumpkin Scones: Substitute the butter with cold vegan butter (I like Miyoko’s or Earth Balance). Use coconut cream or full-fat oat milk instead of heavy cream, and replace the egg with a flax egg (1 tablespoon ground flaxseed mixed with 3 tablespoons water, let sit for 5 minutes). The texture will be slightly less tender, but they’re still delicious. I made these for a friend with a dairy allergy, and she couldn’t tell the difference.
Gluten-Free Pumpkin Scones: Swap the all-purpose flour for a 1:1 gluten-free baking blend (I recommend Bob’s Red Mill or King Arthur). Add 1/2 teaspoon of xanthan gum if your blend doesn’t already include it. The dough will be a bit more fragile, so handle it gently. These are best eaten the same day, as they dry out faster than the regular version.
Spiced Maple Glaze: Add a pinch of cinnamon, nutmeg, or even a tiny dash of cayenne to the glaze for an extra layer of warmth. I once added a pinch of cardamom, and it was incredible. The floral notes of cardamom paired perfectly with the maple.
Savory Pumpkin Scones: Reduce the sugar to 2 tablespoons, omit the pumpkin pie spice, and add 1/2 cup of shredded sharp cheddar cheese, 2 tablespoons of chopped fresh sage, and a pinch of black pepper. Brush with cream and bake as directed. These are amazing alongside a bowl of creamy roasted tomato basil soup or a warm bowl of chili.
Serving & Storage Suggestions
These scones are best enjoyed fresh, but they store surprisingly well if you know what you’re doing.
Serving: Serve the scones slightly warm or at room temperature. The maple glaze will be slightly soft and sticky, which is exactly how it should be. I like to pair them with a hot cup of coffee, a chai latte, or even a simple cup of black tea. For an extra treat, split a scone in half and spread a little salted butter on it. The combination of sweet maple glaze and salty butter is irresistible.
Storing: Store any leftover scones in an airtight container at room temperature for up to 3 days. Place a piece of parchment paper between layers to prevent the glaze from sticking. If you live in a humid climate, the glaze might get a little sticky, but they’ll still taste great.
Freezing: You can freeze the baked, unglazed scones for up to 3 months. Wrap them individually in plastic wrap, then place them in a freezer-safe bag. When you’re ready to enjoy them, thaw at room temperature, then reheat in a 350°F oven for 5-7 minutes. Glaze after reheating for the best texture. I’ve also frozen the unbaked scones—just cut them into wedges, freeze on a baking sheet until solid, then transfer to a freezer bag. Bake from frozen, adding 2-3 minutes to the baking time.
Reheating: The microwave works in a pinch, but it can make the scones a little soft. For a crisper exterior, use a toaster oven or regular oven. I’ve even reheated them in an air fryer at 350°F for 3 minutes, and they came out perfectly.
Flavor development: Honestly, these scones are best on day one. The texture is at its peak, and the glaze is fresh and glossy. By day two, the glaze has absorbed into the scone a bit, making them softer. They’re still delicious, just different. If you want to extend the life of the glaze, store the scones in a single layer in an airtight container.
Nutritional Information & Benefits
Let’s be real—these scones are a treat. They’re not health food, but they’re made with real ingredients, and that counts for something. Here’s a rough estimate per scone (based on 8 servings):
- Calories: ~320
- Fat: 16g
- Carbohydrates: 42g
- Fiber: 1g
- Sugar: 22g
- Protein: 4g
These numbers will vary depending on the exact ingredients you use (especially if you swap in vegan butter or gluten-free flour).
On the plus side, pumpkin puree is packed with vitamin A, which is great for eye health and immune function. It’s also a good source of fiber and antioxidants. The warm spices—cinnamon, nutmeg, ginger—have anti-inflammatory properties and can help regulate blood sugar. So while these scones are definitely a dessert-adjacent breakfast, they’re not entirely without merit.
If you’re looking to lighten them up, you can reduce the sugar in the dough to 1/4 cup and use a lighter hand with the glaze. I’ve also made them with whole wheat pastry flour, which adds a bit more fiber and a nuttier flavor. They won’t be as tender, but they’re still pretty darn good.
As always, these scones contain gluten, dairy, and eggs. If you have allergies, check the variations section above for suitable substitutions.
Conclusion
These cozy pumpkin scones with maple glaze are everything I want in a fall treat. They’re quick to make, use simple ingredients, and deliver that warm, spiced comfort that makes autumn mornings so special. The texture is tender and flaky, the glaze is sweet and maple-y, and the whole thing comes together in less than an hour. Honestly, what more could you ask for?
I love how adaptable this recipe is. Whether you’re adding chocolate chips, going gluten-free, or even making a savory version, the base is solid enough to handle all kinds of twists. That’s the mark of a good recipe, in my opinion. It’s not just one thing—it’s a starting point for your own creativity.
So go ahead, make a batch. Share them with your family, your neighbors, or just keep them all for yourself (no judgment here). And when you do, I’d love to hear about it. Leave a comment below, tag me in your photos, or tell me about your favorite variation. Did you add cranberries? Try a different spice blend? I want to know. Happy baking, friends!
Frequently Asked Questions
Can I use pumpkin pie filling instead of pumpkin puree?
No, please don’t. Pumpkin pie filling is pre-sweetened and spiced, which will throw off the balance of this recipe. Stick with 100% pure pumpkin puree for the best results.
Why are my scones dry?
Dry scones usually come from overworking the dough or overbaking. Handle the dough as little as possible, and start checking for doneness at the 12-minute mark. Also, make sure you’re measuring your flour correctly—scooping directly from the bag can pack in too much flour. Use the spoon-and-level method instead.
Can I make the dough ahead of time?
Absolutely. You can shape the scones, place them on a baking sheet, and refrigerate them for up to 24 hours. Cover them loosely with plastic wrap. When you’re ready to bake, just add a couple of minutes to the baking time. You can also freeze the unbaked scones (see storage section above).
Can I use a different glaze?
Of course! A simple vanilla glaze (powdered sugar, milk, and vanilla extract) works beautifully. Or try a cream cheese glaze for a tangier twist. If you’re feeling adventurous, a brown butter glaze would be incredible with the pumpkin spice.
How do I get my scones to rise higher?
Make sure your baking powder is fresh (test it by adding a teaspoon to hot water—it should bubble vigorously). Also, handle the dough gently and cut it with a sharp knife or bench scraper. Pressing the edges together can prevent them from rising. And don’t skip the step of freezing the butter—cold butter creates steam, which helps the scones puff up.
Pin This Recipe!

Cozy Pumpkin Scones with Maple Glaze: Easy Fall Recipe
These tender, flaky pumpkin scones are topped with a sweet maple glaze and come together in about 30 minutes. Perfect for fall mornings, brunch, or a cozy treat with coffee.
- Prep Time: 15 minutes
- Cook Time: 16 minutes
- Total Time: 31 minutes
- Yield: 8 servings 1x
- Category: Breakfast
- Cuisine: American
Ingredients
- 2 cups (250g) all-purpose flour
- 1/3 cup (65g) granulated sugar
- 1 tablespoon baking powder
- 2 teaspoons pumpkin pie spice
- 1 teaspoon cinnamon
- 1/2 teaspoon salt
- 1/2 cup (1 stick, 113g) cold unsalted butter, frozen and grated
- 1/2 cup (120g) pumpkin puree (not pumpkin pie filling)
- 1/3 cup (80ml) heavy cream, plus more for brushing
- 1 teaspoon vanilla extract
- 1 large egg, room temperature
- For the Maple Glaze:
- 1 cup (120g) powdered sugar, sifted
- 3 tablespoons pure maple syrup
- 1–2 tablespoons milk or heavy cream
- Pinch of salt
Instructions
- Preheat your oven to 400°F (200°C). Line a baking sheet with parchment paper.
- Freeze the butter: Cut the stick of butter into a few chunks and freeze for at least 15 minutes.
- Mix the dry ingredients: In a large bowl, whisk together flour, sugar, baking powder, pumpkin pie spice, cinnamon, and salt.
- Grate the frozen butter using the large holes of a box grater. Toss into the flour mixture and gently coat with your fingers. Do not overmix.
- Whisk the wet ingredients: In a separate bowl, combine pumpkin puree, heavy cream, vanilla extract, and egg until smooth.
- Pour the wet ingredients into the dry ingredients. Stir with a wooden spoon or rubber spatula until just combined. The dough will be shaggy.
- Turn the dough out onto a lightly floured surface. Gently bring together into a rough ball and pat into a 3/4-inch thick circle. Do not use a rolling pin.
- Cut the circle into 8 wedges (like a pizza). Transfer to the prepared baking sheet, spacing 2 inches apart.
- Brush the tops with a little extra heavy cream.
- Bake for 14-16 minutes, until golden brown on the bottom and edges. Cool on the baking sheet for 5 minutes, then transfer to a cooling rack.
- Make the glaze: Whisk together sifted powdered sugar, maple syrup, and a pinch of salt. Add 1-2 tablespoons milk or cream until pourable.
- Drizzle the glaze over slightly warm scones. Let set for 10 minutes before serving.
Notes
Freeze the butter and grate it for flaky layers. Do not overwork the dough. Glaze while scones are slightly warm for best absorption. Store in an airtight container at room temperature for up to 3 days.
Nutrition
- Serving Size: 1 scone
- Calories: 320
- Sugar: 22
- Sodium: 280
- Fat: 16
- Saturated Fat: 10
- Carbohydrates: 42
- Fiber: 1
- Protein: 4
Keywords: pumpkin scones, maple glaze, fall recipe, easy scones, pumpkin breakfast


