My nephew, Leo, asked why I couldn’t just use the bread that was already hard instead of buying a special loaf for stuffing. I started to explain why that wouldn’t work — then stopped. He was eight, and he was holding a half-eaten piece of sourdough from three days ago that had gone rock hard on the counter. I opened my mouth to give him the whole spiel about proper bread selection for stuffing, but honestly? I had nothing. The kid had a point.
That was two Thanksgivings ago, and let me tell you, that stubborn little loaf of sourdough changed everything. I had been so caught up in the “right way” to make stuffing — the fancy bread, the perfect cube size, the exact herb ratio — that I forgot the whole point of the dish. It’s supposed to be forgiving. It’s supposed to use what you have. And it’s supposed to make everyone at the table happy, especially the kids who usually push the stuffing around their plate.
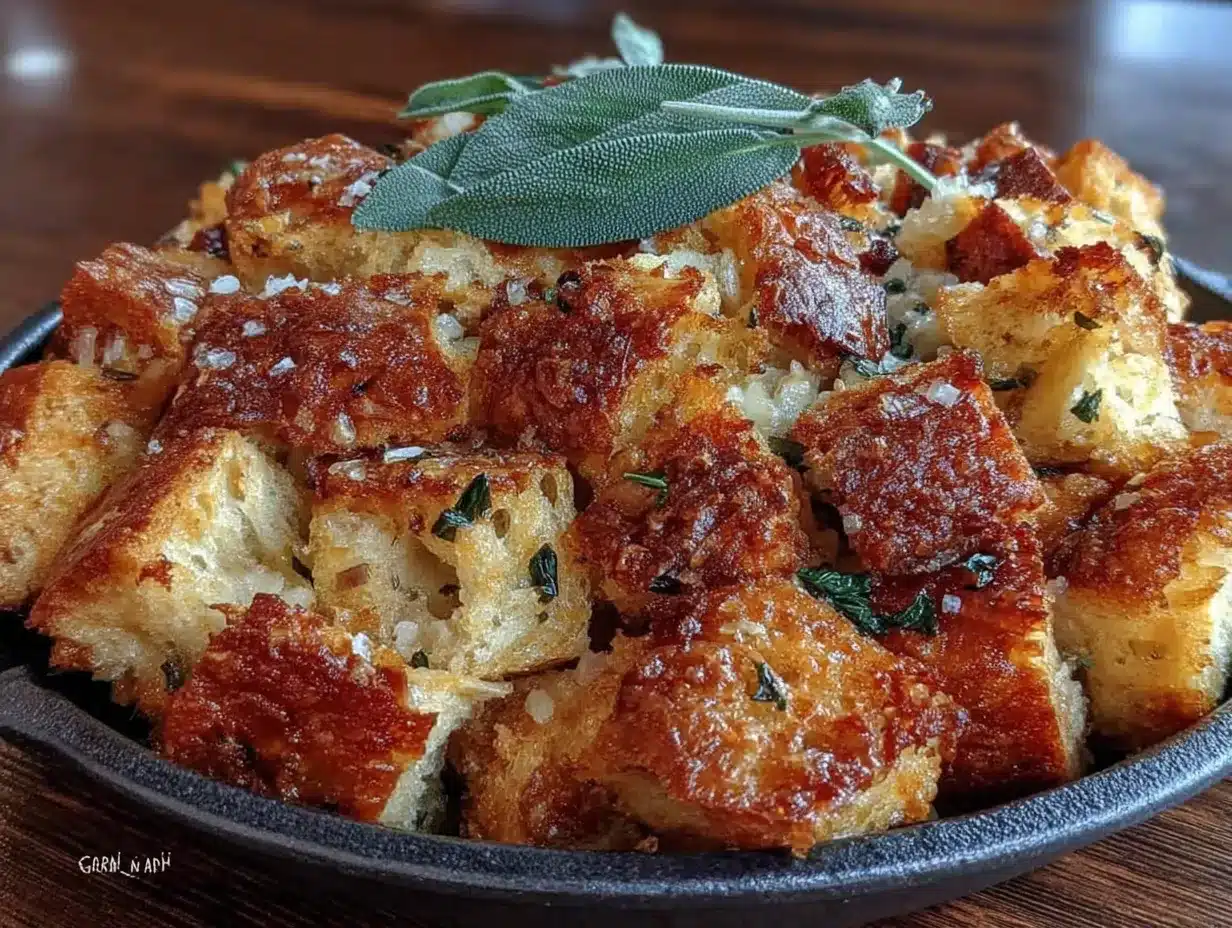
I browned the butter while Leo watched, fascinated by how the foam turned golden and smelled like toasted nuts. He insisted on adding the sage himself, which meant we had a few extra leaves in there, but you know what? That accidental extra sage might have been the best mistake I ever made. The kitchen smelled like a cozy fall dream, and when we pulled that pan out of the oven, the top was perfectly crisp, the inside was tender, and Leo actually asked for seconds. Maybe you’ve been there — watching a kid who swore they hated something go back for more. It’s a good feeling.
This brown butter sage sourdough stuffing is now our family’s go-to for every holiday and chilly Sunday dinner. It’s the kind of recipe that proves some of the best cooking happens when you stop overthinking and just listen to the eight-year-old in the room.
Why You’ll Love This Recipe
This isn’t just another stuffing recipe — it’s the one that finally gets everyone excited about the side dish. I’ve tested this version at three different family gatherings, and each time, the pan came back empty. Here’s why it works so well:
- Kid-Approved Flavor: The brown butter adds a nutty, almost caramel-like richness that even picky eaters find irresistible. My own kids, who normally skip the stuffing, now ask when I’m making “the good bread.”
- Simple Ingredients: You probably already have sourdough bread that’s a few days old, butter, sage, and basic pantry staples. No special trips to a gourmet store required.
- Budget-Friendly: Using day-old sourdough (or even the ends of loaves you’ve been saving) keeps costs low. This whole dish comes together for under $10, feeding a crowd without stretching your grocery budget.
- Perfect for Busy Holidays: You can prep this entirely the day before. Just assemble, cover, and bake when you’re ready. One less thing to stress about on the big day.
- Leftovers That Reheat Beautifully: Unlike some stuffings that turn into a soggy mess, this one stays crispy on top and tender inside, even after a day in the fridge. Just reheat in a hot oven for five minutes.
What makes this recipe different from every other stuffing you’ve tried is the brown butter technique. It sounds fancy, but honestly, it’s just butter cooked until it smells like toasted hazelnuts. That simple step adds a depth of flavor that transforms the whole dish. Plus, using sourdough gives you that perfect balance of crispy edges and soft, custardy center that regular bread just can’t match.
This stuffing is the kind of dish that makes you close your eyes after the first bite. It’s comfort food at its finest — warm, savory, and full of that homemade love that makes holidays feel special without breaking the bank.
What Ingredients You Will Need
This recipe uses simple, wholesome ingredients to deliver bold flavor and satisfying texture without the fuss. Most of these are pantry staples, and the ones that aren’t are easy to find at any grocery store.
For the Stuffing Base
- 1 large loaf (about 1 pound or 450g) day-old sourdough bread — cut into 1-inch cubes. I prefer a crusty artisan loaf from the bakery section. The drier the bread, the better it absorbs the broth without turning mushy. If your bread is still soft, spread the cubes on a baking sheet and toast at 300°F for 10 minutes.
- 1/2 cup (1 stick or 113g) unsalted butter — for browning. Use a good quality butter here since it’s the star of the show. I like Kerrygold for its rich flavor.
- 1 large yellow onion (about 200g) — diced. Yellow onions have the right balance of sweetness and savory flavor for stuffing.
- 3 celery stalks (about 150g) — diced small. Celery adds that classic stuffing crunch and freshness.
- 3 cloves garlic — minced. Fresh garlic is non-negotiable here; the jarred stuff just won’t give you the same punch.
- 1/4 cup (about 8g) fresh sage leaves — roughly chopped. Fresh sage is key for that earthy, slightly peppery flavor. Dried sage works in a pinch, but use only 1 tablespoon and add it with the broth.
- 2 teaspoons fresh thyme leaves — or 1 teaspoon dried thyme.
- 1 1/2 cups (360ml) low-sodium chicken or vegetable broth — warmed. Low-sodium lets you control the salt level. I prefer chicken broth for richer flavor, but vegetable broth works beautifully for a vegetarian version.
- 2 large eggs — lightly beaten. Eggs help bind the stuffing and give it that soft, custardy texture inside.
- 1/2 teaspoon salt — plus more to taste. I use fine sea salt.
- 1/4 teaspoon black pepper — freshly ground.
Optional Add-Ins
- 1/2 cup (60g) dried cranberries — for a touch of sweetness that kids love. My nephew insists on these.
- 1/2 cup (60g) chopped pecans or walnuts — toasted for extra crunch. Leave these out if serving very young children.
- 1 cup (150g) cooked and crumbled Italian sausage or bacon — for a heartier, non-vegetarian version.
Ingredient Note: For the best texture, make sure your sourdough is at least 2-3 days old. If you’re planning ahead, cube the bread and leave it out on a baking sheet overnight to dry out completely. This step makes a huge difference in how well the stuffing holds together.
Equipment Needed
You don’t need a fancy kitchen to make this stuffing. Here’s what you’ll need:
- Large skillet or sauté pan — for browning the butter and cooking the vegetables. A light-colored pan helps you see when the butter turns golden. I use my trusty stainless steel pan, but non-stick works fine too.
- 9×13-inch (3-quart) baking dish — for baking the stuffing. A ceramic or glass dish works best for even heat distribution.
- Large mixing bowl — for combining all the ingredients. You need room to toss everything together without spilling.
- Sharp knife and cutting board — for dicing the vegetables and chopping the sage.
- Wooden spoon or silicone spatula — for stirring the butter as it browns.
- Measuring cups and spoons — for accuracy, though this recipe is forgiving if you eyebit a little.
If you don’t have a 9×13 dish, you can use a 10-inch cast iron skillet or even a disposable aluminum pan for easy cleanup. I’ve made this in a round casserole dish before, and it worked just fine — just check for doneness a few minutes earlier since the depth might be different.
Preparation Method
- Preheat your oven to 375°F (190°C). If you’re using fresh bread cubes, spread them on a baking sheet and toast for 8-10 minutes until dry and slightly golden. Skip this step if your bread is already stale.
- Brown the butter. Place the 1/2 cup butter in a large skillet over medium heat. Let it melt completely, then continue cooking, swirling the pan occasionally. After about 4-5 minutes, the butter will start to foam and turn golden. Watch carefully — once you see brown specks forming at the bottom and it smells nutty, remove it from the heat immediately. This happens fast! Pour the browned butter into a heat-safe bowl, leaving the browned bits in the pan. Don’t scrape those bits out — they’re flavor gold.
- Cook the vegetables. Return the skillet to medium heat with about 2 tablespoons of the browned butter (or use olive oil). Add the diced onion and celery, and cook for 6-8 minutes until softened and translucent. Add the minced garlic and cook for 1 more minute until fragrant. Season with a pinch of salt and pepper.
- Combine the base ingredients. In your large mixing bowl, combine the dried bread cubes, cooked vegetables, chopped sage, and thyme. Toss gently to distribute everything evenly.
- Make the custard mixture. In a separate small bowl or measuring cup, whisk together the warmed broth, beaten eggs, remaining browned butter, 1/2 teaspoon salt, and 1/4 teaspoon pepper. Make sure the broth is warm (not hot) so it doesn’t scramble the eggs when you combine them.
- Assemble the stuffing. Pour the broth mixture evenly over the bread cube mixture. Use a large spoon or your hands (clean, of course!) to gently toss until all the bread is coated. Let it sit for 5-10 minutes so the bread can absorb the liquid. The mixture should look moist but not soupy — if it seems dry, add another 1/4 cup of broth.
- Transfer to baking dish. Grease your 9×13 baking dish with butter or non-stick spray. Spread the stuffing mixture evenly in the dish. Don’t press it down — you want some air pockets for crispy edges.
- Bake uncovered for 35-40 minutes, until the top is golden brown and crispy. For extra crunch, broil for 2-3 minutes at the end, watching carefully so it doesn’t burn.
- Rest before serving. Let the stuffing sit for 5-10 minutes after baking. This helps it set and makes serving easier. The top will be beautifully crisp, and the inside will be soft and tender.
Pro tip: If you’re making this ahead, stop after step 6. Cover the assembled stuffing and refrigerate for up to 24 hours. When ready to bake, add 10-15 minutes to the baking time since you’re starting from cold.
Cooking Tips & Techniques
I’ve made this stuffing at least a dozen times, and I’ve learned a few things the hard way. Here are my best tips to make sure yours turns out perfect every time:
Don’t rush the brown butter. The first time I tried this, I walked away to chop vegetables and came back to burnt butter. It goes from golden to black in seconds. Stay at the stove, swirl the pan, and trust your nose. When it smells like toasted almonds, you’re there.
Use warm broth. Cold broth will shock the melted butter and make it clump. More importantly, warm liquid helps the bread absorb faster and more evenly. I microwave my broth for about 45 seconds before adding it to the egg mixture.
Let the bread rest after adding liquid. This was the biggest game-changer for me. If you bake the stuffing right after adding the broth, the bread hasn’t had time to absorb everything, and you end up with a soggy bottom. Give it at least 5 minutes — I often let it sit for 15 while I clean up the kitchen.
Taste before baking. The bread won’t be fully saturated, but you can grab a small piece and taste it for seasoning. This is your last chance to add salt or pepper. I forgot this step once and ended up with bland stuffing — never again.
For extra crispy top, don’t cover it. Some recipes call for covering with foil to keep the stuffing moist. Don’t do that here. The whole point of the sourdough is those crunchy edges. If the top is browning too fast, tent loosely with foil for the last 10 minutes.
Multitask wisely. While the vegetables are cooking, cube your bread if you haven’t already. While the stuffing rests after adding broth, grease your baking dish and preheat the oven. A little planning makes the whole process feel effortless.
Variations & Adaptations
One of the best things about this stuffing is how flexible it is. Here are some ways to make it your own:
Dietary Variations
- Gluten-Free: Use a good quality gluten-free sourdough. I’ve tried this with Against the Grain brand, and it works beautifully. Just make sure the bread is extra dry since gluten-free bread tends to be more delicate.
- Vegetarian/Vegan: Use vegetable broth and substitute the butter with a high-quality vegan butter (Miyoko’s is my favorite for browning). Omit the eggs and add an extra 1/4 cup of broth — the stuffing will be a bit looser but still delicious.
- Dairy-Free: Use olive oil or a plant-based butter in place of regular butter. The nutty flavor won’t be quite the same, but adding a tablespoon of nutritional yeast can help mimic that savory depth.
Flavor Twists
- Apple & Sage: Add 1 diced apple (I like Honeycrisp or Granny Smith) to the vegetables as they cook. The sweetness pairs perfectly with the brown butter and sage. My kids love this version.
- Sausage Stuffing: Brown 1/2 pound of Italian sausage in the skillet before cooking the vegetables. Remove the sausage, then proceed with the recipe, adding the cooked sausage back in when you combine everything.
- Mushroom & Thyme: Sauté 8 ounces of sliced cremini mushrooms with the onions and celery. The earthy flavor adds a lovely depth that adults especially appreciate.
Seasonal Adaptations
- Fall: Add roasted butternut squash cubes and dried cranberries for a festive twist.
- Winter: Use rosemary instead of sage for a more piney, wintery flavor profile.
- Spring: Swap the sage for fresh dill and add 1 cup of chopped asparagus that’s been blanched for 2 minutes.
I once made a version with leftover Thanksgiving turkey mixed in, and it turned into the best post-holiday lunch. Don’t be afraid to experiment — this recipe is forgiving like that.
Serving & Storage Suggestions
This stuffing is best served warm, straight from the oven, when the top is still crispy and the inside is steamy and tender. Here’s how to make the most of it:
Serving: Spoon the stuffing into a warm serving bowl or serve directly from the baking dish — it looks rustic and inviting either way. Garnish with a few fresh sage leaves for a pop of color. This stuffing pairs beautifully with roasted chicken, turkey, pork chops, or even a simple roast vegetable platter. For a complete holiday meal, serve alongside creamy mashed potatoes, green bean casserole, and warm dinner rolls.
Temperature: Serve hot, but let it rest for 5-10 minutes after baking so it holds its shape. If you’re serving a crowd, keep it warm in a 200°F oven for up to 30 minutes, loosely covered with foil.
Storage: Leftover stuffing keeps well in the refrigerator for up to 4 days. Store it in an airtight container or cover the baking dish tightly with foil. The flavors actually meld and deepen overnight, so leftovers might taste even better the next day.
Reheating: For best results, reheat in a 350°F oven for 10-15 minutes, uncovered, to restore the crispy top. The microwave works in a pinch, but it will make the stuffing soft all the way through — still tasty, just not as textured. I actually prefer the microwave for quick lunches, but for a dinner side dish, the oven is worth the extra minutes.
Freezing: You can freeze this stuffing for up to 3 months. Assemble it completely but don’t bake it. Wrap the dish tightly in plastic wrap, then foil. To bake from frozen, thaw overnight in the fridge, then bake as directed, adding 10-15 minutes to the time. I’ve done this for Christmas when I wanted to prep everything ahead, and it worked like a charm.
Nutritional Information & Benefits
This stuffing is comfort food, but it does have some redeeming qualities. Here’s a rough estimate per serving (based on 10 servings):
| Nutrient | Amount per Serving |
|---|---|
| Calories | 285 |
| Total Fat | 14g |
| Saturated Fat | 8g |
| Cholesterol | 65mg |
| Sodium | 520mg |
| Total Carbohydrates | 32g |
| Dietary Fiber | 2g |
| Sugars | 3g |
| Protein | 7g |
Health Highlights: Sourdough bread is naturally fermented, which makes it easier to digest than regular bread for some people. The fermentation process also lowers the bread’s glycemic index, meaning it won’t spike your blood sugar as much. Sage is packed with antioxidants and has anti-inflammatory properties — so that sprinkle of fresh herbs is doing more than just adding flavor. Brown butter, while indulgent, contains butyrate, a fatty acid that supports gut health. Of course, this is still a treat, but it’s nice to know there are a few good-for-you elements tucked in there.
Dietary Considerations: This recipe contains gluten, dairy, and eggs. For gluten-free or dairy-free options, see the variations section above. It’s naturally nut-free (unless you add the optional pecans) and can be made vegetarian with vegetable broth.
Conclusion
This brown butter sage sourdough stuffing is more than just a side dish — it’s the kind of recipe that brings people together around the table. It started with an eight-year-old’s simple question and turned into our family’s most requested holiday dish. The nutty richness of the brown butter, the earthy warmth of the sage, and the perfect crunch of the sourdough create something that feels both special and familiar.
What I love most about this recipe is how approachable it is. You don’t need to be a professional chef or spend hours in the kitchen. It’s forgiving, flexible, and genuinely hard to mess up. Whether you’re making it for Thanksgiving, Christmas, or just a cozy Sunday dinner, I promise it will earn a permanent spot in your recipe rotation.
I’d love to hear how yours turns out! Did you add any fun twists? Did the kids go back for seconds? Drop a comment below and share your version — I read every single one, and your ideas might inspire someone else’s dinner table. Happy cooking, friends!
Frequently Asked Questions
Can I use regular bread instead of sourdough?
Absolutely! While sourdough gives the best texture and tangy flavor, any sturdy bread will work. French bread, ciabatta, or even a good quality white bread are great substitutes. Just make sure it’s a few days old and dry. Avoid soft sandwich bread — it will turn mushy.
How far ahead can I make this stuffing?
You can assemble the stuffing completely (through step 6) up to 24 hours in advance. Cover and refrigerate, then bake when ready, adding 10-15 minutes to the baking time. You can also bake it fully, then reheat in a 350°F oven for 15 minutes before serving.
My stuffing came out dry. What went wrong?
Most likely, the bread was too dry or you didn’t add enough broth. Next time, make sure your broth is warm and let the bread sit for a full 10 minutes after adding the liquid. If it still looks dry after resting, add another 1/4 cup of broth. Also, check your oven temperature — an oven that runs hot can dry out the stuffing before it’s fully heated through.
Can I make this stuffing in a slow cooker?
Yes, but the texture will be softer since you won’t get the crispy top. Prepare the stuffing as directed through step 6, then transfer to a greased slow cooker. Cook on low for 3-4 hours or on high for 1.5-2 hours. For a crispy top, transfer to a baking dish and broil for 3-4 minutes before serving.
How do I make this stuffing more kid-friendly?
My best advice is to let the kids help make it! My nephew loved browning the butter and adding the sage. You can also add a handful of dried cranberries or a diced apple for sweetness. If your kids are extra picky, blend the cooked onions and celery into the broth before adding — they’ll get all the flavor without the visible chunks. And don’t skip the crispy top — that’s usually what wins them over!
Pin This Recipe!

The Best Brown Butter Sage Sourdough Stuffing

This brown butter sage sourdough stuffing is a family favorite that combines nutty browned butter, earthy sage, and crispy sourdough for a perfect holiday side dish. It’s forgiving, flexible, and kid-approved.
- Prep Time: 20 minutes
- Cook Time: 40 minutes
- Total Time: 1 hour
- Yield: 10 servings 1x
- Category: Side Dish
- Cuisine: American
Ingredients
- 1 large loaf (about 1 pound or 450g) day-old sourdough bread, cut into 1-inch cubes
- 1/2 cup (1 stick or 113g) unsalted butter
- 1 large yellow onion (about 200g), diced
- 3 celery stalks (about 150g), diced small
- 3 cloves garlic, minced
- 1/4 cup (about 8g) fresh sage leaves, roughly chopped
- 2 teaspoons fresh thyme leaves (or 1 teaspoon dried thyme)
- 1 1/2 cups (360ml) low-sodium chicken or vegetable broth, warmed
- 2 large eggs, lightly beaten
- 1/2 teaspoon salt (fine sea salt), plus more to taste
- 1/4 teaspoon black pepper, freshly ground
- 1/2 cup (60g) dried cranberries (optional)
- 1/2 cup (60g) chopped pecans or walnuts, toasted (optional)
- 1 cup (150g) cooked and crumbled Italian sausage or bacon (optional)
Instructions
- Preheat your oven to 375°F (190°C). If using fresh bread cubes, spread them on a baking sheet and toast for 8-10 minutes until dry and slightly golden. Skip if bread is already stale.
- Brown the butter: Place 1/2 cup butter in a large skillet over medium heat. Let it melt completely, then continue cooking, swirling occasionally. After about 4-5 minutes, the butter will foam and turn golden. Once you see brown specks and it smells nutty, remove from heat immediately. Pour browned butter into a heat-safe bowl, leaving the browned bits in the pan.
- Cook the vegetables: Return the skillet to medium heat with about 2 tablespoons of the browned butter (or use olive oil). Add diced onion and celery, cook for 6-8 minutes until softened. Add minced garlic and cook for 1 more minute. Season with a pinch of salt and pepper.
- Combine base ingredients: In a large mixing bowl, combine dried bread cubes, cooked vegetables, chopped sage, and thyme. Toss gently.
- Make the custard mixture: In a separate bowl, whisk together warmed broth, beaten eggs, remaining browned butter, 1/2 teaspoon salt, and 1/4 teaspoon pepper. Ensure broth is warm (not hot) to avoid scrambling the eggs.
- Assemble the stuffing: Pour broth mixture over bread cube mixture. Gently toss until all bread is coated. Let sit for 5-10 minutes so bread absorbs liquid. Mixture should be moist but not soupy; if dry, add another 1/4 cup broth.
- Transfer to baking dish: Grease a 9×13-inch baking dish with butter or non-stick spray. Spread stuffing evenly; do not press down.
- Bake uncovered for 35-40 minutes until top is golden brown and crispy. For extra crunch, broil for 2-3 minutes at the end, watching carefully.
- Rest before serving: Let stuffing sit for 5-10 minutes after baking. Top will be crisp, inside soft and tender.
Notes
For best texture, use sourdough that is 2-3 days old. If bread is still soft, cube and toast at 300°F for 10 minutes. You can assemble the stuffing up to 24 hours in advance; refrigerate and add 10-15 minutes to baking time. For extra crispy top, do not cover while baking. Leftovers keep for up to 4 days in the refrigerator and reheat well in a 350°F oven for 10-15 minutes.
Nutrition
- Serving Size: 1 serving (about 1/1
- Calories: 285
- Sugar: 3
- Sodium: 520
- Fat: 14
- Saturated Fat: 8
- Carbohydrates: 32
- Fiber: 2
- Protein: 7
Keywords: brown butter, sage, sourdough, stuffing, Thanksgiving, holiday, side dish, easy, kid-friendly


