Third Sunday in a row, and I finally stopped burning my fingers. The first batch, I used full-sized hot dogs and wondered why everyone was juggling their plates like hot potatoes. The second batch, I got the chili right but the cheese slid off like a bad toupee in a windstorm. But this time—this time, I cut the dogs into bite-sized coins, nestled them into a mini muffin tin, and everything clicked. My friend Dave actually paused mid-replay to ask, “Did you cater this from somewhere?” I just smiled. These perfect football Sunday chili cheese dog bites were finally mine, and honestly, I don’t know why it took me three tries to get there. There’s something about that first crunch of the toasted bun cup, the snap of the beef, and that gooey, stretchy cheese pull that makes you forget you’re eating something you could technically call “a snack.” It’s a tiny, handheld touchdown.
I started making these because I got tired of the same old wings and nachos. Everyone brings those, right? But these little guys? They disappear. People hover around the tray. I’ve seen grown adults do a subtle sidestep to get the last one. They’re messy in the best way—the kind of messy that means you’re having a good time. And the best part? You can prep almost everything ahead of time, so when the game starts, you’re not stuck in the kitchen. You’re on the couch, yelling at the ref, with a plate of these in your lap. That’s the dream, isn’t it?
Why You’ll Love This Recipe
Let’s be real for a second. Game day food needs to hit three notes: it needs to be easy to eat while holding a drink, it needs to be satisfying, and it needs to actually taste like something. These chili cheese dog bites check every box. I’ve tested this version more times than I care to admit, tweaking the chili consistency so it doesn’t make the buns soggy, and finding the perfect cheese that melts without turning into an oil slick. This is the one.
- Quick & Easy: You’ll have these on the table in about 30 minutes flat. Perfect for when the pregame show is wrapping up and you realize you have nothing out yet.
- Simple Ingredients: No weird specialty items. Hot dogs, cheese, canned chili (or homemade!), and some slider buns. You probably have most of this in your kitchen right now.
- Perfect for Game Day: They’re the ultimate finger food for football Sunday, but honestly? They work for any party, potluck, or even a fun weeknight dinner.
- Crowd-Pleaser: Kids love them, adults love them, and they always get that “who made these?” reaction. I’ve never seen a plate come back with leftovers.
- Unbelievably Delicious: The combination of the slightly toasted bun, the juicy hot dog, the savory chili, and the melted cheese is just pure comfort food magic.
What makes this recipe different from the rest? It’s the method. Instead of just piling chili on a hot dog and hoping for the best, we’re using a mini muffin pan to create little edible cups. This means every bite has the perfect ratio of bun, dog, chili, and cheese. No more struggling with a hot dog that’s too long for the bun, or chili that drips down your arm. These are engineered for maximum deliciousness and minimum mess. And honestly, that’s the kind of innovation I can get behind on a lazy Sunday.
What Ingredients You Will Need
This recipe uses simple, everyday ingredients to deliver big, bold flavor. You can really taste each component, so using good quality items makes a difference. Here’s what you’ll need to grab:
- For the Bites:
- 1 package (8-count) of slider buns or 12-count package of Hawaiian sweet rolls: These are the perfect size for bite-sized cups. I prefer the sweet rolls for a little contrast with the savory chili, but classic slider buns work great too. If you use the Hawaiian rolls, keep them connected in a block; it makes them easier to press into the muffin tin.
- 8-12 beef hot dogs: Use your favorite brand. I like a good all-beef dog with a nice snap. You’ll be cutting them into coins, about 4-5 per dog depending on size. (Use 8 dogs for 8 sliders, or 12 for a 12-count muffin tin).
- 1 (15-ounce) can of your favorite chili (or about 2 cups of homemade): No beans or with beans, it’s totally up to you. I’m partial to a no-bean chili for these because it’s a bit more meaty and thick. If you’re feeling ambitious, you can use a cozy slow cooker Tuscan white bean chicken soup recipe for inspiration, but for these bites, a classic beef chili is the way to go.
- 1 ½ cups shredded sharp cheddar cheese: Don’t buy the pre-shredded stuff if you can help it. It has anti-caking agents that stop it from melting smoothly. Shredding a block of sharp cheddar yourself is a game-changer for that perfect, gooey melt.
- 2 tablespoons melted butter: For brushing the tops of the buns. It helps them get golden and crispy.
- Optional Toppings: Sliced jalapeños, diced white onion, sour cream, a drizzle of ketchup or mustard, fresh chives. These are for after they come out of the oven and make them look restaurant-worthy.
Ingredient Selection Tips: For the best texture, look for hot dogs that are plump and juicy. Avoid the super skinny ones as they can get lost in the bun cup. For the chili, if you’re using canned, I recommend Wolf Brand or Hormel with no beans for a thicker consistency. If you’re making your own, make sure it’s not too watery; a thick chili is key to keeping the bun from getting soggy.
Equipment Needed
You don’t need a ton of fancy gadgets for this recipe, which is part of its beauty. Here’s what you’ll want to have on hand:
- Standard 12-cup muffin tin: This is non-negotiable. It’s what creates the little bun cups. A mini muffin tin would make them too small, and a jumbo one would make them too big. A standard one is perfect.
- A small rolling pin or a flat-bottomed glass: You’ll use this to gently flatten the slider buns or rolls so they fit easily into the muffin cups. A wine bottle works in a pinch.
- A sharp knife and cutting board: For slicing the hot dogs into coins and dicing any toppings.
- A small saucepan or skillet: To warm up the chili before spooning it into the buns. This ensures everything is hot and bubbly at the same time.
- A pastry brush: For brushing the melted butter onto the bun tops. You can use a paper towel in a pinch, but a brush is much more even.
Personal Note: I’ve made these in a cheap, non-stick muffin tin and a high-end one. The cheap one worked fine, but I did have to spray it with a little more non-stick spray. The high-end one released the buns like a dream. If you’re worried about sticking, don’t skip the non-stick spray!
Preparation Method
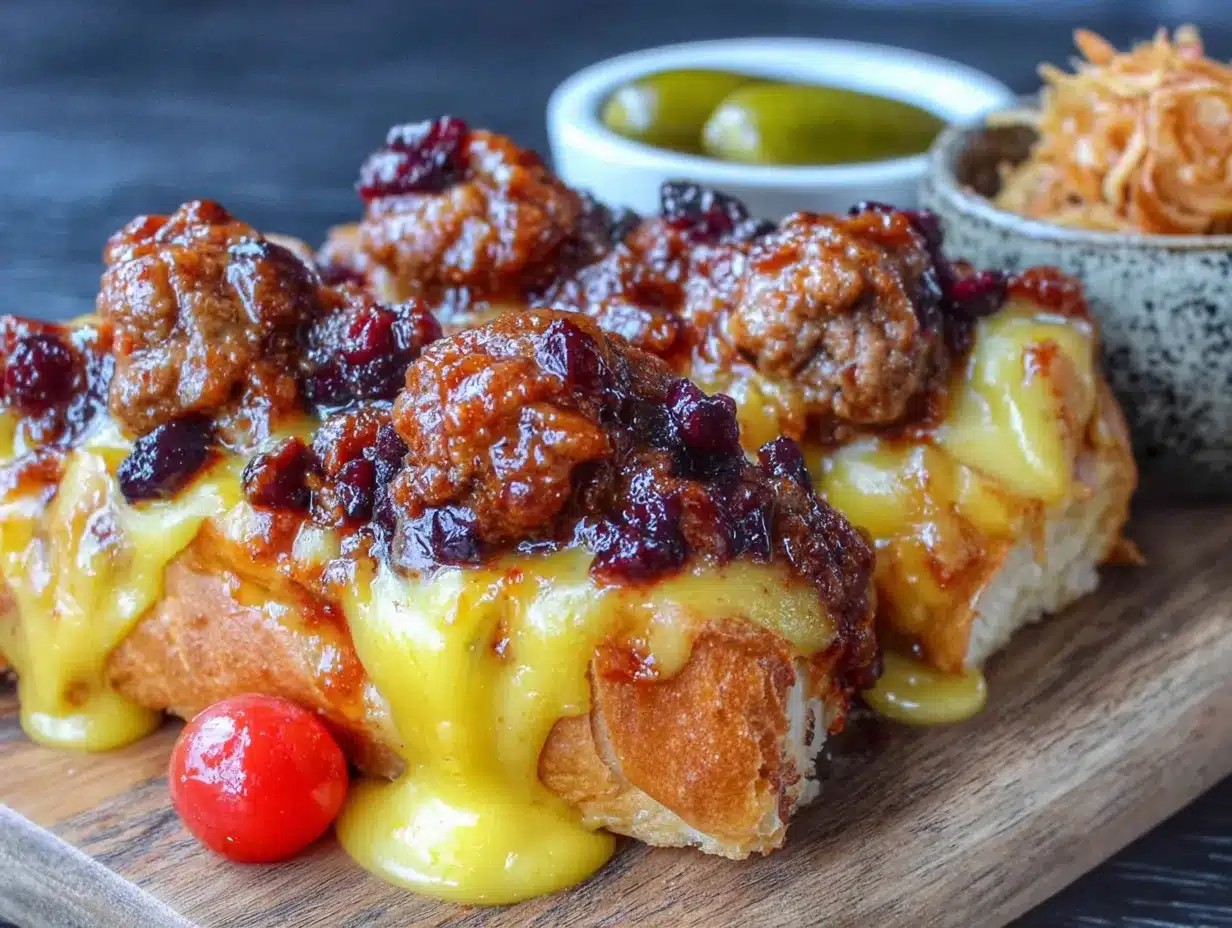
Alright, let’s get down to business. Follow these steps, and you’ll be a hero by the first commercial break.
- Preheat and Prep: Preheat your oven to 375°F (190°C). Generously spray a standard 12-cup muffin tin with non-stick cooking spray. Don’t be shy here; this is your insurance policy against sticking.
- Prepare the Buns: If you’re using a block of 12 Hawaiian sweet rolls, keep them connected. If using 8 slider buns, separate them. Using a rolling pin or the bottom of a glass, gently flatten each bun or roll until it’s about ¼-inch thick. You’re not trying to pulverize it, just flatten it enough so it fits nicely into the muffin cup. The goal is to create a little bowl.
- Form the Cups: Press each flattened bun into a prepared muffin cup. Gently push the center down to the bottom of the cup, forming a small well. The edges should come up the sides of the cup. Don’t worry if they look a little ragged; they’ll puff up beautifully in the oven.
- Toast the Buns: Place the muffin tin in the preheated oven and bake for 5-7 minutes, or until the buns are just lightly golden and slightly set. This step is crucial—it toasts the inside of the bun cup and creates a barrier that prevents the chili from making it soggy later. Remove from the oven and let them cool for a minute in the pan.
- Slice the Hot Dogs: While the buns are toasting, slice your hot dogs into bite-sized coins. For a standard hot dog, I usually get about 4-5 coins. You want them to be about ½-inch thick. You’ll need about 3-4 coins per bun cup.
- Warm the Chili: In a small saucepan over medium heat, warm your chili until it’s hot and bubbly. You can also do this in the microwave in a microwave-safe bowl. You want it hot so it doesn’t cool down the rest of the ingredients.
- Assemble the Bites: Now for the fun part. Place 3-4 hot dog coins into each toasted bun cup. Spoon about 2 tablespoons of warm chili over the hot dogs. Top generously with shredded cheddar cheese. Don’t be stingy—this is the glue that holds everything together!
- Bake Until Bubbly: Return the muffin tin to the oven and bake for another 10-12 minutes, or until the cheese is fully melted, bubbly, and starting to brown in spots. The edges of the buns should be a deep golden brown.
- Cool and Garnish: Let the chili cheese dog bites cool in the pan for about 5 minutes. This is important! They need to set up a little so they don’t fall apart when you remove them. Use a small offset spatula or a butter knife to gently lift them out of the pan. Place them on a serving platter.
- Top and Serve: While they’re still warm, add your favorite toppings. I love a few slices of fresh jalapeño, a sprinkle of diced white onion, and a tiny dollop of sour cream. Serve immediately and watch them disappear.
Sensory Cue: When they come out of the oven, you should hear a slight sizzle from the cheese. The buns will be a beautiful, deep golden brown, and the cheese will be bubbly and slightly crisp at the edges. The smell is intoxicating—toasted bread, savory chili, and melted cheese.
Cooking Tips & Techniques
I’ve made a lot of mistakes so you don’t have to. Here are the things I’ve learned the hard way.
- The Soggy Bottom Problem: This is the #1 issue with these bites. The solution is twofold: first, toast the buns before adding the filling. This creates a barrier. Second, don’t overfill with chili. Two tablespoons is plenty. Too much liquid will inevitably make the bun cup soggy.
- Cheese Selection: I’ve tried pre-shredded cheese, and it just doesn’t melt the same. It gets greasy and doesn’t have that beautiful, stretchy pull. Shred your own block of sharp cheddar. It takes two minutes and makes a world of difference. You can also mix in a little Monterey Jack for extra meltiness.
- Hot Dog Sizing: Don’t use the jumbo “ball park” style hot dogs for this. They’re too thick and the coins are too big for the bun cups. Stick to standard-sized hot dogs. The snap of a good all-beef dog is what you’re after.
- Make Ahead Tip: You can assemble the bites completely (including the chili and cheese) up to 2 hours ahead of time. Keep them in the muffin tin in the fridge, and then just pop them in the oven when you’re ready. You might need to add 2-3 minutes to the final baking time.
- Don’t Skip the Cooling Step: I know you’re hungry. I know the game is on. But letting them cool in the pan for 5 minutes is non-negotiable. They need that time to set up, or they’ll fall apart the second you try to pick them up. Patience, my friend.
A Personal Failure: The first time I made these, I used a super watery chili and didn’t toast the buns. The result was a soggy, sad mess that collapsed into a pile of mush. It was a great learning experience. Now, I always make sure my chili is thick and I never skip the toasting step. Trust me on this one.
Variations & Adaptations
This recipe is a fantastic base for all kinds of fun variations. Here are a few ways to change it up.
- Spicy Fiesta: Use spicy jalapeño cheddar cheese and add a few dashes of hot sauce to the chili. Top with pickled jalapeños and a drizzle of crema. This is my personal favorite when I want a little kick.
- Loaded Nacho Style: After baking, top the bites with a dollop of sour cream, some diced tomatoes, sliced black olives, and a sprinkle of fresh cilantro. It turns them into a little handheld nacho experience.
- Bacon Cheeseburger Twist: Swap the hot dog coins for small, pre-cooked meatballs (homemade or frozen). Use a beefy chili and top with crumbled cooked bacon and a slice of American cheese. It tastes just like a bacon cheeseburger!
- Vegetarian Option: Use vegetarian hot dogs or even vegan sausages. Make sure your chili is vegetarian-friendly as well. The rest of the recipe stays the same, and it’s just as satisfying.
- Different Cheese: Don’t be afraid to experiment with the cheese. Pepper jack adds heat, smoked gouda adds a deep, smoky flavor, and a Mexican blend is always a good choice. I once tried it with a sharp white cheddar and it was incredible.
Personal Variation I’ve Tried: I made a “Chicago Dog” version once. I used a poppy seed bun, an all-beef dog, and topped the chili-cheese mixture with a diced pickle spear, a sprinkle of celery salt, and a couple of sport peppers. It was a total mess and absolutely delicious. Not for the faint of heart!
Serving & Storage Suggestions
These are best served hot, right out of the oven. The cheese pull is at its peak, and the buns are perfectly crispy.
Serving Ideas: Arrange them on a large platter with small bowls of extra toppings on the side—sour cream, diced onions, jalapeños, and hot sauce. They pair perfectly with other game day classics like flavorful buffalo chicken dip stuffed mini peppers or a big bowl of creamy crockpot white chicken chili. For drinks, a cold beer is the classic choice, but a crisp lemonade or a spicy Bloody Mary works wonderfully too.
Storage Instructions: If you have any leftovers (a big if!), store them in an airtight container in the refrigerator for up to 3 days. The buns will soften a bit from the moisture, but they’re still delicious.
Reheating Tips: The best way to reheat them is in the oven or an air fryer. Preheat your oven to 350°F (175°C) and bake them on a baking sheet for 5-7 minutes, or until heated through and the cheese is bubbly again. You can also microwave them, but the buns will be much softer. If you’re in a rush, the microwave works, but the oven is better for texture.
Flavor Development: Honestly, these are best the day they are made. The magic is in that fresh, crispy bun and gooey cheese. However, the flavors do meld together nicely overnight, and they make a fantastic, if slightly softer, leftover lunch the next day.
Nutritional Information & Benefits
Let’s be honest: these are a treat, not a health food. But knowing what’s in them is always good. Here’s an approximate breakdown per bite (based on using standard ingredients, not including optional toppings):
| Nutrient | Amount Per Bite |
|---|---|
| Calories | ~250-300 |
| Fat | 15-18g |
| Carbohydrates | 18-22g |
| Protein | 12-15g |
| Sodium | 600-700mg |
Health Benefits: While not a health food, this recipe does offer some surprising benefits. The hot dogs provide protein, and the cheese is a good source of calcium. If you use a chili with beans, you’ll get a nice dose of fiber. The main thing is portion control—these are small, satisfying bites that can help prevent overeating compared to a full-sized chili dog.
Dietary Considerations: This recipe contains gluten (from the buns) and dairy (from the cheese). For a gluten-free version, use gluten-free slider buns. For a dairy-free version, use a dairy-free cheese alternative, just be aware that the melting properties will be different. This is not a low-carb or keto-friendly recipe due to the buns.
Conclusion
These perfect football Sunday chili cheese dog bites are more than just a snack; they’re a game day tradition waiting to happen. They’re fun, they’re delicious, and they’re surprisingly easy to make. The combination of the crispy bun cup, the juicy hot dog, the savory chili, and the gooey cheese is just unbeatable. It’s the kind of food that brings people together around the TV, making the big plays even better and the commercials a little more bearable.
I hope you give these a try for your next big game, party, or even just a fun weekend treat. Don’t be afraid to customize them with your favorite toppings and make them your own. That’s the beauty of a recipe like this—it’s a perfect canvas for your own creativity.
I’d love to hear how yours turn out! Leave a comment below and let me know what toppings you used, or tag me in your photos on social media. Did you make them spicy? Did you add bacon? Share the love! Until next time, happy cooking, and enjoy the game.
Frequently Asked Questions
Can I use a different type of bread?
Absolutely! While slider buns and Hawaiian rolls work best, you can use any soft, squishy bread that you can flatten. Dinner rolls or even small, thick slices of Texas toast can work in a pinch. Just make sure they’re not too dense or they won’t form a good cup.
Can I make these in an air fryer?
You can, but it’s a bit tricky. You would need a silicone muffin cup that fits in your air fryer basket. The cooking times will be shorter, so keep a close eye on them. I find the oven is more reliable for even toasting and melting.
Can I use homemade chili?
Yes, and I highly recommend it if you have the time! Just make sure your chili is thick. A watery chili will make the buns soggy. If you have leftover easy dump and go lazy crockpot beef stew, it’s not a direct substitute, but the flavor profile is in the same ballpark. For these bites, stick to a classic, thick beef chili.
How do I prevent the buns from sticking to the pan?
Non-stick spray is your best friend. Don’t just give it a quick spritz; make sure you generously coat the entire cup, including the sides. You can also use butter or shortening, but non-stick spray is the easiest and most effective method I’ve found.
Can I prepare these ahead of time for a party?
Yes! You can assemble them completely in the muffin tin (up to the point of adding the cheese) and keep them in the refrigerator for up to 2 hours. When you’re ready to bake, just pop them in the oven. You might need to add 2-3 minutes to the baking time since they’ll be starting from cold. Do not freeze them before baking, as the texture of the bun will suffer.
Pin This Recipe!

Perfect Football Sunday Chili Cheese Dog Bites
These bite-sized chili cheese dog bites are the ultimate game day snack. Made in a muffin tin with toasted bun cups, juicy hot dog coins, savory chili, and gooey cheddar cheese, they’re easy to eat and packed with flavor.
- Prep Time: 15 minutes
- Cook Time: 20 minutes
- Total Time: 35 minutes
- Yield: 12 servings 1x
- Category: Appetizer
- Cuisine: American
Ingredients
- 1 package (8-count) slider buns or 12-count package Hawaiian sweet rolls
- 8–12 beef hot dogs
- 1 (15-ounce) can chili (or about 2 cups homemade), preferably no-bean
- 1 ½ cups shredded sharp cheddar cheese (shredded from a block)
- 2 tablespoons melted butter
- Optional toppings: sliced jalapeños, diced white onion, sour cream, ketchup, mustard, fresh chives
Instructions
- Preheat oven to 375°F (190°C). Generously spray a standard 12-cup muffin tin with non-stick cooking spray.
- If using a block of 12 Hawaiian sweet rolls, keep them connected. If using 8 slider buns, separate them. Using a rolling pin or the bottom of a glass, gently flatten each bun or roll until about ¼-inch thick.
- Press each flattened bun into a prepared muffin cup, pushing the center down to form a small well. The edges should come up the sides.
- Bake the buns for 5-7 minutes, until lightly golden and slightly set. Remove from oven and let cool for a minute in the pan.
- While buns toast, slice hot dogs into ½-inch thick coins (about 4-5 per hot dog).
- In a small saucepan over medium heat, warm the chili until hot and bubbly.
- Place 3-4 hot dog coins into each toasted bun cup. Spoon about 2 tablespoons of warm chili over the hot dogs. Top generously with shredded cheddar cheese.
- Return muffin tin to oven and bake for 10-12 minutes, until cheese is melted, bubbly, and starting to brown in spots. Buns should be deep golden brown.
- Let cool in the pan for 5 minutes. Use a small offset spatula or butter knife to gently lift bites out of the pan and place on a serving platter.
- Add optional toppings while still warm. Serve immediately.
Notes
Toast the buns before adding filling to prevent sogginess. Shred your own cheese for best melting. Let bites cool in the pan for 5 minutes to set. Can be assembled up to 2 hours ahead and refrigerated before baking.
Nutrition
- Serving Size: 1 bite
- Calories: 275
- Sugar: 5
- Sodium: 650
- Fat: 16
- Saturated Fat: 7
- Carbohydrates: 20
- Fiber: 1
- Protein: 13
Keywords: chili cheese dog bites, game day appetizer, football snack, hot dog bites, party food, easy appetizer


