I figured making layered jello would be one of those things that looked way harder than it actually was. It took about twenty minutes of staring at my first set of wobbly, uneven layers for that assumption to fall apart completely. The orange bled into the yellow, the yellow looked more like a sad beige, and the whole thing resembled a melted crayon more than a festive treat. Honestly, I almost tossed the whole batch right then and there.
But here’s the thing about kitchen failures—they teach you exactly what not to do. The second attempt came out cleaner. The third one? That was the one where I finally learned to trust the process, to let each layer set completely before adding the next. And when I unmolded that perfect little stack of orange, yellow, and white, I actually laughed out loud. It looked like a piece of candy corn, only jiggly and ridiculous and absolutely perfect for Halloween.
These Easy Candy Corn Layered Jello Cups are now my go-to for Halloween parties, classroom treats, and any gathering where I want to bring something that makes people smile. They’re not complicated—they just require a little patience. And honestly, that’s a trade I’m happy to make for a dessert that looks this good. There’s something deeply satisfying about pulling a perfectly layered jello cup out of the fridge, knowing you built it one careful step at a time.
Why You’ll Love This Recipe
These jello cups aren’t just cute—they’re genuinely fun to make and even more fun to eat. Here’s why they’ve become my Halloween staple:
- Stunning Visuals: The candy corn color gradient is instantly recognizable and always gets a reaction. People genuinely gasp when they see these.
- Simple Ingredients: You only need three boxes of jello, some water, and whipped topping. No special equipment, no obscure ingredients.
- Make-Ahead Friendly: These need time to set anyway, so you can prep them a day or two before your party. One less thing to stress about.
- Crowd-Pleaser: Kids love them, adults love them, and they’re naturally gluten-free and nut-free. Everyone can enjoy them.
- Customizable: Swap flavors, use sugar-free jello, or add a creamy layer—the basic technique works for endless variations.
What makes these different from other jello recipes is the layering technique. Most people try to rush it and end up with muddy colors. I’ve tested every approach—chilling times, bowl angles, spoon methods—and this version delivers clean, distinct layers every single time. It’s the kind of recipe that makes you look like a kitchen wizard without actually being one.
And honestly? There’s something about pulling these out of the fridge that feels like a magic trick. The first time I served them at a Halloween party, my niece asked if I bought them at a bakery. That’s the kind of reaction that makes the waiting worth it.
What Ingredients You Will Need
This recipe uses simple, shelf-stable ingredients to create something that looks far more complicated than it is. Here’s what you’ll need:
- 1 box (3 oz) orange gelatin (Jell-O brand works best for consistent setting; look for orange or tangerine flavor)
- 1 box (3 oz) lemon or pineapple gelatin (for the yellow layer; lemon gives a brighter color)
- 1 box (3 oz) peach or apricot gelatin (optional, for a deeper orange; I sometimes skip this and use two orange boxes)
- 1 can (14 oz) sweetened condensed milk (this creates the creamy white layer; don’t substitute evaporated milk)
- 1 envelope unflavored gelatin (helps the creamy layer set firmly; Knox brand is reliable)
- Cold water and boiling water (for dissolving each jello layer)
- Nonstick cooking spray (for easy unmolding; I prefer the kind with flour for baking)
For the topping (optional but recommended):
- Whipped topping (thawed; Cool Whip or homemade stabilized whipped cream both work)
- Halloween sprinkles (orange, black, or candy corn shapes)
A few notes from my testing: The sweetened condensed milk layer is non-negotiable for that creamy, opaque white section. I tried using regular milk with extra gelatin once, and it came out see-through and sad. Learn from my mistakes. Also, the unflavored gelatin is crucial—without it, the creamy layer won’t set firmly enough to hold its shape against the jello layers.
If you’re using sugar-free jello, the process is exactly the same. Just know that sugar-free versions can be slightly softer, so you might need to add an extra half hour to each chilling time. And if you want to skip the orange and yellow entirely, you can use any two contrasting colors—red and green for Christmas, pink and purple for Valentine’s Day, or blue and green for a mermaid theme.
Equipment Needed
You don’t need much for this recipe, which is part of its charm. Here’s what you’ll need:
- 9×5-inch loaf pan (standard size; this gives you nice thick layers that are easy to slice)
- Small mixing bowls (one for each jello flavor plus one for the creamy layer)
- Measuring cups (1-cup and 1/4-cup sizes)
- Whisk (for dissolving gelatin completely)
- Rubber spatula (for scraping every last drop of jello into the pan)
- Sharp knife (for cutting clean cubes; a serrated knife works surprisingly well)
- Warm water (for dipping the knife between cuts; this prevents sticking)
If you don’t have a loaf pan, you can use an 8×8-inch square dish. The layers will be thinner, but they’ll still look great. Just reduce the chilling time slightly since thinner layers set faster. I’ve also made these in individual cups—clear plastic cups work perfectly and make them portable for parties. Just spoon the layers in directly and let them set in the cups. No unmolding needed.
One tip: spray your loaf pan lightly with cooking spray, then wipe it with a paper towel. You want a thin, even coating—too much spray will create bubbles in your jello. I learned this the hard way after my first batch looked like a science experiment gone wrong.
Preparation Method
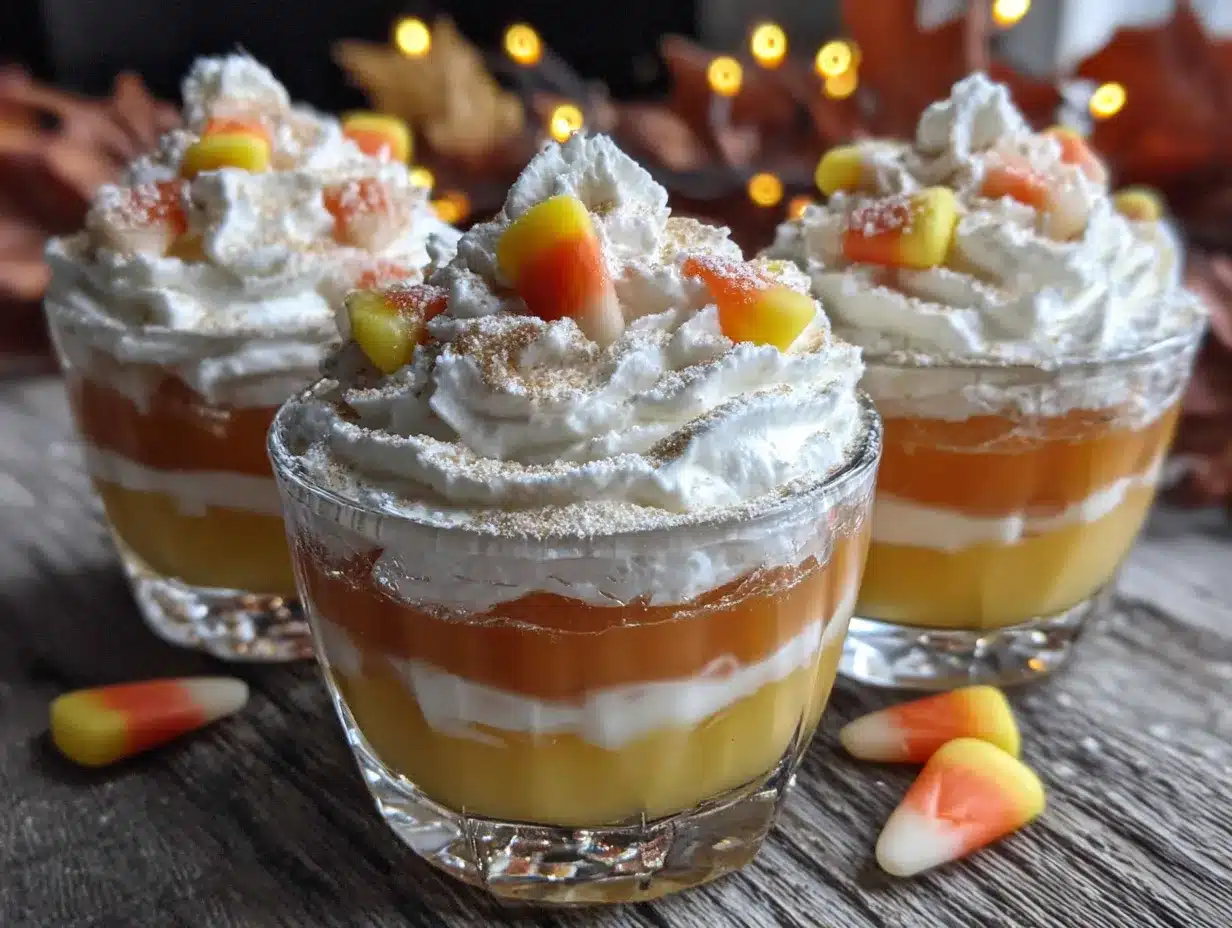
This recipe requires some patience, but the active time is minimal. Plan for about 20 minutes of hands-on work spread across 4-5 hours of chilling. Trust me, it’s worth it.
- Prepare your pan (5 minutes): Lightly spray your 9×5-inch loaf pan with nonstick cooking spray. Wipe with a paper towel to leave just a thin film. Set aside.
- Make the first layer (orange, 10 minutes): In a small bowl, dissolve one box of orange gelatin in 1 cup of boiling water. Stir for 2 minutes until completely dissolved. Add 1/2 cup cold water and stir. Pour into the prepared loaf pan. Refrigerate for 45-60 minutes, or until firm to the touch. The layer should feel set, not jiggly.
- Make the second layer (yellow, 10 minutes): While the orange layer sets, dissolve the lemon gelatin in 1 cup boiling water. Stir in 1/2 cup cold water. Let it cool at room temperature for 15-20 minutes—you want it cool but still liquid. When the orange layer is firm, gently pour the yellow jello over it. Refrigerate for another 45-60 minutes.
- Make the creamy layer (15 minutes): In a small bowl, sprinkle the unflavored gelatin over 1/4 cup cold water. Let it sit for 5 minutes to bloom. In a separate bowl, combine the sweetened condensed milk with 1/2 cup boiling water. Microwave the bloomed gelatin for 10-15 seconds until it’s liquid, then whisk it into the condensed milk mixture. Let cool to room temperature. Gently pour over the set yellow layer. Refrigerate for 60-75 minutes, until completely firm.
- Unmold and slice (10 minutes): Run a sharp knife around the edges of the pan. Dip the bottom of the pan in warm water for 10-15 seconds—don’t overdo it or the layers will start melting. Invert onto a cutting board. Use a sharp knife dipped in warm water to cut into cubes. Clean the knife between cuts for the cleanest edges.
- Serve (5 minutes): Place each cube in a clear cup or on a plate. Top with a dollop of whipped topping and Halloween sprinkles if desired. Serve immediately or refrigerate until ready.
A few things I’ve learned the hard way: Don’t rush the chilling time. If you add a layer before the one below is fully set, they’ll bleed together and you’ll lose the clean lines. If you’re short on time, you can speed things up by placing the pan in the freezer for 15-20 minutes per layer, but watch carefully—jello freezes quickly and becomes grainy if left too long.
Also, when pouring each new layer, use a spoon to gently guide the liquid onto the set layer. Pouring directly can break the surface. I hold a spoon just above the set layer and pour the jello over the back of the spoon—it disperses the liquid gently and prevents damage.
Cooking Tips & Techniques
After making these more times than I care to count, I’ve picked up a few tricks that make the process smoother and the results prettier.
Temperature is everything. The biggest mistake people make is pouring warm jello over a set layer. Even if the bottom layer feels firm, warm liquid can melt the surface and cause bleeding. Let each batch of jello cool to room temperature before pouring—about 15-20 minutes on the counter. If you’re in a hurry, place the bowl in an ice bath and stir until it’s cool but still liquid.
Test for doneness properly. The jello should feel firm to the touch, not wobbly. I gently press the surface with my fingertip—if it springs back without sticking, it’s ready. If it leaves a fingerprint, give it another 15 minutes. And don’t judge by the edges; the center is always the last to set.
Clean cuts make clean cubes. Dip your knife in warm water between each cut. Wipe it dry, dip again, and slice. The warmth helps the knife glide through the jello without dragging or tearing. I keep a small bowl of hot water next to my cutting board for this purpose. It makes a noticeable difference.
One of my biggest failures came when I tried to rush the process for a party. I figured the layers would be fine if I just let them set for 30 minutes each. The result was a muddy, streaky mess that looked nothing like candy corn. I ended up serving it as “Halloween jello cups” and nobody complained, but I knew. So now I set a timer and walk away. Patience isn’t just a virtue here—it’s the whole recipe.
Variations & Adaptations
Once you’ve mastered the basic technique, the possibilities are endless. Here are some of my favorite variations:
- Ghostly White Layer: Replace the sweetened condensed milk layer with a coconut cream layer. Mix 1 can of full-fat coconut milk with 1 envelope of unflavored gelatin and 2 tablespoons of sugar. It sets beautifully and adds a tropical twist.
- Spooky Black Layer: Use blackberry or grape jello for the bottom layer instead of orange. The dark color looks dramatic against the yellow and white. Just know that black jello can stain, so be careful with light-colored countertops.
- Individual Cups: Skip the loaf pan entirely. Layer the jello directly into clear plastic cups. Let each layer set in the cups before adding the next. This is perfect for parties—no slicing, no unmolding, just grab and go.
- Adult Version: Replace half the cold water in each jello layer with vodka or coconut rum. The alcohol won’t prevent the jello from setting as long as you keep the ratio right. Just label them clearly so nobody accidentally grabs one.
- Dairy-Free Option: Use canned coconut cream instead of sweetened condensed milk. Add an extra 1/2 envelope of unflavored gelatin to ensure it sets firmly. The coconut flavor pairs surprisingly well with citrus jello.
I once made a batch using lime, orange, and cranberry jello for a Christmas party. The red, orange, and green layers looked like a sunset. Nobody knew it was supposed to be candy corn, but everyone ate it anyway. That’s the beauty of this recipe—it’s flexible enough to work for any occasion.
Serving & Storage Suggestions
These jello cups are best served chilled, straight from the fridge. The texture is firm but tender, and the layers hold their shape beautifully at cool temperatures. If you’re serving them at a party, keep them on ice or in a chilled serving dish.
For presentation, I love serving them in clear plastic cups with a dollop of whipped cream and a sprinkle of orange and black jimmies. You can also add a candy corn on top for extra theme points. If you’re feeling fancy, drizzle a little caramel sauce over the top—the salty-sweet combination is incredible.
Storage instructions: Store any leftover jello cubes in an airtight container in the refrigerator. They’ll keep for up to 5 days, though the texture is best within the first 2-3 days. After that, the layers can start to weep slightly. If that happens, just blot them with a paper towel before serving.
Freezing is not recommended. Jello becomes grainy and watery when frozen and thawed. If you need to make these far in advance, prepare the jello in the loaf pan, cover tightly, and refrigerate for up to 3 days before slicing and serving.
The flavors actually meld together slightly over time, which isn’t a bad thing. After a day in the fridge, the orange and yellow layers soften into each other just a bit, creating a more subtle gradient. Some people prefer this look. I’m a fan of the crisp lines myself, so I usually make these the day before and serve them within 24 hours.
Nutritional Information & Benefits
These are a treat, not a health food, but here’s what you should know:
- Per serving (1 cube, approximately 2×2 inches): About 120-150 calories, 2g fat, 25g carbohydrates, 2g protein
- Key ingredients: Gelatin provides collagen, which supports joint and skin health. The sweetened condensed milk adds calcium and protein.
- Dietary considerations: These are naturally gluten-free and nut-free. For a lower-sugar version, use sugar-free jello and light condensed milk—just note that the texture will be slightly softer.
- Potential allergens: Dairy (from sweetened condensed milk). For a dairy-free version, use coconut cream as described in the variations section.
I don’t pretend these are healthy, but I do appreciate that they’re made from real ingredients. No artificial preservatives, no weird stabilizers. Just gelatin, sugar, and flavor. In a world of ultra-processed Halloween treats, that feels like a small win.
Conclusion
These Easy Candy Corn Layered Jello Cups are proof that you don’t need complicated techniques or fancy equipment to make something genuinely impressive. With a little patience and three boxes of jello, you can create a dessert that looks like it came from a bakery. Or a candy factory. Or maybe a very organized kitchen witch.
I love making these because they always bring a smile to people’s faces. There’s something about that perfect candy corn gradient that feels like a small magic trick. And when someone takes their first bite and says, “Wait, you made this?”—that’s the best part.
Try them for your next Halloween party. Experiment with the flavors. Make them with your kids. Mess up the first batch and laugh about it. That’s what cooking is all about, honestly. And if you come up with a killer variation, I’d love to hear about it. Drop a comment below and tell me how yours turned out—the good, the bad, and the jiggly.
Frequently Asked Questions
Can I use sugar-free jello for this recipe?
Yes, you can use sugar-free jello. The process is exactly the same, but sugar-free jello sets slightly softer than regular. You may need to add 15-30 minutes to each chilling time to get firm layers.
How far in advance can I make these?
You can make these up to 3 days in advance. Store them in the loaf pan, tightly covered, in the refrigerator. Slice and serve within 24 hours of cutting for the best texture and cleanest edges.
Why did my layers bleed together?
Layers bleed when you pour warm jello over a layer that isn’t fully set. Make sure each layer is completely firm to the touch before adding the next. Also, let your jello cool to room temperature before pouring—warm liquid will melt the surface of the set layer.
Can I make these in individual cups instead of a loaf pan?
Absolutely! Clear plastic cups work perfectly. Just pour each layer directly into the cups and let them set before adding the next layer. This saves you the unmolding step and makes them portable for parties.
How do I get clean cuts when slicing?
Dip your knife in warm water between each cut. Wipe it dry, dip again, and slice. The warmth helps the knife glide through the jello without dragging. Clean the knife after every 2-3 cuts for the best results.
Pin This Recipe!

Easy Candy Corn Layered Jello Cups for Halloween
These Easy Candy Corn Layered Jello Cups are a fun and festive Halloween treat that looks impressive but is surprisingly simple to make. With patience and a few basic ingredients, you can create stunning candy corn-colored layers that will delight kids and adults alike.
- Prep Time: 20 minutes
- Cook Time: 0 minutes
- Total Time: 4 hours 20 minutes (including chilling time)
- Yield: 12 servings 1x
- Category: Dessert
- Cuisine: American
Ingredients
- 1 box (3 oz) orange gelatin (Jell-O brand recommended)
- 1 box (3 oz) lemon or pineapple gelatin
- 1 box (3 oz) peach or apricot gelatin (optional, for deeper orange)
- 1 can (14 oz) sweetened condensed milk
- 1 envelope unflavored gelatin (Knox brand recommended)
- Cold water
- Boiling water
- Nonstick cooking spray
- Whipped topping (thawed, for serving, optional)
- Halloween sprinkles (for serving, optional)
Instructions
- Prepare your pan: Lightly spray a 9×5-inch loaf pan with nonstick cooking spray. Wipe with a paper towel to leave just a thin film. Set aside.
- Make the first layer (orange): In a small bowl, dissolve one box of orange gelatin in 1 cup of boiling water. Stir for 2 minutes until completely dissolved. Add 1/2 cup cold water and stir. Pour into the prepared loaf pan. Refrigerate for 45-60 minutes, or until firm to the touch.
- Make the second layer (yellow): While the orange layer sets, dissolve the lemon gelatin in 1 cup boiling water. Stir in 1/2 cup cold water. Let it cool at room temperature for 15-20 minutes. When the orange layer is firm, gently pour the yellow jello over it. Refrigerate for another 45-60 minutes.
- Make the creamy layer: In a small bowl, sprinkle the unflavored gelatin over 1/4 cup cold water. Let it sit for 5 minutes to bloom. In a separate bowl, combine the sweetened condensed milk with 1/2 cup boiling water. Microwave the bloomed gelatin for 10-15 seconds until liquid, then whisk it into the condensed milk mixture. Let cool to room temperature. Gently pour over the set yellow layer. Refrigerate for 60-75 minutes, until completely firm.
- Unmold and slice: Run a sharp knife around the edges of the pan. Dip the bottom of the pan in warm water for 10-15 seconds. Invert onto a cutting board. Use a sharp knife dipped in warm water to cut into cubes. Clean the knife between cuts for cleanest edges.
- Serve: Place each cube in a clear cup or on a plate. Top with a dollop of whipped topping and Halloween sprinkles if desired. Serve immediately or refrigerate until ready.
Notes
Patience is key—let each layer set completely before adding the next to prevent bleeding. Let jello cool to room temperature before pouring over set layers. For clean cuts, dip knife in warm water between each slice. Can be made up to 3 days in advance.
Nutrition
- Serving Size: 1 cube (approximatel
- Calories: 135
- Sugar: 22
- Sodium: 85
- Fat: 2
- Saturated Fat: 1
- Carbohydrates: 25
- Protein: 2
Keywords: Halloween, jello, candy corn, layered dessert, festive, easy, kid-friendly, gluten-free


