I figured a no-bake dessert for a holiday cookout would be a simple toss-together affair—something you could throw in a bowl and call it a day. It took about one disastrous attempt with a soggy store-bought cake and runny pudding to realize that “easy” and “sloppy” are not the same thing. This red, white, and blue berry trifle was born from that first failure, and honestly, it’s a much better story that way.
The first time I made this for the Fourth of July, I was trying to impress my husband’s family, who have been hosting the same barbecue for thirty years. I showed up with a trifle that had completely collapsed in the car—the layers had merged into a sad, purple-gray blob. My mother-in-law, ever gracious, handed me a spoon and said, “It still tastes good, honey.” She was right about the taste, but I knew I could do better.
So I went back to the drawing board. I wanted something that looked like a flag, tasted like summer, and didn’t require turning on the oven when it was ninety degrees outside. After a few more tries (and a lot of berries), I landed on this version. It’s the one I now bring to every potluck, and it’s the one people ask for by name. It’s not fussy, it’s not fancy, and it doesn’t fall apart on the drive over.
There’s a quiet satisfaction in showing up with a dessert that looks like you spent hours on it—when really, you just knew a few good tricks. This is that recipe.
Why You’ll Love This Recipe
Let’s be honest—most patriotic desserts are either a sugar bomb or a visual mess. This one is neither. It’s the kind of dessert that makes people stop and say, “Wait, you made this?” And you get to shrug and say, “It’s actually really easy.”
- No-Bake and No-Stress: You don’t need to turn on the oven. At all. On a hot summer day, that alone is worth its weight in gold. The whole thing comes together in about 20 minutes of active work.
- Simple Ingredients: Grocery store staples. Angel food cake or pound cake, instant pudding mix, fresh berries, and whipped topping. Nothing weird, nothing expensive.
- Perfect for Any Patriotic Occasion: Fourth of July, Memorial Day, Labor Day, or just a Tuesday when you need a red, white, and blue pick-me-up. It’s a crowd-pleaser at every single gathering.
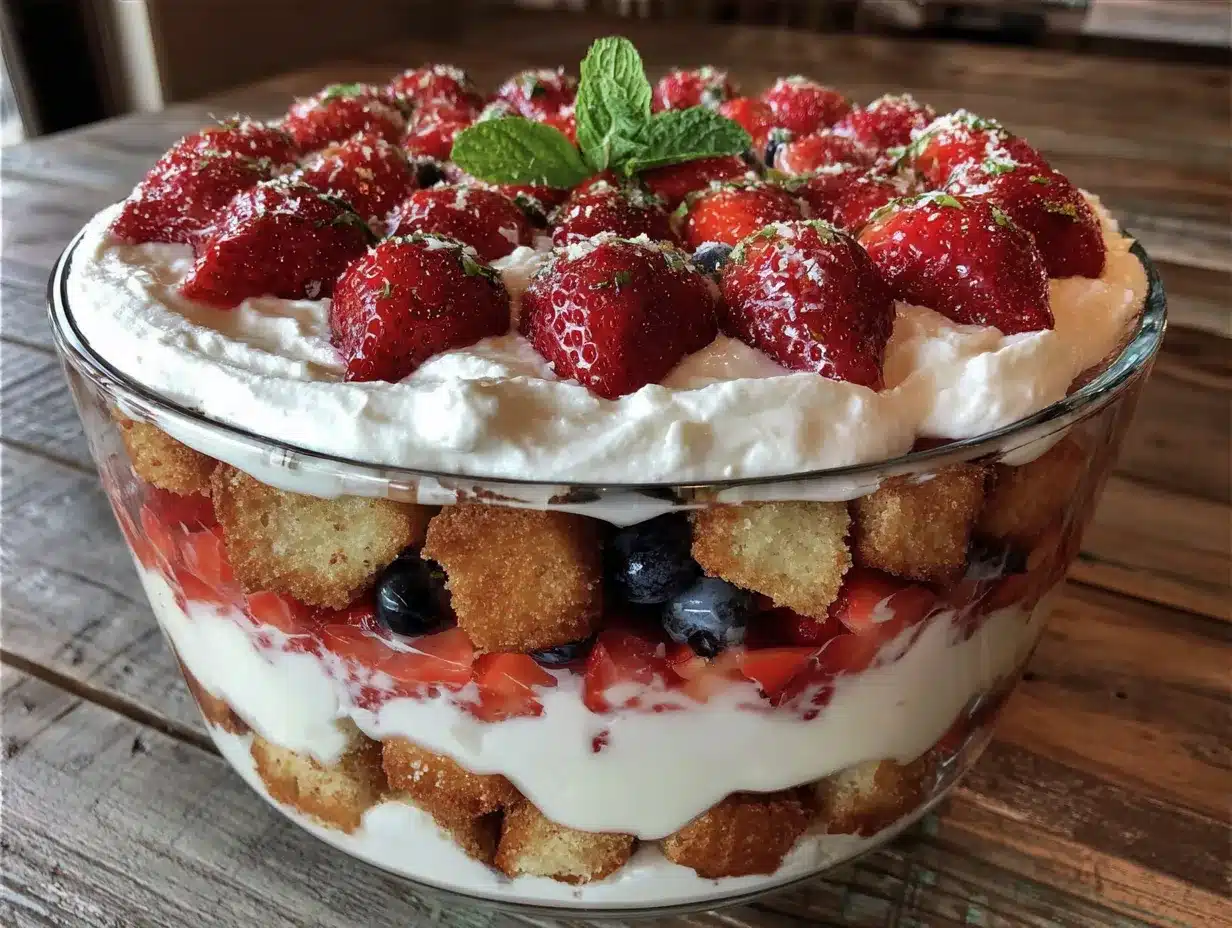
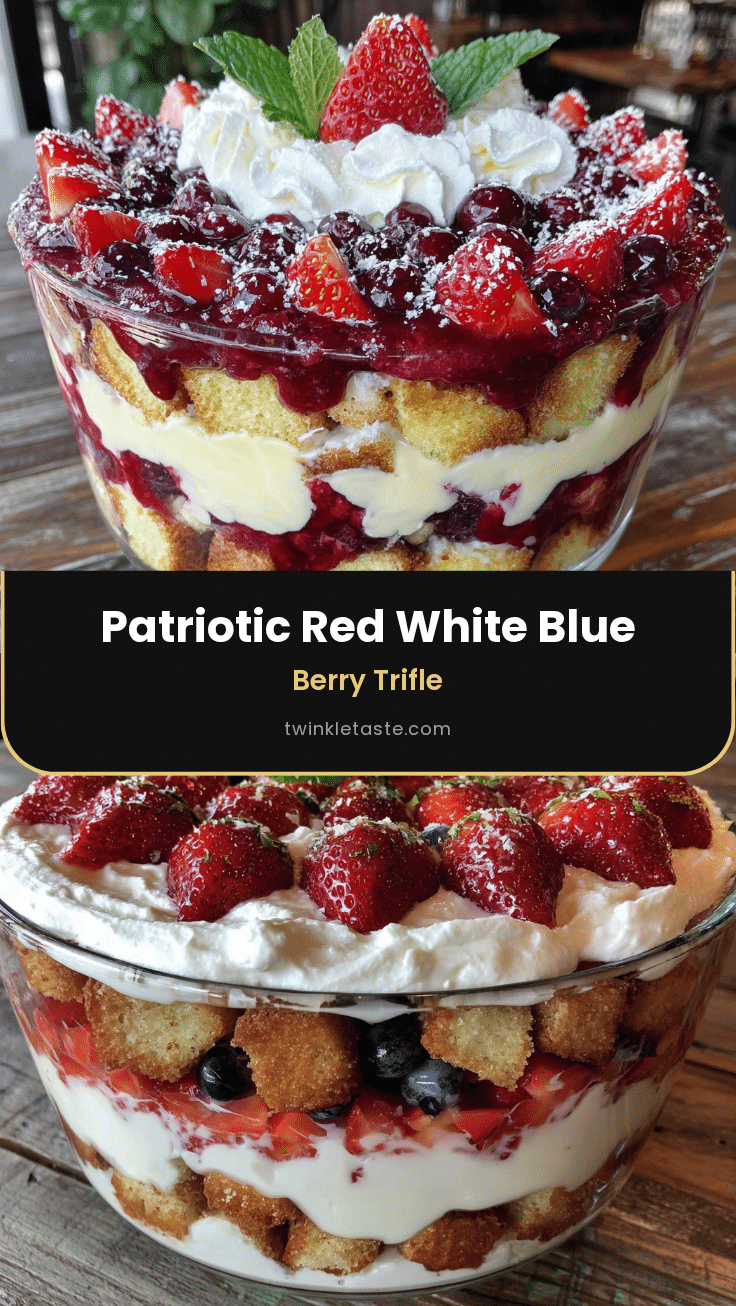
- Visually Stunning: The layers of red strawberries, white cream, and blueberries create a natural flag effect. It looks impressive without any special skills or tools.
- Make-Ahead Friendly: This trifle actually gets better after a few hours in the fridge. The flavors meld, the cake softens, and it becomes this incredible, pudding-like dessert that everyone loves.
What makes this one different from all the other trifle recipes out there? It’s the balance. The cake isn’t too soggy, the cream isn’t too sweet, and the berries provide just enough tartness to cut through the richness. I’ve tested this with different cakes, different puddings, and different ratios. This is the Goldilocks version—everything is just right.
This is the dessert that makes you close your eyes after the first bite. It’s comfort food reimagined for summer—lighter, fresher, but with the same soul-soothing satisfaction. Perfect for impressing a crowd without breaking a sweat.
What Ingredients You Will Need
This recipe uses simple, wholesome ingredients to deliver bold flavor and satisfying texture without the fuss. Most of these are pantry staples or easy to find at any grocery store.
For the Cake Layer
- 1 store-bought angel food cake (about 16 ounces) or 1 loaf of pound cake (about 10-12 ounces). I prefer angel food cake for its light, airy texture, but pound cake gives a denser, richer result. Both work beautifully.
- You can also use 1 box of white cake mix, baked according to package directions and cooled completely. If you go this route, bake it the day before to save time.
For the Cream Layer
- 2 packages (3.4 ounces each) instant vanilla pudding mix. I recommend Jell-O brand for consistent results, but store brands work fine too.
- 3 cups cold whole milk. Whole milk gives the creamiest, richest pudding. You can use 2% in a pinch, but avoid skim—the pudding won’t set up as nicely.
- 1 container (8 ounces) frozen whipped topping, thawed, like Cool Whip. You’ll use about half for the pudding mixture and the rest for the top layer.
For the Berry Layer
- 2 cups fresh strawberries, hulled and sliced. Look for bright red, fragrant berries. If strawberries aren’t in season, you can use frozen sliced strawberries, but thaw and drain them well first.
- 2 cups fresh blueberries. Fresh is best here—frozen blueberries tend to bleed and turn the cream layer purple. If you must use frozen, add them frozen and expect some color bleeding.
- Optional: 1-2 tablespoons granulated sugar to macerate the berries if they’re not perfectly sweet. This draws out their juices and makes them even more flavorful.
For the Garnish
- Additional whipped topping for the top layer.
- Extra berries for decorating the top—a few whole strawberries and a handful of blueberries.
- Fresh mint leaves (optional, but pretty).
Ingredient Selection Tip: For the best texture, use a cake that’s a day or two old. Fresh cake tends to fall apart when you cut it into cubes, while slightly stale cake holds its shape better and absorbs the pudding more evenly.
Substitution Guidance: For a gluten-free version, use a gluten-free pound cake or angel food cake. For a lower-sugar option, use sugar-free pudding mix and a sugar-free cake. For a dairy-free version, use almond milk or oat milk with a dairy-free pudding mix—just note that the texture will be slightly less firm.
Equipment Needed
You don’t need a lot of fancy equipment for this one. Here’s what you’ll need:
- A large trifle bowl or a clear glass bowl (at least 4-quart capacity). The clear glass is important—it shows off those beautiful layers. If you don’t have a trifle bowl, a large glass salad bowl works perfectly.
- A sharp chef’s knife for cutting the cake and slicing strawberries. A serrated knife works best for angel food cake—it won’t squish the delicate crumb.
- A large mixing bowl for the pudding.
- A whisk for mixing the pudding.
- A rubber spatula for folding in the whipped topping and spreading layers.
- A cutting board for prep work.
- Measuring cups and spoons.
Budget-Friendly Option: If you don’t have a trifle bowl, use a large mason jar or even individual serving cups. Individual trifles in small jars or glasses are actually perfect for parties—everyone gets their own, and there’s no fighting over the last scoop.
Personal Experience: I’ve made this in everything from a fancy crystal trifle bowl to a plastic Dollar Store container. It looks gorgeous in anything clear. The container doesn’t matter as much as the layers do.
Preparation Method
Let’s walk through this step by step. I promise it’s easier than it looks.
Step 1: Prep the Berries
Wash and dry your berries thoroughly. Hull the strawberries and slice them into even pieces—about 1/4-inch thick. If your berries are not super sweet, toss them with 1-2 tablespoons of sugar and let them sit for 10 minutes. This draws out their natural juices and makes them even more flavorful. Set the blueberries aside.
Time estimate: 10 minutes.
Step 2: Make the Pudding
In a large mixing bowl, whisk together the two packages of instant vanilla pudding mix and 3 cups of cold whole milk. Whisk for about 2 minutes until the mixture starts to thicken. It will be quite thin at first—don’t panic, that’s normal. Let it sit for 5 minutes to set up completely.
Sensory cue: The pudding should be thick enough to leave a trail when you lift the whisk. It should look like a thick custard, not runny.
Step 3: Fold in the Whipped Topping
Gently fold about half of the thawed whipped topping into the pudding mixture. Use a rubber spatula and fold from the bottom up, turning the bowl as you go. Stop when you don’t see any white streaks. This creates a lighter, fluffier cream layer that’s not too dense.
Personal tip: Don’t overmix here. You want the cream to be light and airy, not deflated. A few small lumps are totally fine.
Step 4: Cut the Cake
If using angel food cake, slice it into 1-inch cubes. A serrated knife works best—it cuts through the delicate cake without squishing it. If using pound cake, cut it into similar-sized cubes. You should have about 6-7 cups of cake cubes.
Preparation note: Don’t cut the cubes too small, or they’ll turn into mush when you layer them. One-inch cubes are the sweet spot.
Step 5: Layer the Trifle
Now for the fun part. Start with a layer of cake cubes at the bottom of your trifle bowl—about one-third of the cake. Spread it evenly. Next, add a layer of the cream mixture—about one-third of it. Spread it gently over the cake. Then add a layer of sliced strawberries and blueberries—about one-third of the berries. Repeat the layers two more times: cake, cream, berries. End with a final layer of cream on top.
WARNING: Don’t press down on the layers. Let them sit naturally. Pressing will make the cake soggy and the layers will blend together instead of staying distinct.
Step 6: Top and Decorate
Spread the remaining whipped topping over the top layer. Use the back of a spoon to create soft peaks or swirls—this gives it a beautiful, homemade look. Arrange extra strawberries and blueberries on top in a patriotic pattern. I like to make a row of blueberries in the corner and a row of sliced strawberries next to it, like a flag.
Time estimate for assembly: 10 minutes.
Step 7: Chill
Cover the trifle loosely with plastic wrap and refrigerate for at least 2 hours—overnight is even better. This allows the flavors to meld and the cake to absorb some of the cream, creating that perfect, pudding-like texture.
Time estimate: At least 2 hours of chilling.
Cooking Tips & Techniques
After making this trifle about twenty times (for science, of course), I’ve learned a few things the hard way. Here are my best tips:
Don’t skip the chilling time. I know it’s tempting to serve it right away, but the texture is completely different after a few hours in the fridge. The cake softens, the cream sets, and the flavors meld together. It’s like a completely different dessert. Trust me on this one.
Use a serrated knife for the cake. I learned this after squishing an entire angel food cake into a sad, flat mess with a regular chef’s knife. A serrated knife cuts through the delicate cake without compressing it. It’s a game-changer.
Layer strategically for the best visual effect. When you’re layering, try to place the berries close to the sides of the bowl. This way, they’re visible through the glass and create those beautiful red and blue stripes. If you just dump them in the middle, you’ll end up with a white blob when you look at it from the side.
Watch the berry juices. If you macerate your strawberries with sugar, they’ll release a lot of liquid. That’s great for flavor, but too much liquid can make your trifle soupy. Drain off any excess juice before layering, or use the juice sparingly.
Make it the day before. This is one of those desserts that actually improves overnight. The cake absorbs the cream, the flavors deepen, and the texture becomes this incredible, custard-like consistency. Make it the night before your party, and you’ll have one less thing to worry about on the day of.
My biggest failure: The first time I made this, I used frozen blueberries straight from the bag. They bled purple everywhere, and my beautiful red, white, and blue trifle turned into a muddy mess. Fresh berries are non-negotiable for the visual effect. If you must use frozen, add them frozen and accept that there will be some color bleeding.
Variations & Adaptations
This recipe is incredibly versatile. Here are some of my favorite variations:
Berry Swap
Not a fan of strawberries? Use raspberries instead. They’re a little more tart, which balances the sweetness nicely. You can also use blackberries for a deeper flavor. Just keep the total amount of berries the same—about 4 cups total.
Cake Swap
Angel food cake is light and airy, but pound cake gives a denser, richer texture. I’ve also used lemon pound cake for a citrusy twist, and it was amazing. Vanilla cake, white cake, or even a basic yellow cake work well too. Just avoid chocolate cake—it doesn’t look as patriotic.
Pudding Flavor Swap
Vanilla pudding is classic, but cheesecake-flavored pudding is incredible. It adds a tangy, creamy note that pairs perfectly with the berries. White chocolate pudding is another great option—it’s sweeter and richer. Just don’t use chocolate pudding, or your white layer will turn brown.
Dairy-Free Version
Use almond milk or oat milk with a dairy-free vanilla pudding mix. For the whipped topping, use a dairy-free brand like CocoWhip. The texture will be slightly less firm, but it’s still delicious. I’ve tested this with oat milk, and it worked surprisingly well.
Low-Sugar Version
Use sugar-free pudding mix, sugar-free cake, and unsweetened whipped topping. The berries provide natural sweetness, so you won’t miss the sugar. This version is perfect for anyone watching their sugar intake.
Individual Trifles
For parties, make individual trifles in small mason jars or clear plastic cups. Layer the cake, cream, and berries in each cup, then top with whipped cream and a berry. Everyone gets their own, and they look adorable. Plus, no fighting over the last scoop.
Serving & Storage Suggestions
Serving Temperature: Serve this trifle cold, straight from the fridge. The cold temperature keeps the layers distinct and the cream firm. If it sits out at room temperature for too long, the cream will start to soften and the layers will blend together.
Presentation: Use a clear glass bowl to show off those beautiful layers. Garnish the top with extra berries and a few mint leaves for a pop of green. A dusting of powdered sugar over the top berries adds a nice touch.
Complementary Dishes: This trifle pairs beautifully with grilled meats like burgers, hot dogs, or barbecue chicken. It’s also great alongside other summer desserts like peach cobbler or zucchini brownies. For drinks, lemonade, iced tea, or a crisp white wine are all excellent choices.
Storage Instructions: Cover the trifle tightly with plastic wrap or a lid and store in the refrigerator for up to 3 days. The texture will continue to soften over time, so it’s best within the first 2 days. Do not freeze—the cream will separate and become watery when thawed.
Reheating: This is a cold dessert, so no reheating needed. If it’s been in the fridge for a day or two, just give it a quick stir before serving to redistribute the layers.
How Flavors Develop Over Time: The first day, the layers are distinct and the cake is still relatively firm. By the second day, the cake has absorbed more of the cream, creating a softer, more pudding-like texture. The berries release more juice, adding flavor to the cream. Both versions are delicious—just different. I personally prefer it on day two.
Nutritional Information & Benefits
Here’s the estimated nutritional information for one serving (based on 12 servings):
| Nutrient | Amount per Serving |
|---|---|
| Calories | 285 |
| Total Fat | 8g |
| Saturated Fat | 5g |
| Cholesterol | 5mg |
| Sodium | 420mg |
| Total Carbohydrates | 48g |
| Dietary Fiber | 2g |
| Sugars | 32g |
| Protein | 4g |
Health Benefits: Strawberries and blueberries are packed with antioxidants, vitamin C, and fiber. They’re great for your immune system and overall health. Angel food cake is lower in fat than most cakes, making this a lighter dessert option. The whole milk provides calcium and protein.
Dietary Considerations: This recipe can be made gluten-free, dairy-free, and low-sugar with simple substitutions. It’s naturally nut-free and egg-free (if using a store-bought angel food cake that’s egg-free).
Potential Allergens: This recipe contains dairy and gluten. If using a store-bought cake, check the label for potential allergens like eggs or soy.
Personal Wellness Perspective: I love that this dessert feels indulgent without being heavy. It’s the kind of treat you can enjoy without guilt—especially when you load it up with fresh, antioxidant-rich berries. It’s a celebration dessert that doesn’t leave you feeling sluggish.
Conclusion
This Easy Patriotic Red, White, and Blue Berry Trifle is the dessert you’ve been looking for. It’s simple enough for a weeknight, impressive enough for a holiday party, and delicious enough to become a family tradition. The layers of fluffy cake, creamy pudding, and fresh berries create a dessert that’s both beautiful and satisfying.
I love this recipe because it’s forgiving. You can swap ingredients, adjust the layers, and make it your own. It’s the kind of dessert that doesn’t judge you for using store-bought cake or instant pudding. It just tastes good.
So go ahead—make this for your next barbecue, potluck, or family dinner. Watch people’s faces light up when they see those red, white, and blue layers. And when they ask for the recipe, just smile and say, “It’s easy.” Because it really is.
I’d love to hear how yours turns out. Leave a comment below and let me know what variations you tried, or tag me in your photos on social media. Happy cooking!
Frequently Asked Questions
Can I make this trifle the night before?
Absolutely! In fact, I recommend it. The flavors meld together overnight, and the texture becomes even better. Just cover it tightly with plastic wrap and refrigerate. Add the fresh berries on top right before serving for the best visual effect.
Can I use frozen berries?
You can, but fresh berries are strongly recommended. Frozen berries release a lot of liquid as they thaw, which can make the trifle watery. Frozen blueberries especially tend to bleed purple into the cream. If you must use frozen, add them frozen and expect some color bleeding.
How long does this trifle last in the fridge?
This trifle will keep in the refrigerator for up to 3 days. The texture will continue to soften over time, so it’s best within the first 2 days. Do not freeze it—the cream will separate when thawed.
Can I use homemade whipped cream instead of Cool Whip?
Yes, you can. Whip 1 cup of heavy cream with 2 tablespoons of powdered sugar until stiff peaks form. Use it in place of the Cool Whip in the recipe. Homemade whipped cream is less stable than Cool Whip, so the trifle may not hold its shape as well after a day or two.
What’s the best cake to use for this trifle?
Angel food cake is my top choice—it’s light, airy, and absorbs the cream beautifully without becoming mushy. Pound cake is a close second for a denser, richer texture. You can also use vanilla cake, white cake, or lemon pound cake. Avoid chocolate cake, as it doesn’t look as patriotic.
Pin This Recipe!
Easy Patriotic Red White and Blue Berry Trifle
A no-bake, visually stunning dessert featuring layers of angel food cake, creamy vanilla pudding, and fresh strawberries and blueberries. Perfect for Fourth of July, Memorial Day, or any summer gathering.
- Prep Time: 20 minutes
- Cook Time: 0 minutes
- Total Time: 2 hours 20 minutes (includes chilling)
- Yield: 12 servings 1x
- Category: Dessert
- Cuisine: American
Ingredients
- 1 store-bought angel food cake (about 16 ounces) or 1 loaf of pound cake (about 10–12 ounces)
- 2 packages (3.4 ounces each) instant vanilla pudding mix
- 3 cups cold whole milk
- 1 container (8 ounces) frozen whipped topping, thawed
- 2 cups fresh strawberries, hulled and sliced
- 2 cups fresh blueberries
- 1–2 tablespoons granulated sugar (optional, for macerating berries)
- Additional whipped topping for garnish
- Extra berries for decorating
- Fresh mint leaves (optional)
Instructions
- Wash and dry berries. Hull strawberries and slice into 1/4-inch thick pieces. If berries are not sweet, toss with 1-2 tablespoons sugar and let sit for 10 minutes. Set blueberries aside.
- In a large mixing bowl, whisk together instant vanilla pudding mix and cold whole milk for about 2 minutes until mixture starts to thicken. Let sit for 5 minutes to set completely.
- Gently fold about half of the thawed whipped topping into the pudding mixture using a rubber spatula, folding from bottom up until no white streaks remain.
- Slice angel food cake into 1-inch cubes using a serrated knife. You should have about 6-7 cups of cake cubes.
- In a large trifle bowl, layer one-third of the cake cubes, then one-third of the cream mixture, then one-third of the berries. Repeat layers two more times, ending with a final layer of cream on top.
- Spread remaining whipped topping over the top layer. Use the back of a spoon to create soft peaks or swirls. Arrange extra strawberries and blueberries on top in a patriotic pattern.
- Cover loosely with plastic wrap and refrigerate for at least 2 hours, preferably overnight, before serving.
Notes
For best results, use fresh berries to avoid color bleeding. The trifle improves overnight as flavors meld. Do not press down on layers to keep them distinct. Use a serrated knife for cutting angel food cake to avoid squishing.
Nutrition
- Serving Size: 1 serving
- Calories: 285
- Sugar: 32
- Sodium: 420
- Fat: 8
- Saturated Fat: 5
- Carbohydrates: 48
- Fiber: 2
- Protein: 4
Keywords: patriotic dessert, red white and blue trifle, no-bake dessert, berry trifle, Fourth of July dessert, Memorial Day dessert, summer dessert