“You really don’t need to make the whole batch,” my friend warned me over the phone as I chopped the final bits of dark chocolate. But, honestly, I just couldn’t stop myself that night. It was one of those rare quiet evenings when the house was empty, and the only thing lighting up the kitchen was the soft glow from the oven timer. I started this recipe almost on a whim, inspired by the idea of Halloween treats that are just as fun to make as they are to eat. The dark chocolate witch hat cupcakes came together like magic—rich, moist cake crowned with little chocolate cones, dusted with sprinkles, and topped with a swirl of creamy frosting.
At first, I was skeptical about how well the dark chocolate would play with the whimsical witch hat design—would it be too bitter? But the balance was just right, the cupcakes melting in your mouth with a perfect bittersweet bite. What surprised me most was how quickly they vanished at a neighborhood Halloween party. Kids and adults alike kept asking for the recipe, not just because they looked cute, but because they tasted genuinely delicious. I never expected a simple idea to become a new seasonal favorite that I find myself baking every October—sometimes multiple times a week. The combination of cozy chocolate flavor with a playful, spooky twist made these cupcakes stick in my mind, and I bet they’ll charm you too.
These witch hat cupcakes aren’t just a treat—they’re a little pause of joy in the craziness of fall. You’ll find yourself smiling as you frost each one, and maybe sneaking a bite or two before the party even starts. That’s the kind of recipe that feels like a secret shared between friends, and I’m happy to pass it on.
Why You’ll Love This Recipe
This recipe has been tested and tweaked through many baking sessions, each time bringing out more of the rich chocolatey goodness balanced with a fun Halloween vibe. Here’s why it stands apart:
- Quick & Easy: Ready in under an hour, perfect for last-minute Halloween parties or when you just want a festive treat without fuss.
- Simple Ingredients: No need for fancy or hard-to-find items. Most of these are pantry staples you probably already have on hand.
- Perfect for Halloween: The witch hat design is playful and instantly festive, making these cupcakes a hit for school events, family gatherings, or spooky-themed dinners.
- Crowd-Pleaser: The bittersweet dark chocolate flavor wins over both kids and adults, even those who usually shy away from overly sweet desserts.
- Unbelievably Delicious: The cupcakes are moist and tender, and the creamy frosting complements the dark chocolate perfectly, creating a comforting yet indulgent bite.
This recipe isn’t just another chocolate cupcake—it’s a little bit of Halloween magic. The secret lies in the dark cocoa powder and a touch of espresso powder to deepen the chocolate flavor without overpowering it. Plus, the creative witch hat toppers are surprisingly simple to make but bring that wow factor that everyone remembers. Honestly, it’s a recipe I trust to impress without stress, whether I’m bringing treats to a casual gathering or a themed party.
What Ingredients You Will Need
This recipe uses simple, wholesome ingredients to deliver a bold chocolate flavor and fun festive look without the fuss. You can easily find these in your local grocery store or swap a few to fit your pantry.
- For the Cupcakes:
- All-purpose flour – 1 ½ cups (190 g)
- Unsweetened dark cocoa powder – ¾ cup (75 g) (I recommend Valrhona or Ghirardelli for best richness)
- Baking powder – 1 ½ tsp
- Baking soda – ½ tsp
- Salt – ¼ tsp
- Granulated sugar – 1 cup (200 g)
- Large eggs – 2, room temperature
- Buttermilk – 1 cup (240 ml) (or plain yogurt thinned with milk)
- Vegetable oil – ½ cup (120 ml)
- Vanilla extract – 1 tsp
- Hot water – ½ cup (120 ml)
- Espresso powder – 1 tsp (optional, enhances chocolate flavor)
- For the Frosting:
- Unsalted butter – ½ cup (113 g), softened
- Powdered sugar – 2 cups (240 g), sifted
- Cream cheese – 4 oz (115 g), softened (adds tang and creaminess)
- Vanilla extract – 1 tsp
- Heavy cream – 2-3 tbsp (30-45 ml), to adjust consistency
- Dark cocoa powder – 2 tbsp (for a chocolate frosting option)
- For Decoration:
- Mini chocolate cones or waffle cones – about 12 (break to size if needed)
- Colored sprinkles or edible glitter – for a festive touch
- Black or purple food coloring (optional, to tint frosting)
Substitution notes: Use almond flour for a gluten-free variation (though texture will differ). Swap cream cheese with coconut cream for a dairy-free frosting. For a richer cupcake, try substituting half the vegetable oil with melted butter. Seasonal twist: add a pinch of cinnamon or pumpkin pie spice to the batter for an autumnal touch.
Equipment Needed
- Standard 12-cup muffin tin – essential for shaping your cupcakes evenly. If you don’t have one, silicone muffin molds work just as well and are easier to clean.
- Mixer (hand or stand) – for creaming butter and eggs smoothly. A stand mixer makes the frosting extra fluffy, but a sturdy hand mixer is fine.
- Mixing bowls – at least two, one for dry ingredients and one for wet.
- Spatula and whisk – for folding and mixing without overworking the batter.
- Piping bag with star or round tip – to swirl the frosting like a pro. No piping bag? Use a zip-top bag with a corner snipped off.
- Measuring cups and spoons – accuracy makes a difference, especially for baking powder and cocoa powder.
- Cooling rack – cupcakes cool faster and more evenly, preventing soggy bottoms.
Pro tip: I’ve tried silicone muffin liners and they help release the cupcakes without breaking the delicate chocolate hat toppers. For frosting, a clean, dry bowl is key—any moisture can make it clumpy. If you’re on a budget, a good whisk and mixing bowls will get you far without fancy gadgets.
Preparation Method
- Preheat your oven to 350°F (175°C). Line your muffin tin with cupcake liners or grease lightly to prevent sticking. This step takes about 10 minutes including prep.
- Mix dry ingredients: In a large bowl, sift together 1 ½ cups flour, ¾ cup dark cocoa powder, 1 ½ tsp baking powder, ½ tsp baking soda, and ¼ tsp salt. Whisk until combined. The sifted cocoa powder ensures a smooth batter without lumps.
- Combine sugar and wet ingredients: In a separate bowl, beat 1 cup granulated sugar with 2 large eggs until pale and fluffy, about 2 minutes. Add ½ cup vegetable oil, 1 cup buttermilk, and 1 tsp vanilla extract. Mix gently to blend.
- Add espresso powder: Stir 1 tsp espresso powder into ½ cup hot water until dissolved. Slowly add this to the wet ingredients while mixing on low speed. This step deepens the chocolate flavor and gives a subtle complexity.
- Combine wet and dry: Gradually add the dry mixture to the wet, folding gently with a spatula until just combined. Avoid overmixing; the batter should be smooth but still thick. Overmixing can make cupcakes dense and tough.
- Fill cupcake liners: Spoon the batter evenly into the liners, filling about ⅔ full. This ensures they rise nicely without spilling over. You should get approximately 12 cupcakes.
- Bake: Place in the oven and bake for 18-22 minutes. Test doneness by inserting a toothpick in the center—if it comes out clean or with a few moist crumbs, they’re done. Let cupcakes cool in the pan for 5 minutes before transferring to a wire rack to cool completely.
- Make the frosting: Beat ½ cup softened unsalted butter and 4 oz softened cream cheese together until smooth and creamy. Gradually add 2 cups powdered sugar and 1 tsp vanilla extract. For chocolate frosting, add 2 tbsp cocoa powder and adjust powdered sugar to taste. Thin with 2-3 tbsp heavy cream until spreadable but thick enough to hold shape.
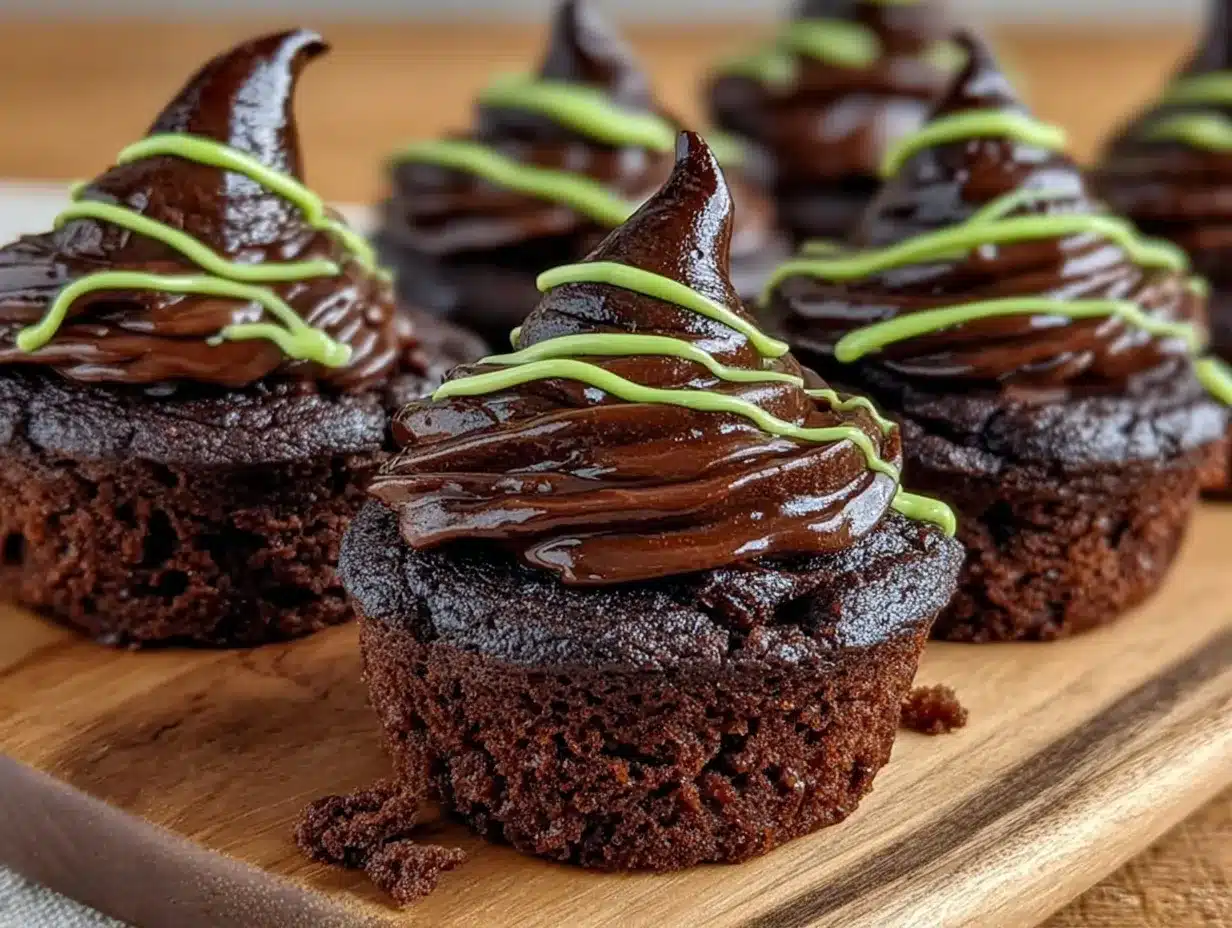
- Assemble witch hats: Pipe or spread a generous swirl of frosting onto each cooled cupcake. Place a mini chocolate cone upside down on top to mimic a witch’s hat. Decorate with sprinkles or edible glitter for a spooky touch.
- Final touches: Optionally, tint the frosting with black or purple food coloring for a more dramatic look. Chill cupcakes for 15 minutes to set frosting before serving.
Tip: If cones are too tall, break them gently to fit. For more even frosting swirls, start from the outside edge and spiral inward. If frosting feels too stiff, add a splash more cream. If too soft, refrigerate briefly.
Cooking Tips & Techniques
One trick I learned the hard way is not to skip sifting the cocoa powder and flour. Cocoa tends to clump, and sifting helps the batter stay smooth and consistent. Also, folding in the dry ingredients gently keeps the cupcakes tender. I once mixed too vigorously and ended up with chewy cupcakes—not the vibe you want when you’re aiming for light, fluffy treats.
Don’t underestimate the espresso powder. It’s subtle but brings out the chocolate flavor without making the cupcakes taste like coffee. Use hot water to dissolve it properly, or it won’t blend well.
When frosting, chilling the butter and cream cheese too much makes it hard to mix smoothly. Let them soften to room temperature first. For piping neat swirls, I find a star tip works best, but a simple round tip is fine too—practice makes perfect!
Timing is everything. Bake all cupcakes at once if you can, as uneven oven temperatures can cause inconsistent results. If you’re multitasking, prep your frosting while the cupcakes bake to save time and keep everything fresh.
Variations & Adaptations
- Flavor Twists: Add a teaspoon of pumpkin pie spice or cinnamon to the batter for a fall-inspired version. You can also swirl in some raspberry jam before baking for a fruity surprise inside.
- Dietary Adjustments: Swap all-purpose flour for a gluten-free blend to accommodate sensitivities. Use coconut cream and dairy-free butter alternatives to make a vegan-friendly frosting.
- Decoration Ideas: Instead of chocolate cones, use ice cream cones dipped in melted chocolate and decorated with edible glitter. Or, top with little fondant bats and spiders for an extra spooky look.
- For a different take, try serving these cupcakes alongside a hearty, comforting stew for a full Halloween dinner experience.
I personally made a batch with salted caramel drizzle on top once, and it was a hit! The salty-sweet contrast made the cupcakes feel even more indulgent. Feel free to experiment with the toppings and frosting colors to suit your Halloween vibe.
Serving & Storage Suggestions
These cupcakes are best served at room temperature to fully enjoy the creamy frosting and moist cake. Arrange them on a festive platter with some fresh autumn leaves or mini pumpkins for a charming presentation. Pair with a hot cup of spiced apple cider or a rich, dark coffee to balance the chocolate richness.
To store, keep cupcakes in an airtight container in the fridge for up to 3 days. Bring to room temperature before serving for the best texture. You can freeze unfrosted cupcakes for up to 2 months—just thaw and frost when ready.
When reheating, avoid microwaving with the frosting on. Instead, gently warm the cupcake alone for 10 seconds and then add frosting, or enjoy chilled for a refreshing bite. Flavors actually mellow and deepen when chilled overnight, so these cupcakes can be made ahead for stress-free entertaining.
Nutritional Information & Benefits
Each delicious dark chocolate witch hat cupcake contains approximately 320 calories, with 15 grams of fat, 40 grams of carbohydrates, and 4 grams of protein. The use of dark cocoa powder brings antioxidants and a richer flavor without excessive sugar.
Using buttermilk adds a tender crumb while contributing calcium and probiotics, depending on the brand. Cream cheese in the frosting offers additional protein and a creamy texture without too much sweetness.
This recipe can be adapted to lower sugar or dairy-free versions if needed. Just be mindful that substitutions may slightly alter texture and flavor. Overall, these cupcakes are a festive treat that balances indulgence with a thoughtful ingredient list.
Conclusion
These delicious dark chocolate witch hat cupcakes capture the spirit of Halloween in every bite. They’re simple enough to whip up on a busy weeknight, yet special enough to impress your guests (or just yourself, honestly). The rich chocolate base paired with the fun, festive witch hat design makes them a standout treat that’s hard to resist.
Feel free to tweak the frosting, play with decorations, or add your own twist to make this recipe truly yours. I love how these cupcakes bring a little magic into the kitchen each fall, reminding me that even the simplest recipes can create lasting memories.
Give them a try and let me know how your Halloween treats turn out! And if you want a savory dish to balance your sweet sides, you might enjoy the spicy dakgalbi stir-fried chicken recipe I shared—it pairs perfectly with festive celebrations.
FAQs about Dark Chocolate Witch Hat Cupcakes
Can I make these cupcakes ahead of time?
Yes! You can bake the cupcakes up to 2 days in advance and store them in an airtight container at room temperature. Frost just before serving for the freshest look and taste.
What if I don’t have buttermilk?
Use plain yogurt thinned with a little milk as a substitute, or add 1 tbsp lemon juice or vinegar to 1 cup milk and let it sit for 5 minutes before using.
Can I use milk chocolate instead of dark chocolate?
You can, but the cupcakes will be sweeter and less rich. Dark chocolate provides a nice balance to the sweetness of the frosting and decorations.
How do I keep the witch hat cones from getting soggy?
Place the cones on the cupcakes just before serving. If you need to store them assembled, keep them in a cool, dry place to avoid moisture softening the cones.
Is there a vegan version of this recipe?
Yes! Use dairy-free yogurt or buttermilk substitute, egg replacer or flax eggs, and vegan butter with coconut cream for frosting. The texture will vary slightly but still delicious.
Pin This Recipe!
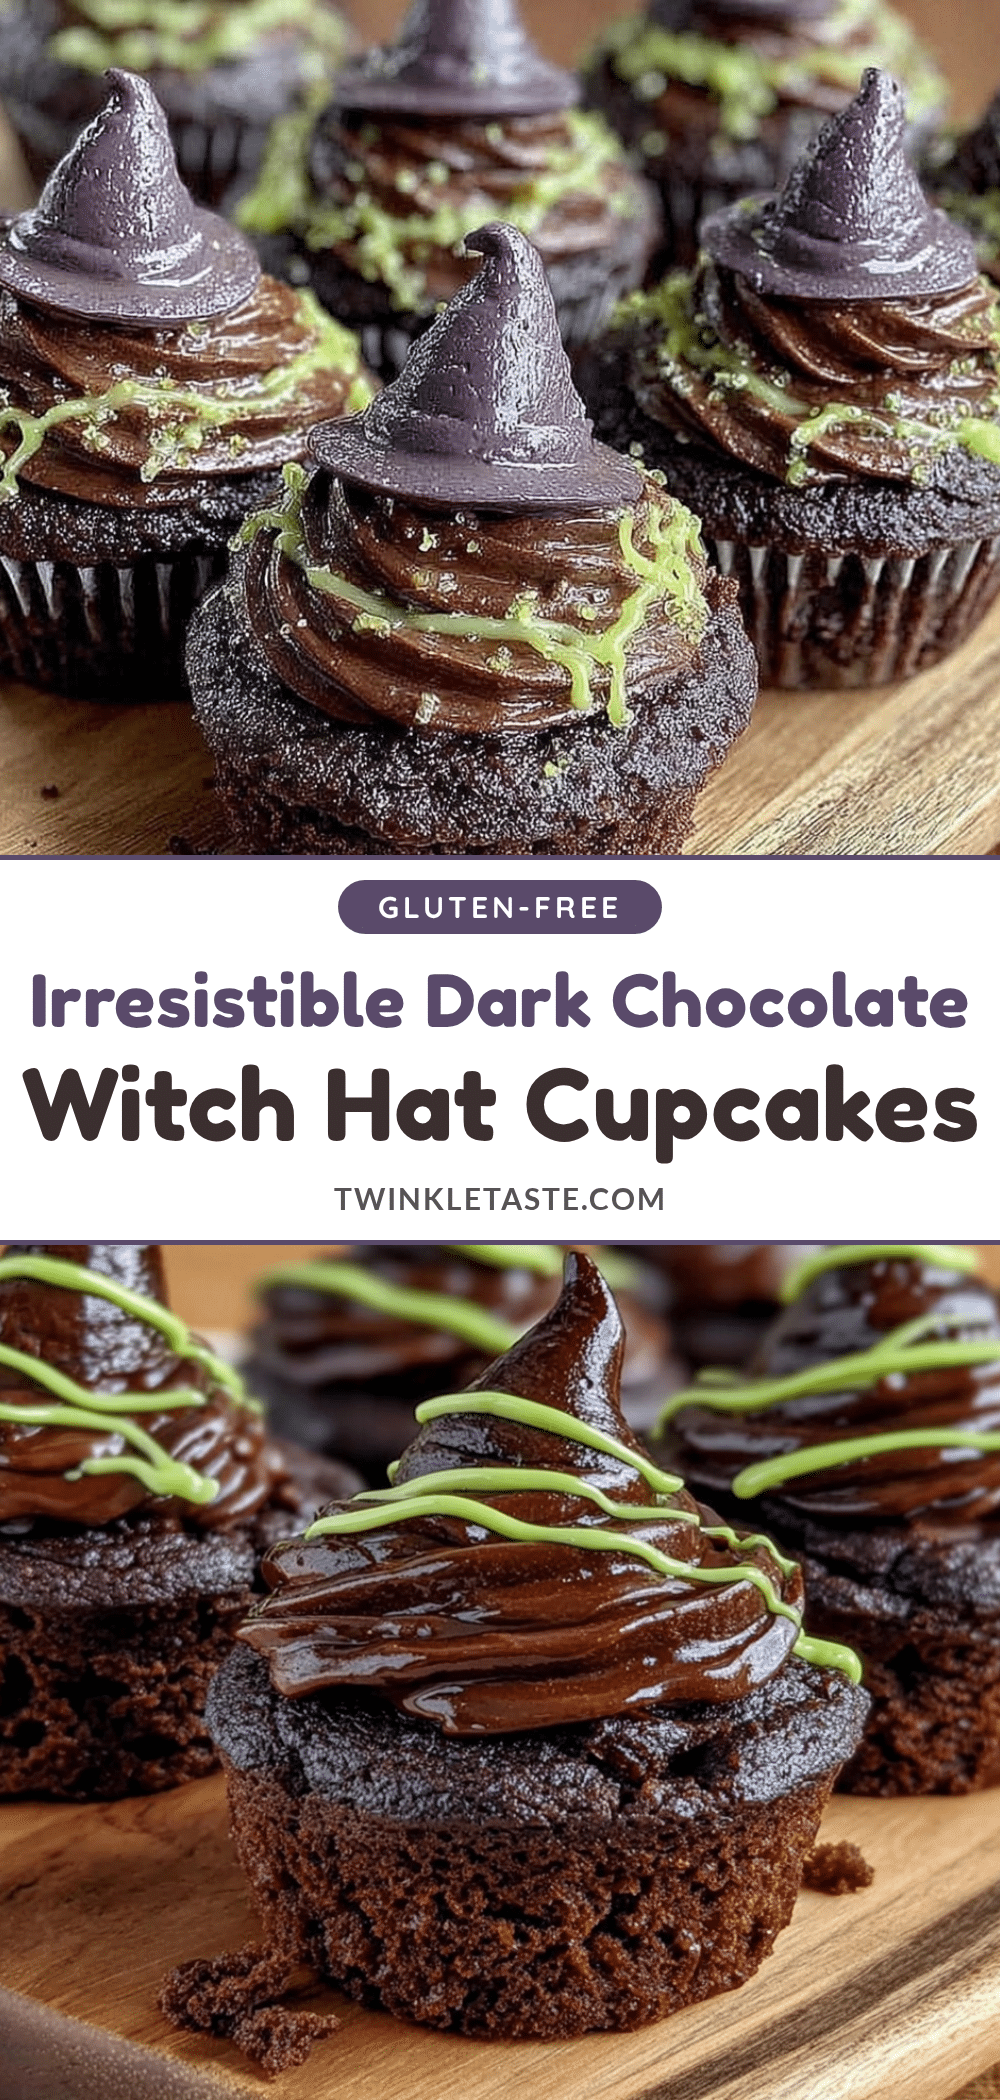
Delicious Dark Chocolate Witch Hat Cupcakes
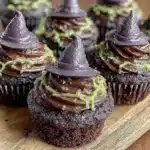
Rich, moist dark chocolate cupcakes topped with creamy frosting and playful witch hat chocolate cone decorations, perfect for Halloween treats.
- Prep Time: 15 minutes
- Cook Time: 22 minutes
- Total Time: 37 minutes
- Yield: 12 cupcakes 1x
- Category: Dessert
- Cuisine: American
Ingredients
- 1 ½ cups (190 g) all-purpose flour
- ¾ cup (75 g) unsweetened dark cocoa powder
- 1 ½ tsp baking powder
- ½ tsp baking soda
- ¼ tsp salt
- 1 cup (200 g) granulated sugar
- 2 large eggs, room temperature
- 1 cup (240 ml) buttermilk (or plain yogurt thinned with milk)
- ½ cup (120 ml) vegetable oil
- 1 tsp vanilla extract
- ½ cup (120 ml) hot water
- 1 tsp espresso powder (optional)
- ½ cup (113 g) unsalted butter, softened (for frosting)
- 2 cups (240 g) powdered sugar, sifted (for frosting)
- 4 oz (115 g) cream cheese, softened (for frosting)
- 1 tsp vanilla extract (for frosting)
- 2–3 tbsp (30–45 ml) heavy cream (for frosting)
- 2 tbsp dark cocoa powder (for chocolate frosting option)
- About 12 mini chocolate cones or waffle cones (for decoration)
- Colored sprinkles or edible glitter (for decoration)
- Black or purple food coloring (optional, for frosting tint)
Instructions
- Preheat oven to 350°F (175°C). Line a 12-cup muffin tin with cupcake liners or grease lightly.
- In a large bowl, sift together flour, dark cocoa powder, baking powder, baking soda, and salt. Whisk until combined.
- In a separate bowl, beat granulated sugar with eggs until pale and fluffy, about 2 minutes. Add vegetable oil, buttermilk, and vanilla extract; mix gently.
- Dissolve espresso powder in hot water and slowly add to wet ingredients while mixing on low speed.
- Gradually fold dry ingredients into wet ingredients with a spatula until just combined; avoid overmixing.
- Spoon batter evenly into liners, filling about ⅔ full (makes approximately 12 cupcakes).
- Bake for 18-22 minutes. Test doneness with a toothpick; let cool in pan 5 minutes, then transfer to wire rack to cool completely.
- For frosting, beat softened butter and cream cheese until smooth. Gradually add powdered sugar and vanilla extract. Add cocoa powder for chocolate frosting and adjust sugar to taste. Thin with heavy cream to desired consistency.
- Pipe or spread frosting onto cooled cupcakes. Place a mini chocolate cone upside down on each cupcake to resemble a witch’s hat. Decorate with sprinkles or edible glitter.
- Optionally tint frosting with black or purple food coloring. Chill cupcakes for 15 minutes to set frosting before serving.
Notes
Sift cocoa powder and flour to avoid lumps. Fold dry ingredients gently to keep cupcakes tender. Dissolve espresso powder in hot water for best flavor. Soften butter and cream cheese to room temperature before frosting. Break cones if too tall to fit. Store cupcakes in airtight container in fridge up to 3 days; freeze unfrosted cupcakes up to 2 months.
Nutrition
- Serving Size: 1 cupcake
- Calories: 320
- Fat: 15
- Carbohydrates: 40
- Protein: 4
Keywords: dark chocolate cupcakes, witch hat cupcakes, Halloween treats, chocolate frosting, spooky cupcakes, easy Halloween dessert