I burned the skin of chicken breasts at least three times before I understood what was going wrong. Not because I’m clumsy or distracted, but because I didn’t realize how finicky chicken skin can be. It’s that tricky dance of heat and timing — too hot, and you’re left with blackened bits; too cool, and it never crisps up. Honestly, I wasn’t even a huge fan of chicken skin before I got this recipe right. I used to peel it off and toss it aside like it was just a necessary evil.
One evening, after another failed attempt, I slowed down, paid attention to the sizzle, and trusted the process. The skin turned out shiny, golden, and impossibly crispy. The tangy lemon caper sauce wasn’t part of the original trial, but adding it was a game-changer — a bright counterpoint to that rich, fatty crust. It’s funny how a sauce can make you rethink a whole dish.
What stuck with me, beyond the kitchen mess and the burnt smell, was how this recipe made dinner feel special without extra fuss. It’s approachable but impressive, and that balance is rare. I often find myself coming back to this dish when I want to impress without stress — it’s the kind of meal that makes you pause and really enjoy each bite. No gimmicks, just honest, crispy skin chicken breasts with that punchy lemon caper sauce that keeps you coming back.
Why You’ll Love This Recipe
This recipe for crispy skin chicken breasts with tangy lemon caper sauce has gone through many tweaks in my kitchen. It’s a straightforward dish but packed with flavor and texture that feel anything but ordinary.
- Quick & Easy: Ready in about 30 minutes, making it perfect for busy weeknights or unexpected guests.
- Simple Ingredients: No hunting down weird spices here — basic pantry staples like lemons, capers, and chicken breasts are all you need.
- Perfect for Dinner Parties: It looks fancy (that golden skin!) but doesn’t require hours of prep, so you can spend time with your guests.
- Crowd-Pleaser: Everyone loves crispy chicken skin, and the lemon caper sauce adds a bright twist that appeals to both kids and adults.
- Unbelievably Delicious: The crispiness and tangy sauce combo hits all the right notes — savory, crunchy, and zesty.
This recipe stands out because it combines a professional technique — rendering chicken skin slowly in a cold pan — with a sauce that balances richness with acidity. Unlike many lemon chicken dishes that can feel one-dimensional, the capers bring a salty burst that complements the citrus. It’s a dish that’s both comforting and fresh, making it a staple in my rotation.
Honestly, this chicken is the kind that makes you close your eyes after the first bite and say, “Yep, this is exactly what I wanted.” If you’ve ever struggled with soggy chicken skin or bland sauces, this is your fix. For a lighter side, I often pair it with a fresh Mediterranean quinoa bowl with grilled chicken — the flavors just sing together.
What Ingredients You Will Need
This recipe uses simple, wholesome ingredients to deliver bold flavor and satisfying texture without the fuss. Most are pantry staples, and you can easily swap a few if needed.
- Chicken Breasts: Skin-on, bone-in preferred for juiciness and flavor. If you can’t find bone-in, skin-on boneless works too.
- Olive Oil: For crisping the skin and sautéing the sauce. I recommend extra virgin olive oil for depth.
- Salt & Pepper: Essential seasoning to bring out the chicken’s natural flavor.
- Lemon: Fresh lemons for both juice and zest in the sauce — the zest adds a subtle brightness you don’t want to skip.
- Capers: Briny and tangy, they add a punch of flavor. Look for capers packed in salt or brine; rinse before use.
- Butter: Unsalted and cold, used to finish the sauce with richness and silkiness.
- Garlic: Fresh cloves, minced — they add a mild pungency that rounds the sauce.
- Fresh Parsley: Chopped, for garnish and a fresh herbal lift.
Ingredient Tips & Substitutions: If you need a dairy-free option, swap butter with a neutral oil like avocado oil. For a gluten-free diet, this recipe is naturally safe as it contains no flour or breading. If you want to add a bit of sweetness to the sauce, a teaspoon of honey or maple syrup works nicely without overpowering the lemony tang.
Equipment Needed
- Heavy-Bottomed Skillet or Cast Iron Pan: Key for achieving that perfect crispy skin. Cast iron is my go-to because it holds heat evenly.
- Tongs: For flipping the chicken gently without tearing the skin.
- Sharp Knife: To score the skin lightly if needed (helps prevent curling).
- Citrus Juicer: Handy but optional for extracting lemon juice.
- Small Saucepan or Same Skillet: To make the lemon caper sauce right after the chicken is done.
If you don’t have cast iron, a heavy stainless steel pan works fine — just be patient with heat control. Avoid nonstick here; it doesn’t give you the same sear on skin. For budget options, a well-seasoned carbon steel pan is a great alternative and often cheaper than cast iron.
Preparation Method
- Prep the Chicken: Pat the chicken breasts dry with paper towels — moisture is the enemy of crispiness. Lightly score the skin with a sharp knife if it curls up during cooking. Season generously with salt and pepper on both sides. (5 minutes)
- Start in a Cold Pan: Place your skin-on chicken breasts skin side down in a cold, dry cast iron skillet. Resist the temptation to preheat the pan — this helps render fat slowly for crisp skin. Turn the heat to medium-low. (10 minutes)
- Render the Skin: Cook undisturbed until the skin is golden brown and crisp — about 12-15 minutes. You should hear a steady sizzle but no burning. If it starts to burn, lower the heat immediately. (12-15 minutes)
- Flip and Finish Cooking: Flip the chicken breasts and cook for an additional 6-8 minutes, until the internal temperature reaches 165°F (74°C). Use a meat thermometer for accuracy. (6-8 minutes)
- Rest the Chicken: Transfer the chicken to a plate and tent loosely with foil to rest while you make the sauce. This locks in juices. (5 minutes)
- Make the Lemon Caper Sauce: In the same skillet, add 2 tablespoons of olive oil and 2 tablespoons of cold butter. Add minced garlic and cook for 30 seconds until fragrant. Add juice and zest of one lemon, plus 2 tablespoons of rinsed capers. Let simmer for 2-3 minutes, stirring to combine flavors. (5 minutes)
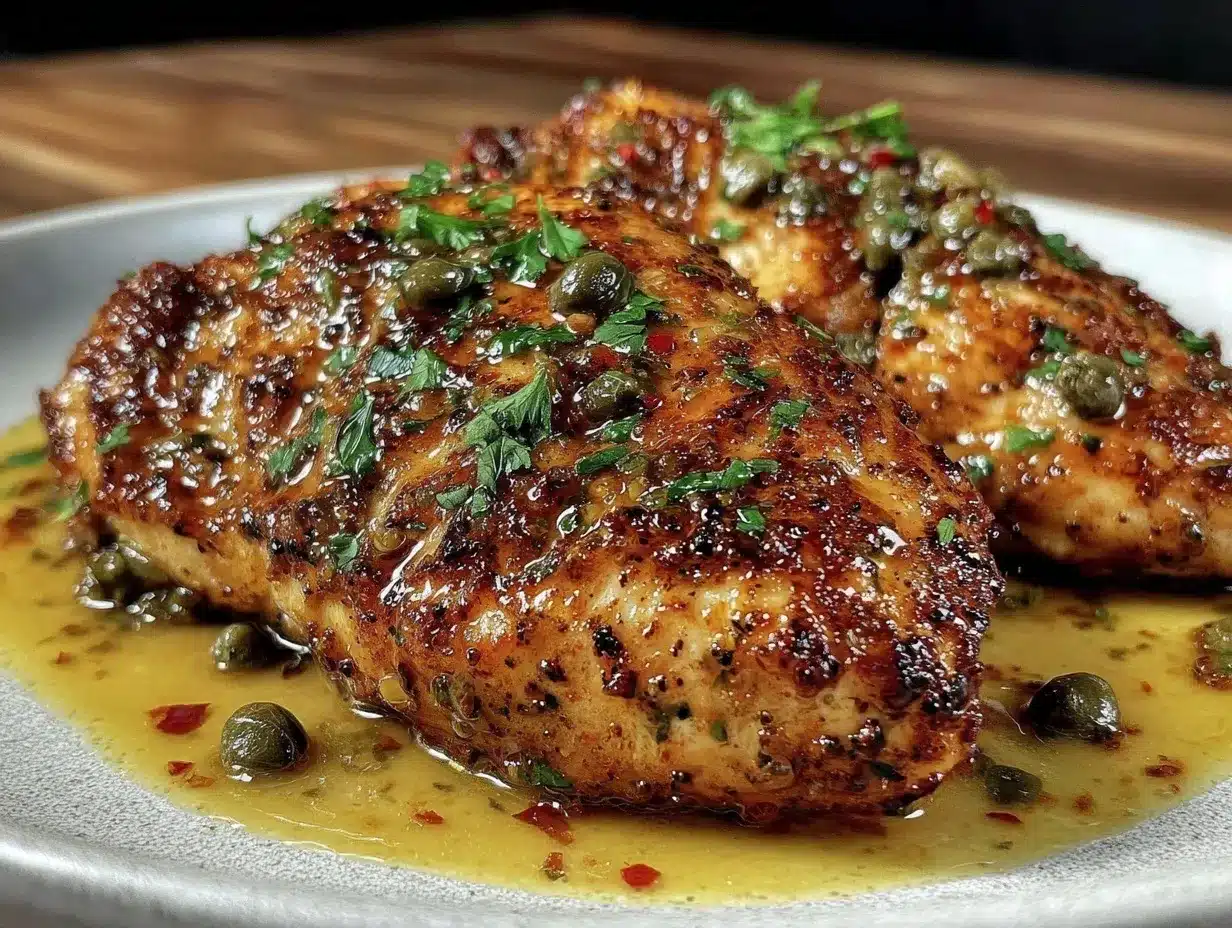
- Serve: Spoon the warm lemon caper sauce over the chicken breasts, garnish with chopped fresh parsley, and enjoy immediately.
Pro Tips: Keep the heat moderate to avoid burning the skin. Don’t overcrowd the pan — cook chicken in batches if needed. Resting the meat is non-negotiable for juicy results. The sauce should be tangy but balanced; if it tastes too sharp, a tiny pinch of sugar can smooth it out.
Cooking Tips & Techniques
Rendering chicken skin slowly in a cold pan is the secret to that irresistible crispy crust. I learned this the hard way — rushing the process with high heat just scorches the skin before the fat melts away. Patience is key here.
Use a meat thermometer to avoid overcooking. Chicken breasts dry out quickly if you guess doneness by time alone. When you hit 165°F (74°C), pull it off and rest it. I once ruined a batch by skipping this step — the result was dry chicken that no sauce could fix.
Keep your pan dry except for the olive oil — any water will steam the skin and ruin crispiness. Also, don’t move the chicken around too much while it’s cooking skin side down; let it form that crust undisturbed.
When making the sauce, use fresh lemon juice, not bottled, for the best brightness. The capers need a quick rinse to remove excess brine but don’t soak them too long or they’ll lose their punch.
If multitasking, start prepping your sides while the chicken cooks. For instance, a quick Mediterranean quinoa bowl pairs wonderfully and can cook alongside.
Variations & Adaptations
- Herb-Infused Sauce: Add fresh thyme or rosemary to the lemon caper sauce for a fragrant twist.
- Spicy Kick: Toss in a pinch of red pepper flakes while sautéing garlic for some heat.
- Gluten-Free Alternative: This recipe is naturally gluten-free, but watch out for cross-contamination with capers brands.
- Dairy-Free Version: Swap butter with coconut oil or extra olive oil in the sauce — it won’t be as rich but still tasty.
- Chicken Thighs: Use bone-in, skin-on chicken thighs for a juicier, more forgiving cut. Adjust cooking time accordingly.
Personally, I once tried a version with smoked paprika in the seasoning — it added a subtle smoky depth that was unexpectedly good. If you like experimenting, feel free to tweak the sauce by adding a splash of white wine or a dash of honey for sweetness.
Serving & Storage Suggestions
Serve the chicken breasts hot, straight from the pan, to enjoy the crispy skin at its best. The lemon caper sauce is warm and glossy, ideal drizzled over the top just before serving.
Pair this dish with light sides like roasted asparagus, herbed quinoa, or a fresh green salad to keep things balanced. For a complete meal, consider the easy Mediterranean chicken sheet pan recipe with lemon and olives for inspiration on complementary flavors.
Leftovers store well in an airtight container in the fridge for up to 3 days. Reheat gently in a skillet over medium-low heat to keep the skin crisp. Avoid the microwave if you can — it’ll make the skin rubbery.
Flavors in the lemon caper sauce tend to develop and mellow after a day, so leftovers can taste even better. You can also freeze cooked chicken breasts (without the sauce) for up to 2 months; thaw overnight in the fridge before reheating.
Nutritional Information & Benefits
This dish is a great source of lean protein from chicken breasts, essential for muscle repair and satiety. Olive oil and butter add healthy fats, with olive oil providing heart-healthy monounsaturated fats.
Capers are low in calories but add a burst of flavor with antioxidants and vitamins. Lemon juice offers a good dose of vitamin C, which supports immunity and skin health.
This recipe fits well into low-carb and gluten-free diets naturally. Be mindful of butter if you’re dairy sensitive, but substitutions are easy. Overall, it’s a balanced meal that feels indulgent but aligns with many wellness goals.
Conclusion
Crispy skin chicken breasts with tangy lemon caper sauce is one of those dishes that feels fancy but is surprisingly simple to make once you know the tricks. It’s satisfying, flavorful, and perfect when you want a meal that impresses without the fuss.
Feel free to make this recipe your own by adding herbs, spices, or sides that you love. I keep coming back to it because it hits that sweet spot between comfort and freshness. Plus, it pairs beautifully with many dishes, like the creamy whipped feta dip with honey roasted tomatoes for a Mediterranean-inspired meal.
Give it a try, and let me know how your crispy skin chicken turns out — I’m always curious about your variations and tips!
Frequently Asked Questions
How do I get the chicken skin extra crispy?
Start cooking the chicken skin side down in a cold pan with no oil, then slowly increase heat to medium-low. Don’t move the chicken until the skin is golden brown to allow proper rendering.
Can I use boneless chicken breasts?
Yes, but bone-in chicken breasts tend to stay juicier and have better flavor. If using boneless, watch cooking time closely to avoid drying out.
What can I substitute for capers?
If you don’t have capers, green olives chopped finely or a splash of brine from pickles can provide a similar salty tang.
Is this recipe suitable for meal prep?
Absolutely. Cooked chicken breasts store well in the fridge for 3 days and can be reheated gently. Keep the sauce separate if possible to maintain crispiness.
Can I make the lemon caper sauce in advance?
Yes, but it’s best fresh. If you make it ahead, reheat gently and add a splash of lemon juice to brighten the flavor before serving.
Pin This Recipe!

Crispy Skin Chicken Breasts with Tangy Lemon Caper Sauce

A straightforward and flavorful recipe featuring crispy skin chicken breasts paired with a bright, tangy lemon caper sauce. Perfect for quick weeknight dinners or impressing guests with minimal fuss.
- Prep Time: 10 minutes
- Cook Time: 25 minutes
- Total Time: 35 minutes
- Yield: 2 servings 1x
- Category: Main Course
- Cuisine: American
Ingredients
- 2 skin-on, bone-in chicken breasts (or skin-on boneless as substitute)
- 2 tablespoons extra virgin olive oil
- Salt and pepper, to taste
- 1 lemon (juice and zest)
- 2 tablespoons capers, rinsed
- 2 tablespoons unsalted cold butter
- 2 cloves garlic, minced
- Fresh parsley, chopped (for garnish)
Instructions
- Pat the chicken breasts dry with paper towels. Lightly score the skin if it curls during cooking. Season generously with salt and pepper on both sides.
- Place the chicken breasts skin side down in a cold, dry cast iron skillet. Do not preheat the pan. Turn heat to medium-low.
- Cook undisturbed until the skin is golden brown and crisp, about 12-15 minutes. Lower heat if skin starts to burn.
- Flip the chicken breasts and cook for an additional 6-8 minutes until internal temperature reaches 165°F (74°C).
- Transfer chicken to a plate and tent loosely with foil to rest for 5 minutes.
- In the same skillet, add 2 tablespoons olive oil and 2 tablespoons cold butter. Add minced garlic and cook for 30 seconds until fragrant.
- Add lemon juice and zest, plus rinsed capers. Simmer for 2-3 minutes, stirring to combine flavors.
- Spoon the warm lemon caper sauce over the chicken breasts, garnish with chopped parsley, and serve immediately.
Notes
Start cooking chicken skin side down in a cold pan to render fat slowly and achieve crispy skin. Use a meat thermometer to ensure chicken reaches 165°F for safety and juiciness. Rest chicken before serving to lock in juices. Rinse capers before use to reduce excess saltiness. For dairy-free, substitute butter with neutral oil like avocado or extra olive oil. Avoid overcrowding pan; cook in batches if needed. Reheat leftovers gently in a skillet to maintain crispiness.
Nutrition
- Serving Size: 1 chicken breast wit
- Calories: 450
- Sugar: 1
- Sodium: 600
- Fat: 30
- Saturated Fat: 9
- Carbohydrates: 3
- Fiber: 0.5
- Protein: 40
Keywords: crispy chicken skin, lemon caper sauce, chicken breasts, easy dinner, quick recipe, weeknight meal, gluten-free, dairy-free option