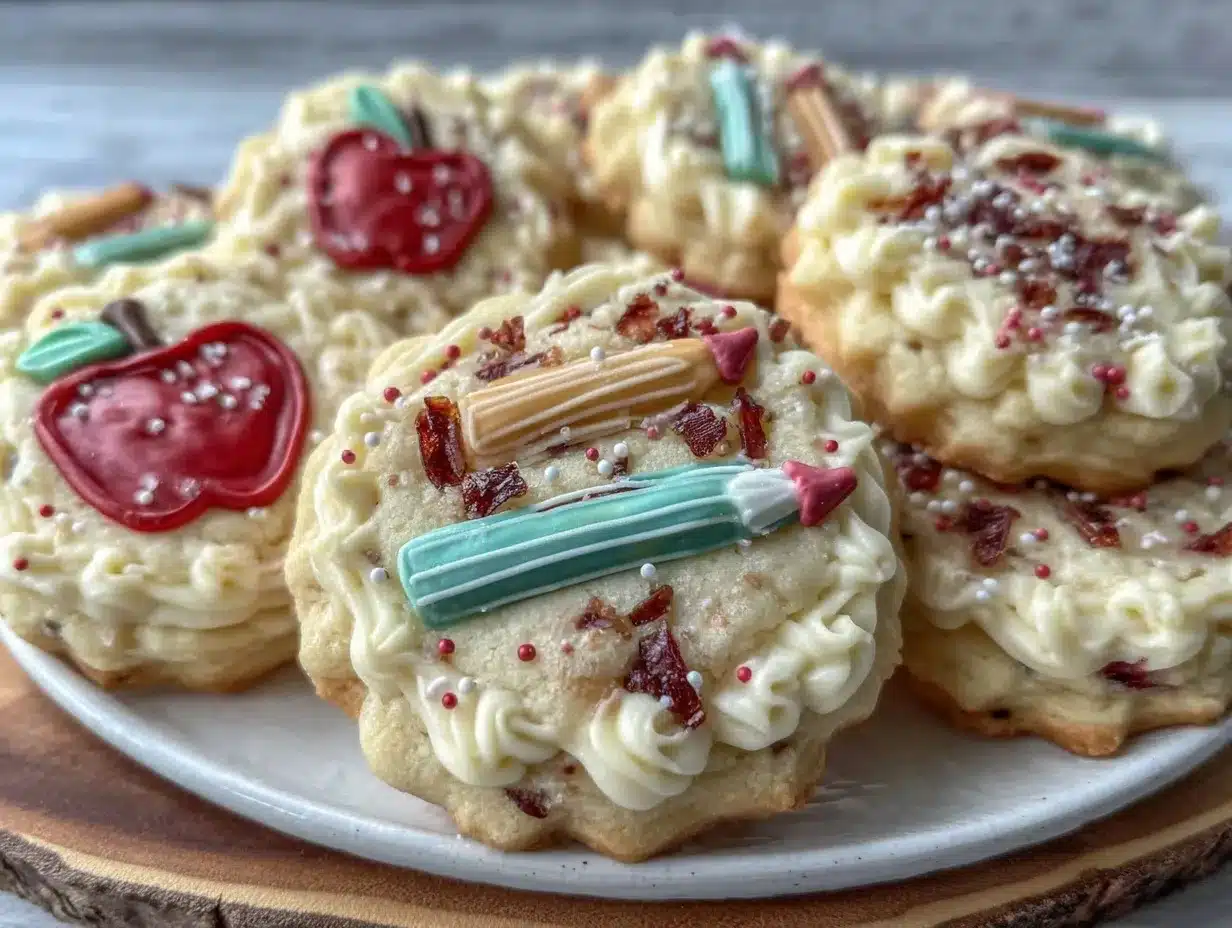
My partner took one bite of these decorated back-to-school sugar cookies and immediately asked, “Where have you been hiding these all summer?” Honestly, I was just as surprised. I had made them on a whim one late afternoon, while the school supplies were still scattered on the kitchen table and the scent of fresh pencils mingled with the vanilla sugar aroma. Watching that moment unfold—her eyes lighting up, the playful decorations catching the light—it hit me just how much these cookies weren’t just some sweet treat. They were a little celebration, a tiny burst of joy on what can often be a hectic, nerve-wracking day for both kids and parents.
The sugar cookie dough itself was nothing fancy, but the way the icing dried smooth and the colors popped made the whole experience feel special. And the best part? The kids from the neighborhood quickly gathered around, drawn by the smell and the fun shapes—apples, pencils, and tiny backpacks. It wasn’t just about the cookies; it was about marking a fresh start with a bit of sweetness and laughter.
I realized then that these perfect decorated back-to-school sugar cookies were going to be my go-to for every year’s kickoff. They’re simple enough to make in the afternoon but bring a sense of occasion that even store-bought treats can’t match. Plus, with just a few pantry staples and some basic decorating skills, anyone can pull them off. So here’s the step-by-step recipe that stuck with me—and hopefully will with you too.
Why You’ll Love This Recipe
Let me tell you, I’ve tested plenty of sugar cookie recipes over the years, and this one really nails that balance between soft, buttery flavor and just the right texture for decorating. It’s the kind of cookie that feels like a little celebration every bite—perfect for back-to-school but also great for any festive occasion.
- Quick & Easy: The dough comes together in under 20 minutes, which means you won’t be stuck in the kitchen all afternoon when there’s homework (and after-school chaos) waiting.
- Simple Ingredients: No specialty flours or fancy extracts here—just basics like butter, sugar, eggs, and vanilla. If you’ve got these in your pantry, you’re halfway there already.
- Perfect for Celebrations: Whether it’s a classroom party, a neighborhood gathering, or just a little treat after school, these cookies bring that fun factor with their colorful decorations and themed shapes.
- Crowd-Pleaser: I’ve had kids and adults alike reach for seconds (and thirds). The texture is soft but sturdy enough to hold intricate icing designs, which always impresses.
- Unbelievably Delicious: The buttery sugar cookie base pairs beautifully with the sweet, slightly tangy royal icing, making each bite a little different experience depending on the decoration.
What sets this recipe apart is the attention to icing consistency and the little decorating tricks I learned after many, many batches. Instead of just a flat glaze, the icing dries firm but still melts in your mouth, and the colors stay vibrant without bleeding. The dough itself is rolled to the perfect thickness so the cookies bake evenly and keep their shape during decorating. Honestly, these are cookies that make you want to close your eyes and savor the moment, not just scarf them down.
What Ingredients You Will Need
This recipe keeps things straightforward with ingredients that are pantry staples for most homes. Each ingredient plays a role in creating a cookie that’s soft, flavorful, and the right canvas for decorating.
- For the Sugar Cookies:
- 2 ¾ cups (345 g) all-purpose flour (I prefer King Arthur for consistent texture)
- 1 teaspoon baking powder
- ½ teaspoon salt
- 1 cup (227 g) unsalted butter, softened (room temperature is key for proper creaming)
- 1 ½ cups (300 g) granulated sugar
- 1 large egg, room temperature
- 2 teaspoons pure vanilla extract (quality vanilla makes a big flavor difference)
- Optional: ½ teaspoon almond extract for a subtle twist
- For the Royal Icing:
- 3 cups (360 g) powdered sugar, sifted
- 2 large egg whites or 4 tablespoons meringue powder + 6 tablespoons water (safer and easier)
- 1 teaspoon lemon juice (adds brightness and helps set the icing)
- Food coloring gels in your favorite back-to-school colors: red, yellow, green, blue
If you want to swap to a gluten-free option, almond or oat flour can work but expect a softer cookie—great for smaller decorations or hand-held treats. For a dairy-free version, coconut oil or vegan butter can replace butter, but the flavor will shift slightly.
Equipment Needed
Having the right tools makes decorating sugar cookies so much less stressful. Here’s what you’ll need to make these perfect decorated back-to-school sugar cookies:
- Mixing Bowls: At least two—one for the cookie dough and one for the royal icing.
- Electric Mixer: A handheld or stand mixer helps cream the butter and sugar properly. I’ve used both, and honestly, a stand mixer saves your wrists but either works.
- Rolling Pin: A smooth rolling pin, ideally with thickness guides, to roll the dough evenly to about ¼ inch (6 mm).
- Cookie Cutters: Back-to-school themed shapes like apples, pencils, backpacks, or simple circles if you want to freestyle your decorations.
- Baking Sheets: Heavy-duty, non-stick or lined with parchment paper for easy cleanup and even baking.
- Piping Bags and Tips: Small round tips (#1 or #2) for outlining and flooding the cookies with icing. If you don’t have piping bags, zip-top bags with a tiny corner snipped work fine.
- Cooling Rack: To let the cookies cool completely before decorating.
For those on a budget, using a clean plastic sandwich bag as a piping bag and simple cookie cutters from a dollar store can totally get the job done. Just make sure your rolling pin is clean and the dough is chilled before rolling.
Preparation Method
- Mix Dry Ingredients: In a medium bowl, whisk together 2 ¾ cups (345 g) flour, 1 teaspoon baking powder, and ½ teaspoon salt. Set aside. (About 5 minutes)
- Cream Butter and Sugar: In a large bowl, use an electric mixer to beat 1 cup (227 g) softened unsalted butter and 1 ½ cups (300 g) granulated sugar until light and fluffy—about 3-4 minutes. This step is key for tender cookies, so don’t rush it.
- Add Egg and Vanilla: Beat in 1 large room temperature egg and 2 teaspoons vanilla extract (and almond extract if using) until just combined.
- Combine Wet and Dry: Gradually add the dry ingredients to the wet mixture, mixing on low speed until the dough just comes together. If the dough feels too sticky, sprinkle a little extra flour (1 tablespoon at a time). The dough should be soft but not sticky.
- Chill the Dough: Wrap the dough in plastic wrap and chill it for at least 1 hour (or up to overnight). This helps the dough firm up and makes rolling easier.
- Preheat Oven: Set your oven to 350°F (175°C). Line baking sheets with parchment paper.
- Roll and Cut Shapes: On a lightly floured surface, roll out the dough to about ¼ inch (6 mm) thickness. Use your cookie cutters to cut shapes, then transfer them carefully to the baking sheets. (Tip: Chill cut cookies on the sheet for 10 minutes before baking to help maintain shape.)
- Bake: Bake cookies for 8-10 minutes, until edges just start to turn golden. Avoid overbaking to keep them soft. Let cookies cool on the baking sheet for 5 minutes, then transfer to a wire rack to cool completely.
- Prepare Royal Icing: While cookies cool, whisk together 3 cups (360 g) sifted powdered sugar, 2 egg whites or meringue powder mixture, and 1 teaspoon lemon juice until smooth and glossy. Divide into bowls and tint with your food coloring gels.
- Decorate: Use piping bags fitted with small round tips to outline each cookie with a thicker icing, then flood with a thinner consistency for the interior. Allow each color to dry slightly before adding details to prevent bleeding. Let decorated cookies dry at least 4 hours or overnight.
Pro tip: If your icing is too thick, add tiny drops of water; too thin, add more powdered sugar. I’ve learned the hard way that patience during decorating makes all the difference.
Cooking Tips & Techniques
Getting sugar cookies just right can be a bit of a balancing act, but here are some tips I’ve picked up to help you nail it every time:
- Don’t Skip the Chill: Chilling the dough is non-negotiable. It prevents spreading and keeps shapes sharp, especially important for decorated cookies.
- Roll Evenly: Use rolling pin guides or measure thickness with a ruler. Uneven dough leads to uneven baking and won’t hold decorations well.
- Test One Cookie First: Baking a single cookie before the whole batch helps you fine-tune baking time and temperature.
- Use Meringue Powder for Royal Icing: It’s safer than raw egg whites and easier to control consistency. Plus, it dries beautifully hard but not brittle.
- Practice Icing Consistency: Thick icing is for outlines (should hold a peak), while thinner icing is for flooding (flows smoothly but not runny). This technique avoids colors running into each other.
- Work in Sections: When flooding, fill one color area at a time and let it crust before adding more details.
- Storage Tip: Store decorated cookies in a single layer in an airtight container to prevent smudging.
I’ve had my fair share of cracked cookies and runny icing disasters, but these tips helped me turn those into sweet victories. Timing your decorating and having patience between layers are the biggest game changers.
Variations & Adaptations
Want to make these decorated back-to-school sugar cookies your own? There are plenty of ways to tweak the recipe to fit your style and dietary needs.
- Gluten-Free Version: Swap the all-purpose flour for a 1:1 gluten-free baking blend. Expect a slightly crumblier texture but just as delicious.
- Flavor Twists: Add citrus zest (lemon or orange) to the dough for a fresh note, or swap vanilla for almond or maple extracts.
- Alternative Icing: Use a simple cream cheese frosting for a softer, tangier topping, perfect for those who prefer less sweetness.
- Seasonal Themes: Switch up the cookie cutters and icing colors for other holidays—pumpkins for fall, snowflakes for winter, or flowers for spring.
- Natural Coloring: Use beet juice, turmeric, or spirulina powder to tint your icing if you prefer natural food dyes.
One time, I swapped out the royal icing for a smooth vanilla glaze and sprinkled crushed freeze-dried strawberries on top—turned into a fun, textured treat that the kids adored. Don’t be afraid to get creative!
Serving & Storage Suggestions
These sugar cookies are best served at room temperature, allowing the buttery flavor and icing to shine. They make a fantastic centerpiece for back-to-school celebrations or classroom parties.
Pair them with a refreshing glass of milk or a lightly brewed iced tea. For a more festive touch, I sometimes set up a little cookie decorating station where kids can add their own sprinkles or details. It’s a hit every time and keeps everyone busy happily.
To store, place the cookies in a single layer inside an airtight container. They’ll keep well for up to 5 days at room temperature. For longer storage, freeze undecorated cookies in a zip-top bag for up to 3 months. Decorated cookies freeze best if wrapped individually in plastic wrap before freezing.
When reheating, avoid microwaving as it can melt the icing. Instead, let frozen cookies thaw at room temperature overnight. The flavors actually mellow and improve after a day, making them even more enjoyable.
For a light snack alongside these, you might enjoy a fresh creamy dill cucumber tomato salad from my recipe collection, which balances sweet treats with refreshing veggies beautifully.
Nutritional Information & Benefits
Each decorated back-to-school sugar cookie (medium size) contains approximately 150-180 calories, with 7-9 grams of fat, 22 grams of carbohydrates, and 2 grams of protein. Keep in mind the royal icing adds sugar but also that small pop of flavor and texture.
The butter provides a source of fat-soluble vitamins, and using fresh eggs adds protein and essential nutrients. If you add zest or natural coloring from fruits and vegetables, you’re sneaking in a bit more nutrition too.
These cookies are naturally gluten-containing unless you swap flours, and they do contain eggs and dairy, so they aren’t suitable for everyone. However, with simple substitutions, they can easily fit gluten-free or vegan diets.
From my perspective, these cookies are a treat worth savoring, especially when paired with wholesome meals and snacks throughout the day. They turn a simple moment into a small celebration that’s good for the soul.
Conclusion
Perfect decorated back-to-school sugar cookies are more than just a dessert—they’re a tiny party in cookie form that makes the first day feel special and fun. The recipe is forgiving enough for beginners but offers enough detail for those who want to get fancy with their decorations.
Feel free to customize the colors, shapes, and flavors to match your family’s vibe or your classroom’s theme. I love these cookies because they bring a little brightness to a busy day and create memories around the kitchen table that don’t require a big fuss.
If you try this recipe, I’d love to hear how your decorations turned out or any fun twists you added. Sharing those moments makes baking even sweeter.
So go ahead, roll up your sleeves, and let these cookies kick off your school year with a smile.
FAQs about Perfect Decorated Back-to-School Sugar Cookies
Can I make the dough ahead of time?
Yes! The dough can be wrapped and refrigerated for up to 3 days or frozen for up to a month. Just thaw before rolling out.
What if I don’t have cookie cutters in school shapes?
No worries! Simple shapes like circles, stars, or hearts work just as beautifully and let you get creative with the icing.
How do I prevent royal icing from cracking?
Make sure your icing isn’t too thick when flooding and let it dry slowly at room temperature. Avoid humidity and don’t refrigerate icing-covered cookies.
Can I use food coloring liquids instead of gels?
Gel colors are best because they don’t thin out the icing. Liquid colors can make the icing too runny, which makes decorating tricky.
What’s the best way to store decorated cookies?
Store them in an airtight container at room temperature in a single layer. If stacking, place parchment paper between layers to protect the decorations.
For a fun snack pairing, consider a batch of easy quick pickled refrigerator cucumbers to balance sweetness with crunch and tang—a combo my family goes nuts for during busy school weeks.
Pin This Recipe!

Perfect Decorated Back-to-School Sugar Cookies

Soft, buttery sugar cookies decorated with vibrant royal icing, perfect for back-to-school celebrations and festive occasions.
- Prep Time: 20 minutes
- Cook Time: 10 minutes
- Total Time: 1 hour 30 minutes
- Yield: 24 medium cookies 1x
- Category: Dessert
- Cuisine: American
Ingredients
- 2 ¾ cups (345 g) all-purpose flour
- 1 teaspoon baking powder
- ½ teaspoon salt
- 1 cup (227 g) unsalted butter, softened
- 1 ½ cups (300 g) granulated sugar
- 1 large egg, room temperature
- 2 teaspoons pure vanilla extract
- Optional: ½ teaspoon almond extract
- 3 cups (360 g) powdered sugar, sifted
- 2 large egg whites or 4 tablespoons meringue powder + 6 tablespoons water
- 1 teaspoon lemon juice
- Food coloring gels in red, yellow, green, blue
Instructions
- Mix dry ingredients: whisk together flour, baking powder, and salt in a medium bowl; set aside.
- Cream butter and sugar: beat softened butter and granulated sugar with an electric mixer until light and fluffy, about 3-4 minutes.
- Add egg and vanilla (and almond extract if using); beat until just combined.
- Gradually add dry ingredients to wet mixture on low speed until dough just comes together; add extra flour if too sticky.
- Wrap dough in plastic wrap and chill for at least 1 hour or overnight.
- Preheat oven to 350°F (175°C) and line baking sheets with parchment paper.
- Roll dough on lightly floured surface to ¼ inch (6 mm) thickness; cut shapes with cookie cutters and transfer to baking sheets.
- Chill cut cookies on baking sheet for 10 minutes before baking.
- Bake for 8-10 minutes until edges just start to turn golden; cool on baking sheet for 5 minutes then transfer to wire rack to cool completely.
- Prepare royal icing by whisking powdered sugar, egg whites or meringue powder mixture, and lemon juice until smooth and glossy; divide and tint with food coloring gels.
- Decorate cookies using piping bags with small round tips: outline with thicker icing, flood with thinner icing, allowing each color to dry slightly before adding details.
- Let decorated cookies dry at least 4 hours or overnight.
Notes
Chill dough before rolling to prevent spreading and maintain shape. Use meringue powder for safer royal icing. Adjust icing consistency by adding water or powdered sugar. Store decorated cookies in a single layer in an airtight container to prevent smudging. Let decorated cookies dry at least 4 hours or overnight for best results.
Nutrition
- Serving Size: 1 medium decorated s
- Calories: 165
- Sugar: 15
- Sodium: 90
- Fat: 8
- Saturated Fat: 5
- Carbohydrates: 22
- Protein: 2
Keywords: sugar cookies, decorated cookies, back-to-school, royal icing, celebration cookies, easy sugar cookies, cookie decorating


