The autumn I turned thirty, I found myself at a local hardware store on a rainy Tuesday, buying a new mop head. Honestly, not my finest moment. But as I was waiting in line, the woman behind me—a retired schoolteacher with glasses on a chain—started talking to me about her Halloween party. I wasn’t expecting cooking advice from a woman buying lightbulbs and duct tape, but there I was, holding my mop, listening to her describe exactly how to make these little black cat truffles. She said her grandkids were “health-conscious” (her air quotes, not mine) and that she had been playing with the recipe for years. She swore by using lighter ingredients so you could eat three without the sugar coma. I was intrigued. I scribbled her instructions on the back of my receipt.
I went home, dug out some cream cheese I had forgotten about, and gave it a shot. The first batch was a little messy—let’s just say the “ears” looked more like alien antennae. But the taste? Oh, the taste was something else. It was creamy, rich, and that perfect Halloween treat that didn’t leave me regretting my life choices. I’ve been tweaking it ever since. Maybe you’ve been there, staring at a Pinterest board full of complicated Halloween desserts that require a pastry degree. These Lighter Black Cat Oreo Truffles are the answer. They are simple, they are adorable, and they taste so good you won’t believe they are a little bit better for you. This is the recipe that keeps me coming back every October.
Why You’ll Love This Recipe
Let’s face it, Halloween treats are usually a sugar bomb wrapped in food coloring. I love a good candy corn as much as the next person, but I wanted something that felt indulgent without the crash. After testing this recipe on my skeptical neighbor (who swears by full-fat everything), I knew I had a winner. These truffles have that classic Oreo truffle texture—creamy, fudgy, and melt-in-your-mouth—but with a few smart swaps that make them feel lighter.
- Quick & Easy: These come together in about 20 minutes of active time. The hardest part is waiting for them to chill.
- Simple Ingredients: You probably have most of these in your pantry right now. No weird Halloween candy or specialty baking items required.
- Perfect for Halloween Parties: They look like little black cats! They are the star of any spooky spread, from classroom parties to cocktail hours.
- Crowd-Pleaser: Kids go wild for them, and adults love that they aren’t overly sweet. I’ve seen people eat four in a row without blinking.
- Unbelievably Delicious: The combination of the light cream cheese, the cocoa, and the slight saltiness from the pretzel ears is just next-level comfort food.
What makes this recipe different from the rest? It’s the balance. I use a lower-fat cream cheese and a touch of Greek yogurt to keep the filling creamy without the heaviness. The chocolate coating is dark and rich, which pairs perfectly with the sweet Oreo center. This isn’t just another version of a truffle—it’s the version you will actually want to make every year. It’s comfort food reimagined: healthier, faster, but with the same soul-soothing satisfaction. Perfect for impressing your Halloween guests without any stress.
What Ingredients You Will Need
This recipe uses simple, wholesome ingredients to deliver that classic truffle flavor without the guilt. Most of these are pantry staples, and the swaps are easy to make if you need to.
- Oreo Cookies (28 cookies): Use the classic Oreo, not the Double Stuf. You will use the whole cookie, filling and all. (For a gluten-free option, use gluten-free Oreo-style cookies.)
- Reduced-Fat Cream Cheese (4 oz, softened): This is the secret to the lighter texture. I prefer Philadelphia brand for the creamiest result. Make sure it is at room temperature so it blends smoothly.
- Plain Greek Yogurt (2 tablespoons): This adds creaminess and a slight tang without the extra fat. Use full-fat Greek yogurt if you prefer, but non-fat works perfectly here. (Adds richness without the calories.)
- Vanilla Extract (1 teaspoon): Pure vanilla extract gives the best flavor. Avoid imitation vanilla if you can.
- Dark Chocolate Chips (1 cup, or about 180g): I use 60% cacao dark chocolate for a rich, less sweet coating. Ghirardelli or Lily’s are my go-to brands.
- Coconut Oil (1 teaspoon): This helps thin the chocolate for a smooth, shiny coating. (Use refined coconut oil to avoid a coconut taste.)
- Pretzel Sticks (for ears): You’ll break these into small pieces to form the cat ears. They add a perfect salty crunch.
- Candy Eyes (for decoration): These are the classic black cat eyes. You can find them at any craft store or online.
- Black Sanding Sugar (optional, for garnish): This gives a little sparkle. Totally optional, but very cute.
Substitution Guidance: If you are dairy-free, use a dairy-free cream cheese alternative and a dairy-free yogurt. The texture will be slightly different, but still delicious. For a vegan version, use vegan cream cheese and dark chocolate that is certified vegan.
Equipment Needed
You don’t need a fancy kitchen for these truffles. I’ve made them in a tiny apartment kitchen with a hand mixer, and they turned out perfect.
- Food Processor: This is the easiest way to crush the Oreos into a fine crumb. You can also use a rolling pin and a zip-top bag, but the food processor is faster and gives a more consistent texture.
- Electric Mixer (hand or stand): For beating the cream cheese and yogurt until smooth. A whisk and some elbow grease will work too, but it takes a little more effort.
- Mixing Bowls: One large bowl for the truffle mixture, one small bowl for the chocolate.
- Baking Sheet: Lined with parchment paper or a silicone mat for chilling the truffles.
- Double Boiler or Microwave-Safe Bowl: For melting the chocolate. I usually use the microwave in 30-second bursts, but a double boiler gives you more control.
- Toothpicks or Dipping Tools: For coating the truffles in chocolate. A fork works in a pinch.
Budget-Friendly Tip: If you don’t have a food processor, place the Oreos in a large zip-top bag and crush them with a rolling pin. It’s a great way to release some frustration!
Preparation Method
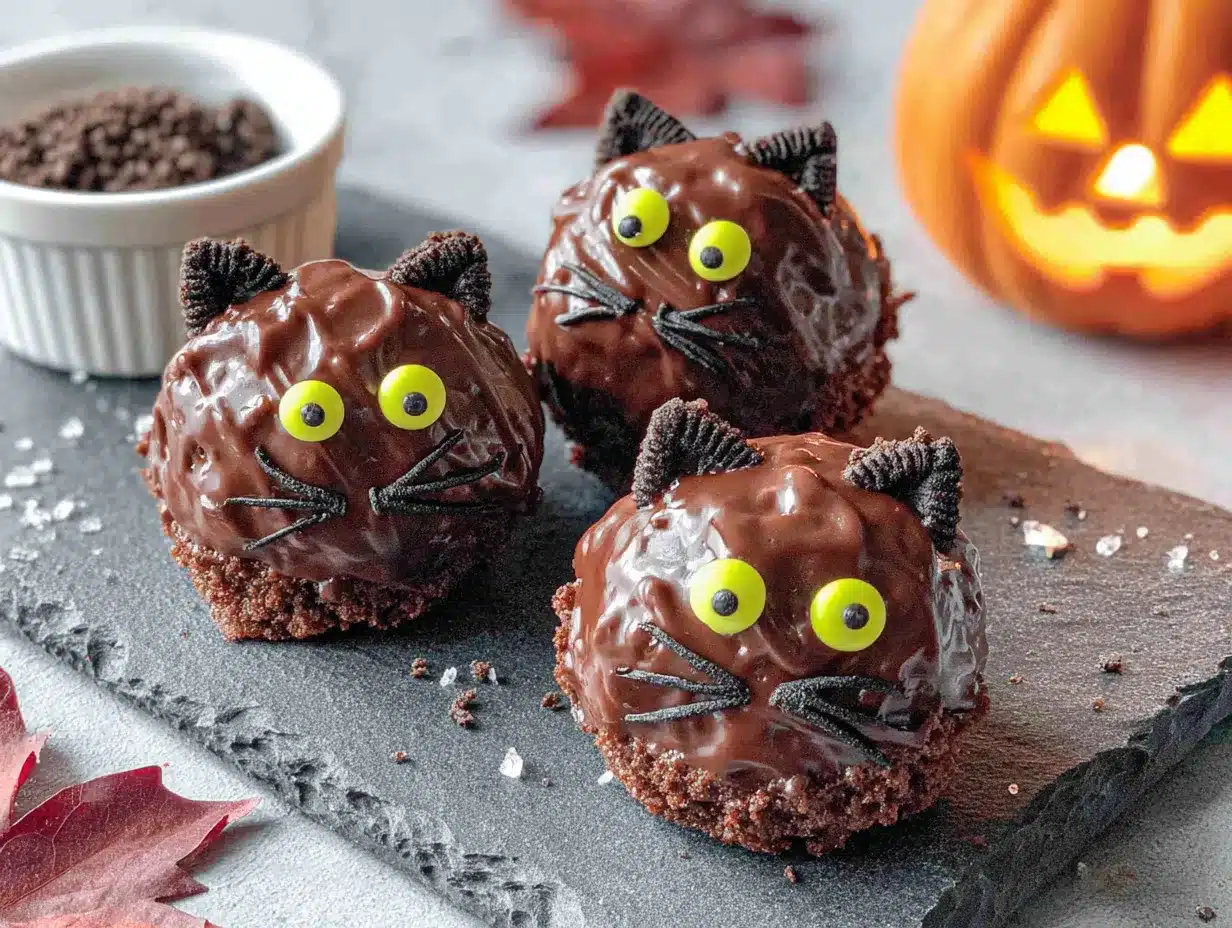
Follow these steps carefully, and you will have the cutest black cats on the block. I’ve added some notes from my own trial and error so you don’t make the same mistakes I did.
- Crush the Oreos: Place all 28 Oreo cookies in your food processor. Pulse until they turn into a fine, sandy crumb. You don’t want any large chunks, as they will make the truffle texture uneven. (Pro tip: If you are using a bag and rolling pin, make sure the bag is sealed tight. I learned that the hard way.)
- Mix the Cream Cheese Base: In a large mixing bowl, beat the softened reduced-fat cream cheese with an electric mixer until it is smooth and fluffy. This should take about 1 minute. Add the Greek yogurt and vanilla extract, and beat again until fully combined. The mixture should look like a thick, creamy frosting.
- Combine Wet and Dry: Pour the crushed Oreos into the cream cheese mixture. Mix on low speed until everything is fully incorporated. The mixture will be thick and a little sticky. This is exactly what you want. Scrape down the sides of the bowl to make sure there are no dry spots.
- Chill the Mixture: Cover the bowl with plastic wrap and place it in the refrigerator for at least 30 minutes. This step is crucial. If the mixture is too warm, it will be impossible to roll into balls. I once skipped this step because I was impatient, and I ended up with a sticky mess that looked more like a blob than a cat.
- Form the Truffle Balls: Once the mixture is chilled, use a small cookie scoop or a tablespoon to portion out the mixture. Roll each portion into a smooth ball, about 1 inch in diameter. Place the balls on a parchment-lined baking sheet. You should get about 20-22 truffles.
- Add the Ears: This is the fun part. Break the pretzel sticks into small pieces, about 1/2 inch long. Gently press two pretzel pieces into the top of each truffle ball to form the cat ears. Be careful not to press too hard, or the truffle will crack. (If the truffle starts to crack, just roll it back into a ball and try again.)
- Freeze the Truffles: Place the baking sheet with the truffles in the freezer for 15 minutes. This will firm them up and make them easier to dip in chocolate. Do not skip this step—it prevents the truffles from falling apart in the warm chocolate.
- Melt the Chocolate: In a microwave-safe bowl, combine the dark chocolate chips and coconut oil. Microwave in 30-second intervals, stirring after each, until the chocolate is completely smooth and melted. Be careful not to overheat the chocolate, or it will seize. (If it seizes, add another teaspoon of coconut oil and stir vigorously.)
- Dip the Truffles: Remove the truffles from the freezer. Using a toothpick or a dipping tool, carefully dip each truffle into the melted chocolate, making sure it is fully coated. Let the excess chocolate drip off, then place the coated truffle back on the parchment paper. Work quickly, as the chocolate will start to set.
- Add the Eyes: While the chocolate is still wet, gently press two candy eyes onto each truffle to create the cat’s face. If you are using black sanding sugar, sprinkle it on now before the chocolate sets.
- Set the Coating: Place the baking sheet back in the refrigerator for at least 20 minutes, or until the chocolate is completely firm. The truffles are now ready to serve.
Sensory Cue: When you bite into one, you should hear a slight crack from the chocolate shell, followed by the soft, creamy interior. The pretzel ears should give a satisfying crunch. That is the perfect texture.
Cooking Tips & Techniques
I have made these truffles more times than I care to count, and I have definitely learned a few things the hard way. Here are my best tips for success.
- Don’t overmix the cream cheese: If you beat the cream cheese too long, it can become too soft and loose, making the truffle mixture sticky. Mix just until smooth.
- Chill, chill, chill: I cannot stress this enough. The truffle mixture needs to be cold to roll properly, and the formed truffles need to be frozen before dipping. Warm truffles will slide right off the toothpick into a puddle of chocolate.
- Use a toothpick for dipping: I’ve tried forks, spoons, and even my fingers. A toothpick is the easiest way to get a clean coating. Simply poke the truffle, dip it, and tap the toothpick on the edge of the bowl to let the excess drip off. Then, use a second toothpick to slide the truffle off onto the parchment paper.
- Work in small batches: If you take all the truffles out of the freezer at once, they will start to warm up. Work with 4-5 truffles at a time, keeping the rest in the freezer.
- Troubleshooting the chocolate: If your chocolate is too thick to coat the truffles smoothly, add another 1/2 teaspoon of coconut oil. If it is too thin, add a few more chocolate chips. The perfect consistency is like warm honey.
- My biggest failure: The first time I made these, I used white chocolate for the coating because I thought it would look “spooky.” It looked like a sad ghost, and the white chocolate was way too sweet. Stick with dark chocolate—it balances the sweetness of the Oreo filling perfectly.
Variations & Adaptations
One of the best things about this recipe is how easy it is to customize. I have tried several variations over the years, and these are my favorites.
- Peanut Butter Black Cats: Add 2 tablespoons of creamy peanut butter to the cream cheese mixture. It adds a rich, nutty flavor that pairs beautifully with the chocolate. Just be aware that the mixture will be slightly softer, so you will need to chill it a little longer.
- Spooky Spider Truffles: Instead of making cat ears, skip the pretzels. After dipping the truffles in chocolate, use a toothpick to drag lines of melted white chocolate across the top to create a spiderweb pattern. Add a single candy eye for a one-eyed spider.
- Mint Chocolate Version: Add 1/2 teaspoon of peppermint extract to the cream cheese mixture. It gives the truffles a refreshing, holiday-like twist. These are perfect for a Christmas party too.
- Vegan & Dairy-Free Adaptation: Use a vegan cream cheese (like Kite Hill or Tofutti) and a dairy-free Greek yogurt. Make sure your dark chocolate is certified vegan. The texture will be a little less firm, so freeze the truffles for an extra 10 minutes before dipping.
- Gluten-Free Option: Use gluten-free Oreo-style cookies. Everything else in the recipe is naturally gluten-free. Just double-check your pretzel sticks to make sure they are certified gluten-free.
Personal Favorite: I love the peanut butter version. I made it for a Halloween potluck last year, and the entire tray was gone in ten minutes. People were scraping the leftover chocolate off the parchment paper.
Serving & Storage Suggestions
These truffles are best served cold, straight from the refrigerator. The chocolate shell is perfectly snappy, and the filling is firm and creamy. If you let them sit at room temperature for more than 15 minutes, the truffles will start to soften, so keep them chilled until you are ready to serve.
Presentation Idea: Arrange the truffles on a black or orange platter for a festive Halloween look. You can also place each truffle in a mini paper cupcake liner—it makes them look extra special and keeps your hands clean. For a spooky touch, add a few plastic spiders or fake cobwebs around the platter.
Complementary Dishes: These truffles pair beautifully with a hot cup of coffee or a glass of cold milk. If you are serving them at a party, try them alongside a batch of lighter pumpkin bars for a full Halloween dessert spread. The flavors are a perfect match.
Storage Instructions: Store the truffles in an airtight container in the refrigerator. They will stay fresh for up to 5 days, though I doubt they will last that long. The flavors actually develop a little over time, so they taste even better on day two.
Freezer Instructions: These truffles freeze beautifully. Place them in a single layer in a freezer-safe container, separating layers with parchment paper. They will keep for up to 3 months. To serve, thaw them in the refrigerator for about 2 hours. Do not thaw them at room temperature, as the chocolate may sweat.
Reheating Note: You do not need to reheat these truffles. They are meant to be eaten cold. If you prefer a softer texture, let them sit at room temperature for 5 minutes before eating.
Nutritional Information & Benefits
I am not a nutritionist, but I do care about what I put in my body. These truffles are a much better option than a store-bought Halloween candy bar. Here is a rough estimate per truffle (based on 22 servings):
| Nutrient | Amount per Truffle |
|---|---|
| Calories | ~110 |
| Total Fat | 6g |
| Saturated Fat | 3g |
| Carbohydrates | 14g |
| Sugar | 9g |
| Protein | 2g |
Health Benefits: By using reduced-fat cream cheese and Greek yogurt, I have cut the saturated fat and calories significantly compared to traditional Oreo truffles. The dark chocolate is rich in antioxidants, and the Greek yogurt adds a little protein and calcium. Plus, you are getting portion control—one truffle feels like a treat, not a binge.
Dietary Considerations: This recipe can easily be made gluten-free and dairy-free. It is naturally low in sodium and can be made vegan with a few simple swaps. The only potential allergen is dairy (if using regular cream cheese) and wheat (from the Oreos and pretzels).
My Wellness Perspective: I believe in balance. I don’t want to eat a whole bag of candy corn, but I also don’t want to miss out on Halloween fun. These truffles let me have my treat and feel good about it. They are a win-win.
Frequently Asked Questions
Can I use regular cream cheese instead of reduced-fat?
Absolutely. The truffles will be richer and creamier, but they will also be higher in calories and fat. If you are not worried about the lighter aspect, go for it. Just know that the texture will be slightly softer, so you may need to chill the mixture a little longer before rolling.
Why did my truffle mixture crack when I added the ears?
This usually happens if the mixture is too cold or if you pressed the pretzel too hard. Let the truffle sit at room temperature for 30 seconds to soften slightly. Then, gently press the pretzel pieces in. If it still cracks, just roll the truffle back into a ball and try again with a lighter touch.
Can I use milk chocolate instead of dark chocolate?
Yes, but be warned: milk chocolate is much sweeter. The dark chocolate helps balance the sweetness of the Oreo filling. If you use milk chocolate, the truffles might be overly sweet. I recommend using a semi-sweet chocolate if you want something in between.
How do I get the chocolate coating perfectly smooth?
The key is the coconut oil and the temperature. Make sure your chocolate is fully melted and thin enough to coat the back of a spoon. If it is too thick, add a little more coconut oil. Also, make sure the truffles are very cold (from the freezer) before dipping. The cold truffle helps the chocolate set quickly, creating a smooth shell.
Can I make these truffles ahead of time for a party?
Yes! These are the perfect make-ahead treat. You can prepare the truffles (without the chocolate coating) up to 2 days in advance. Keep them in the refrigerator. Then, dip them in chocolate the day of your party. Or, you can fully make them and store them in the refrigerator for up to 5 days. They actually taste better after a day or two.
Conclusion
These Lighter Black Cat Oreo Truffles are more than just a Halloween treat—they are a little piece of joy that you can feel good about eating. They come together with simple ingredients, they look absolutely adorable on a party platter, and they taste like a decadent indulgence without the heavy feeling. Whether you are making them for a classroom party, a spooky movie night, or just because you want a fun baking project, I promise you will love every step.
I love this recipe because it proves that you don’t have to sacrifice flavor for a lighter option. It is the kind of treat that makes you close your eyes after the first bite and smile. So go ahead, get a little messy, and make some black cats. And when you do, I would love to hear about it. Leave a comment below and tell me how your truffles turned out. Did you add peanut butter? Did you make spiders instead? Share your photos and tag me on social media. I cannot wait to see your spooky creations. Happy Halloween, and happy baking!
Pin This Recipe!

Lighter Black Cat Oreo Truffles: Easy Halloween Treat

These Lighter Black Cat Oreo Truffles are a healthier Halloween treat that’s creamy, rich, and adorable. Made with reduced-fat cream cheese and Greek yogurt, they’re quick to make and perfect for parties.
- Prep Time: 20 minutes
- Cook Time: 0 minutes
- Total Time: 1 hour 25 minutes (includes chilling and freezing time)
- Yield: 22 servings 1x
- Category: Dessert
- Cuisine: American
Ingredients
- 28 Oreo cookies (classic, not Double Stuf)
- 4 oz reduced-fat cream cheese, softened
- 2 tablespoons plain Greek yogurt
- 1 teaspoon vanilla extract
- 1 cup dark chocolate chips (60% cacao, about 180g)
- 1 teaspoon coconut oil
- Pretzel sticks (for ears)
- Candy eyes (for decoration)
- Black sanding sugar (optional, for garnish)
Instructions
- Crush the Oreos: Place all 28 Oreo cookies in a food processor. Pulse until they turn into a fine, sandy crumb.
- Mix the Cream Cheese Base: In a large mixing bowl, beat the softened reduced-fat cream cheese with an electric mixer until smooth and fluffy, about 1 minute. Add the Greek yogurt and vanilla extract, and beat again until fully combined.
- Combine Wet and Dry: Pour the crushed Oreos into the cream cheese mixture. Mix on low speed until fully incorporated. The mixture will be thick and a little sticky.
- Chill the Mixture: Cover the bowl with plastic wrap and refrigerate for at least 30 minutes.
- Form the Truffle Balls: Use a small cookie scoop or tablespoon to portion out the mixture. Roll each portion into a smooth ball, about 1 inch in diameter. Place on a parchment-lined baking sheet. You should get about 20-22 truffles.
- Add the Ears: Break pretzel sticks into small pieces, about 1/2 inch long. Gently press two pretzel pieces into the top of each truffle ball to form cat ears.
- Freeze the Truffles: Place the baking sheet in the freezer for 15 minutes.
- Melt the Chocolate: In a microwave-safe bowl, combine dark chocolate chips and coconut oil. Microwave in 30-second intervals, stirring after each, until smooth.
- Dip the Truffles: Remove truffles from freezer. Using a toothpick or dipping tool, dip each truffle into melted chocolate, fully coating it. Let excess drip off, then place back on parchment.
- Add the Eyes: While chocolate is still wet, press two candy eyes onto each truffle. Sprinkle with black sanding sugar if using.
- Set the Coating: Refrigerate for at least 20 minutes, or until chocolate is firm. Serve cold.
Notes
Chill the mixture thoroughly before rolling to prevent sticking. Freeze truffles before dipping to ensure a smooth chocolate coating. Work in small batches when dipping to keep truffles cold. For a vegan version, use vegan cream cheese, dairy-free yogurt, and certified vegan dark chocolate.
Nutrition
- Serving Size: 1 truffle
- Calories: 110
- Sugar: 9
- Sodium: 85
- Fat: 6
- Saturated Fat: 3
- Carbohydrates: 14
- Fiber: 1
- Protein: 2
Keywords: Halloween treats, Oreo truffles, black cat truffles, lighter dessert, easy Halloween recipe, no-bake dessert


