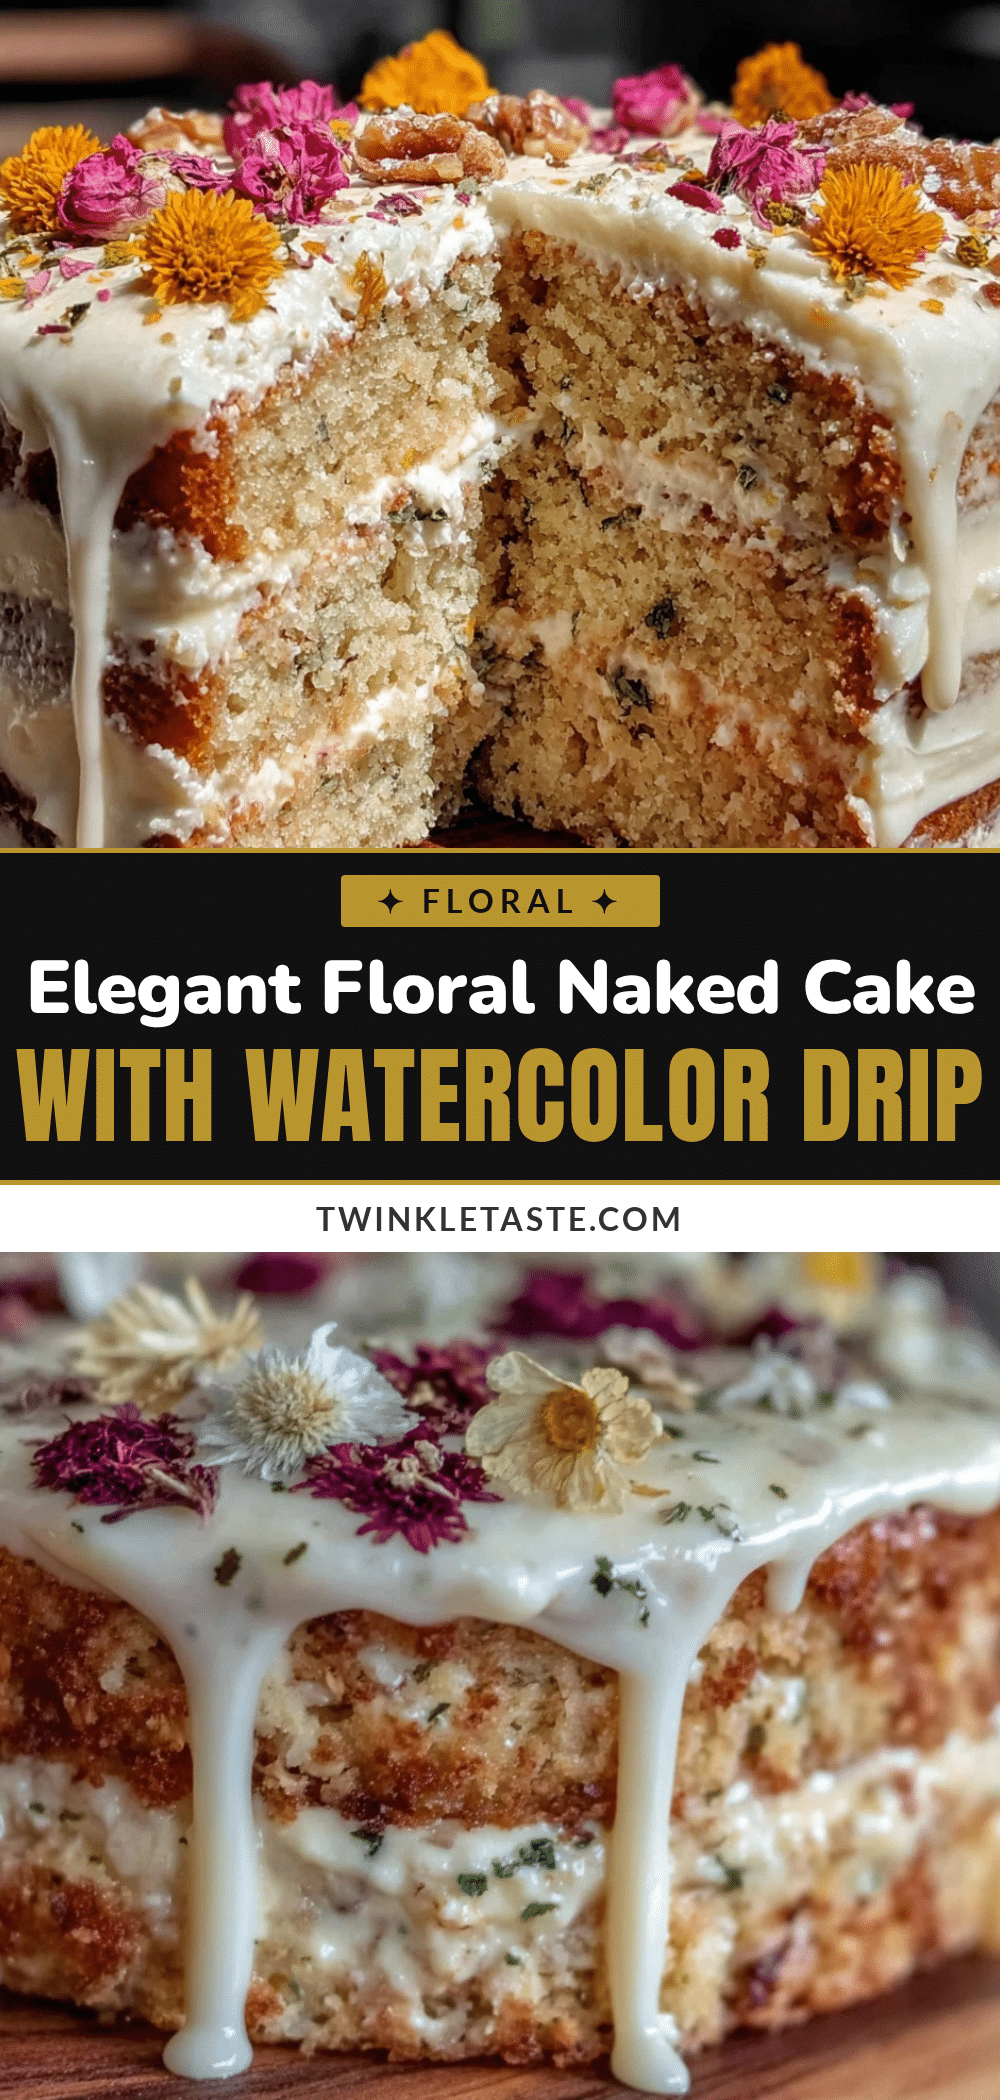
“Can you believe this cake is mostly dried flowers and watercolor glaze?” my friend gasped as she took a slow, curious slice. Honestly, I was just as surprised the first time I pulled off this perfect modern dried pressed flower naked cake with watercolor drip. It wasn’t some grand plan; it started late one evening when I was fiddling with leftover edible flowers from a salad and a half-made watercolor drip glaze that didn’t quite turn out on a different recipe. I thought, why not layer them together? The result? A cake that looks like a delicate piece of art and tastes like a light dream. No thick frosting, no fuss—just soft sponge, subtle floral notes, and that hypnotic watercolor drip that gently cascades down the sides.
The drying and pressing of flowers is an old craft, but pairing it with a minimalistic naked cake and that dreamy drip was something I hadn’t seen anywhere nearby. It became a little obsession—I baked it three times in a week, tweaking the glaze’s color blend and the flower arrangement until it felt just right. Each slice carries a whisper of spring, a soft crunch of petals, and a fresh, modern vibe that’s not too sweet or over the top.
What’s funny is how this cake fits perfectly into those moments when you want to impress quietly—like a brunch with close friends or a calm weekend celebration—without screaming “look at me.” It’s gentle, artistic, and surprisingly simple once you get the hang of the technique. That’s why this recipe stuck with me. It’s not just a cake; it’s a little floral story on your plate, waiting to be shared.
Why You’ll Love This Recipe
This perfect modern dried pressed flower naked cake with watercolor drip isn’t just a visual stunner; it’s a recipe that’s been tested in my kitchen enough to trust every step. You know how some cakes promise beauty but fall short on flavor or effort? Not this one. Here’s why it’s worth your time:
- Quick & Easy: You can put it together in about 90 minutes, perfect for when you want a show-stopper without the all-day baking marathon.
- Simple Ingredients: No exotic or hard-to-find items here—just pantry staples and dried edible flowers you can prep yourself or buy online.
- Perfect for Special Occasions: Whether it’s a bridal shower, an elegant birthday, or simply a spring brunch, this cake hits the mark for style and taste.
- Crowd-Pleaser: Even folks who usually shy away from floral desserts find this cake delightful, with its light crumb and delicate sweetness.
- Unbelievably Delicious: The watercolor drip glaze adds a subtle fruity tang that cuts through the cake’s buttery richness, creating a balanced flavor profile.
What makes this recipe stand out is the watercolor drip technique that uses natural fruit purees mixed with white chocolate—no artificial colors needed. Plus, pressing your own flowers gives you a personal touch that feels intimate and creative. I’ve tried other naked cakes, but layering the dried flowers between soft sponge layers and topped with this drip glaze is a game-changer. It’s like edible art that tastes as good as it looks.
When you make this cake, you’re not just baking; you’re crafting a moment. It’s the kind of dessert that makes people pause and smile, closing their eyes to savor each bite. Honestly, it’s my go-to when I want something that feels both modern and timeless.
What Ingredients You Will Need
This recipe uses simple, wholesome ingredients that come together beautifully to create bold yet subtle flavor and texture contrasts. Most are pantry staples, and the dried flowers add a seasonal, artistic touch that’s easy to customize.
- For the Cake Batter:
- All-purpose flour – 2 ½ cups (320g), sifted
- Baking powder – 2 ½ tsp
- Salt – ½ tsp
- Unsalted butter – 1 cup (227g), softened (I recommend Plugrá for great texture)
- Granulated sugar – 1 ¾ cups (350g)
- Large eggs – 4, room temperature
- Whole milk – 1 cup (240ml), room temperature (can swap with almond or oat milk)
- Pure vanilla extract – 2 tsp
- For the Watercolor Drip Glaze:
- White chocolate chips – 1 ½ cups (270g)
- Heavy cream – ½ cup (120ml)
- Natural fruit purees (e.g., strawberry, blueberry, or mango) – 3-4 tbsp total, divided by color
- Lemon juice – 1 tsp (for brightness)
- For the Decoration:
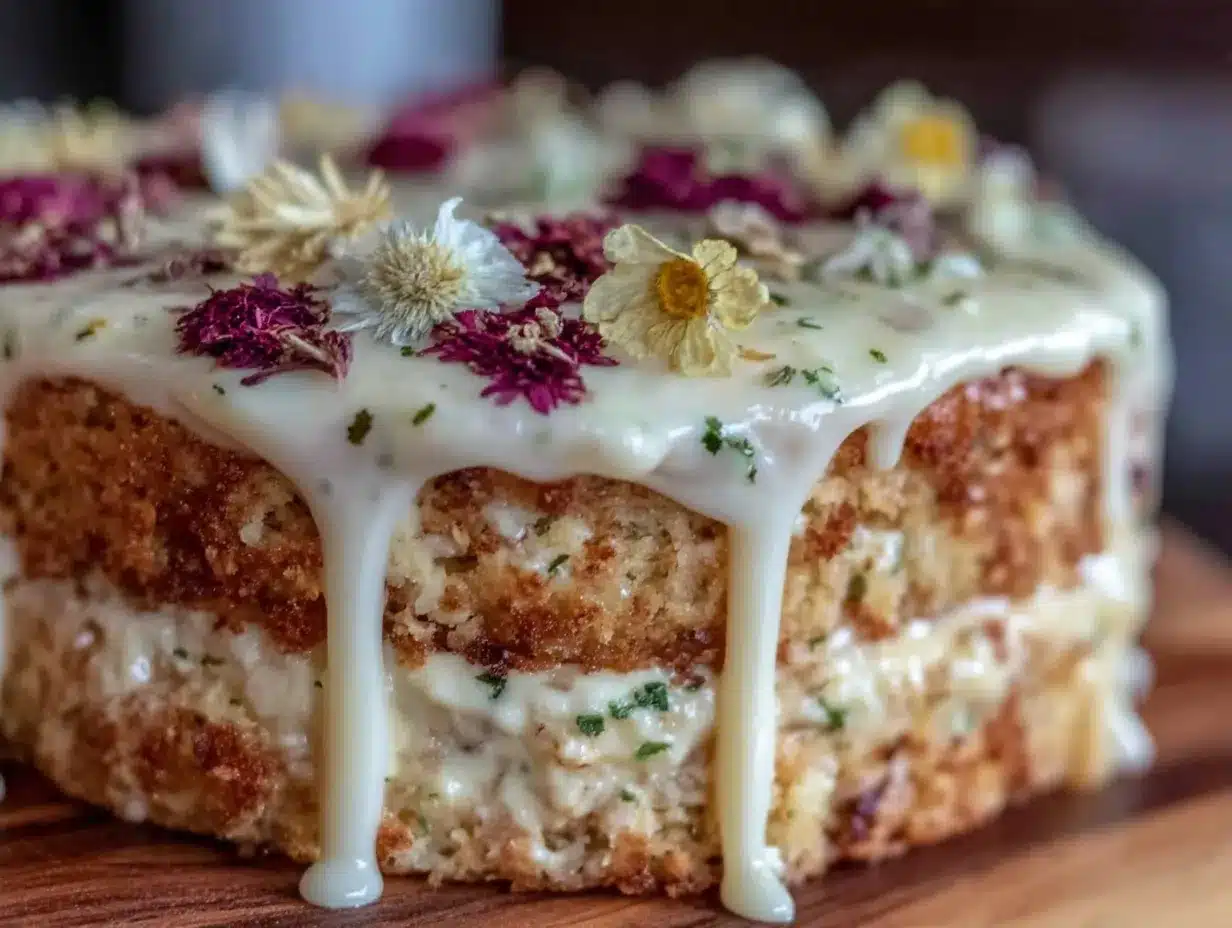
- Dried pressed edible flowers (violets, pansies, rose petals, cornflowers) – about 1 cup loosely packed
- Fresh edible flowers (optional, for garnish)
- Powdered sugar – for dusting (optional)
For the dried flowers, I like to press them myself a week ahead using a heavy book and parchment paper, but you can buy pre-pressed edible flowers from specialty suppliers. Just make sure they are safe for consumption. The fruit purees are what give the watercolor drip its gentle hues—using fresh or frozen berries blended and strained works beautifully.
If you want to make this gluten-free, swap the all-purpose flour with a 1:1 gluten-free baking flour blend. And if dairy is a concern, coconut cream works well in the glaze, though it changes the texture slightly.
Equipment Needed
- Two 8-inch (20 cm) round cake pans – non-stick recommended
- Mixing bowls – medium and large
- Hand or stand mixer – for creaming butter and sugar smoothly
- Rubber spatulas – for folding and scraping batter
- Fine mesh sieve – to sift flour and strain fruit purees
- Offset spatula – helpful for smoothing cake layers
- Pastry brush (optional) – for brushing syrup if you want a moist crumb
- Small saucepan – to heat cream for the glaze
- Cooling racks – to cool cake layers evenly
- Plate or cake stand – for assembly and presentation
If you don’t have cake pans, you can use springform pans or even line a square pan and cut rounds with a cookie cutter, though it’s a bit more work. I’ve tried silicone pans, which work but don’t give the same crisp edges that add to the naked cake’s charm. For the watercolor drip, a small spoon or squeeze bottle helps control the flow precisely—something I learned after a few messy attempts!
Preparation Method
- Preheat and Prep: Preheat your oven to 350°F (175°C). Grease and flour two 8-inch cake pans, or line them with parchment paper. This prevents sticking and helps with clean edges. (5 minutes)
- Mix Dry Ingredients: In a medium bowl, sift together 2 ½ cups flour, 2 ½ tsp baking powder, and ½ tsp salt. Set aside. This ensures even rising and no lumps. (5 minutes)
- Cream Butter and Sugar: In a large bowl, beat 1 cup softened butter with 1 ¾ cups granulated sugar on medium speed until pale and fluffy—about 4-5 minutes. This step is key for a light crumb. (7 minutes)
- Add Eggs and Vanilla: Add eggs one at a time, beating well after each. Stir in 2 tsp vanilla extract. If the mixture looks a little curdled, don’t worry—that’s normal. (5 minutes)
- Alternate Adding Dry Ingredients and Milk: Reduce mixer speed to low. Add the dry ingredients in three parts, alternating with the 1 cup milk (start and end with flour). Mix until just combined; overmixing will toughen the cake. Batter should be smooth and thick but pourable. (5 minutes)
- Divide and Bake: Pour batter evenly into prepared pans. Smooth tops gently with an offset spatula. Bake for 28-32 minutes, or until a toothpick inserted comes out clean. The edges should pull away slightly from the pan. (30 minutes)
- Cool Thoroughly: Let cakes cool in pans for 10 minutes, then turn out onto wire racks to cool completely. This prevents sogginess during assembly. (30-60 minutes)
- Prepare Watercolor Drip Glaze: Heat ½ cup heavy cream in a small saucepan until just simmering. Pour over 1 ½ cups white chocolate chips in a heatproof bowl. Let sit 2 minutes, then stir until smooth. Divide glaze into small bowls and mix in fruit purees and 1 tsp lemon juice to create watercolor shades. (15 minutes)
- Assemble Naked Cake: Place one cake layer on your serving plate. Optionally, brush lightly with syrup for added moisture. Scatter a handful of dried pressed flowers evenly on top. Carefully place second cake layer on top. (10 minutes)
- Apply Watercolor Drip: Using a spoon or squeeze bottle, gently drip the colored glaze around the edges, letting it cascade down naturally. Use different colors side by side for the watercolor effect. Let glaze set at room temperature for 20 minutes. (20 minutes)
- Final Touches: Decorate the top with more dried pressed flowers and a light dusting of powdered sugar if desired. Keep the cake in a cool spot until ready to serve. (5 minutes)
Pro tip: If your glaze is too thick to drip, warm it gently over a double boiler to loosen. If it’s too thin, add a little more melted white chocolate and stir well. The texture should be smooth but still fluid enough to create those gentle drips that make the cake pop visually.
Cooking Tips & Techniques
Working with a naked cake and watercolor drip glaze is rewarding but comes with a few quirks. Here’s what I learned after a few tries:
- Pressing Flowers: Make sure to press flowers at least a week in advance. Use parchment paper and heavy books or a flower press. Thin flowers like violets or pansies work best—they dry flat and keep vibrant color.
- Layering with Flowers: Place flowers gently between cake layers rather than on wet frosting to avoid wilting. The dried petals add texture without moisture issues.
- Glaze Consistency: The watercolor drip glaze needs to be just right—not too thick or it won’t drip; not too thin or it runs off too fast. Test a small amount on the edge of a bowl before applying.
- Multitasking: While cakes bake, prepare the glaze and press flowers if you’re in a rush (though pressing flowers ahead is best). This keeps the flow smooth.
- Common Mistakes: Don’t overmix your batter—this toughens the crumb. Also, avoid applying glaze on a warm cake; it will melt and lose definition. Let cakes cool completely.
One time, I tried adding fresh flowers directly onto the wet glaze, and they wilted immediately, ruining the look. Lesson learned: dried flowers hold up much better and give that elegant matte finish. Also, I like to set the cake on a chilled plate when glazing to slow drip speed and create cleaner edges.
Variations & Adaptations
This cake is wonderfully versatile and welcomes creative tweaks:
- Dietary: Swap all-purpose flour for a gluten-free blend to make it friendly for gluten-sensitive guests. Use coconut cream for a dairy-free glaze.
- Seasonal: Instead of dried flowers, try thinly sliced fresh stone fruit like peaches or plums between layers for summer. Adjust the glaze with citrus purees for a bright twist.
- Flavor Twists: Add a subtle lavender or rose water essence to the batter for an extra floral note that complements the pressed flowers beautifully.
- Cooking Method: If you don’t have an oven, this cake batter can be baked in a microwave-safe pan in intervals, though texture differs slightly (less crumbly, more moist).
- Personal Variation: I once layered a thin spread of lemon curd beneath the flowers, balancing the sweetness with tart brightness. Guests loved the surprise zing!
Serving & Storage Suggestions
Serve this cake at room temperature to fully enjoy the soft crumb and delicate glaze. It pairs beautifully with a cup of jasmine tea or a light sparkling wine. I like to present it on a simple white cake stand to let the natural colors shine.
Store leftovers covered loosely with plastic wrap in the refrigerator for up to 3 days. The cake keeps well but might dry out slightly, so let it come back to room temperature before serving. If you want to store longer, freeze wrapped slices in airtight containers for up to 1 month; thaw overnight in the fridge.
The watercolor drip glaze slightly firms up in the fridge, giving a pleasant texture contrast to the soft cake. Flavors meld better after a few hours, so if you have the patience, make the cake a day ahead—though it’s tempting to dig right in!
Nutritional Information & Benefits
This cake balances indulgence with natural ingredients. Each slice (1/12th of the cake) roughly contains:
| Calories | 320 kcal |
|---|---|
| Fat | 18g |
| Carbohydrates | 38g |
| Protein | 4g |
| Sugar | 24g |
Key benefits come from the use of real fruit purees in the glaze, adding antioxidants and natural flavor without artificial coloring. The dried edible flowers not only add visual appeal but also contain trace nutrients and antioxidants, depending on the variety.
This recipe is naturally gluten-free adaptable and can be customized for dairy-free diets. It avoids artificial additives, making it a cleaner choice among celebration cakes. From a wellness perspective, it’s a treat that honors real ingredients and simple techniques.
Conclusion
Making the perfect modern dried pressed flower naked cake with watercolor drip is like crafting a little edible masterpiece. It’s approachable enough for home bakers who want to impress without stress, yet refined enough for special occasions that deserve something truly unique. I love how this recipe turned a handful of pantry staples and a few dried flowers into a cake that feels both fresh and timeless.
Feel free to tweak the flower choices, colors, and flavors to match your style or the season. This cake is a canvas waiting for your creativity. Plus, if you’re curious about baking techniques, my olive oil lemon almond cake offers a different take on floral flavors worth trying alongside this one.
Your turn to bring this gentle floral cake to life—and maybe impress your next brunch guests or celebrate a quiet moment with a slice of art.
FAQs
Can I use fresh flowers instead of dried pressed flowers?
Fresh edible flowers can be used for garnish but won’t hold up well layered inside the cake. They tend to wilt and release moisture that may affect texture.
How do I press flowers for this cake?
Place flowers between parchment paper inside a heavy book or flower press. Leave for 5-7 days until completely dry and flat to ensure they don’t bruise or fade.
What if my watercolor drip glaze is too runny?
Warm the glaze gently and add a bit more melted white chocolate to thicken. Stir well and test the consistency before applying to the cake.
Can I prepare this cake a day ahead?
Yes! It actually tastes better after resting a few hours as flavors meld and the glaze firms up nicely. Store covered at room temperature or in the fridge.
Is this cake suitable for gluten-free diets?
Absolutely. Substitute all-purpose flour with a gluten-free baking blend in equal measure, and ensure other ingredients are gluten-free certified.
For those who enjoy combining artistic presentation with flavorful baking, you might also appreciate the delicate layering technique in my fluffy cinnamon rolls with brown butter filling, which shares a similar approach to balancing bold flavor with visual appeal.
Pin This Recipe!