“Hey, did you see what I made for the grad party?” my friend texted me, and honestly, I wasn’t expecting much. But when I showed up, those Perfect Grad Cap Chocolate Dipped Oreo Cookie Pops for Class of 2026 stole the spotlight. It wasn’t just a snack; it was a little celebration on a stick, and I couldn’t stop thinking about how easy and fun they were to make. I’m not usually the one to fuss over detailed desserts, but these cookie pops felt just right—simple, sweet, and festive all at once.
That evening, surrounded by laughter and the buzz of excited graduates, these Oreo pops became the quiet heroes. No fancy frosting or complicated baking—just rich chocolate, crunchy Oreos, and a playful grad cap twist. I remember thinking, “Why haven’t I made these sooner?” They’re the kind of treat that’s perfect for last-minute celebrations when you want something special but don’t want to spend hours in the kitchen.
Now, as graduation season rolls around again, I’m sharing this recipe because it’s the little thing that made the party extra memorable. It’s not about perfection but about that simple joy of celebrating milestones with a sweet bite that everyone loves. So if you’re looking for a fun, no-fuss graduation treat that feels personal and festive, these Oreo cookie pops might just become your new go-to.
Why You’ll Love This Recipe
This recipe is honestly one of those rare wins that makes you feel like a dessert pro without breaking a sweat. I’ve made these over and over (and yes, sometimes just for the fun of it), and here’s why they’re a standout choice for graduation celebrations or any time you want a cute, easy treat.
- Quick & Easy: These cookie pops come together in about 30 minutes, perfect for busy parents or last-minute hosts.
- Simple Ingredients: You probably already have Oreo cookies and chocolate chips sitting in your pantry—they’re super accessible.
- Perfect for Graduation Parties: The grad cap design adds a playful, personalized touch that kids and adults alike adore.
- Crowd-Pleaser: These are always the first to disappear at gatherings—chocolate and Oreos are a winning combo every time.
- Unbelievably Delicious: The contrast of smooth chocolate coating and crunchy Oreo is just next-level satisfying.
What really sets this recipe apart is the clever little grad cap made with simple fondant or chocolate details that feel special without fuss. It’s not just another dipped cookie—it’s a fun, creative twist that anyone can make at home. If you’ve ever enjoyed making treats like the soft and chewy chocolate chip cookies, you’ll appreciate how this recipe balances simplicity with that wow factor.
Honestly, this recipe isn’t just about a sweet finish—it’s that moment when you hand someone a cookie pop and see their face light up. It’s the kind of treat that makes you slow down, smile, and maybe savor a little victory along with the chocolate.
What Ingredients You Will Need
This recipe relies on straightforward, pantry-friendly ingredients that come together to create a treat that’s both fun and tasty. Each element plays its part—Oreos bring the iconic crunch and cream, chocolate gives that silky coating, and the decorations turn it into a celebration.
- Oreo Cookies: Classic sandwich cookies with cream filling—regular Oreos work best for sturdiness.
- Chocolate Chips or Melting Wafers: About 12 oz (340 g) of semi-sweet or milk chocolate chips (I personally prefer Ghirardelli for smooth melting).
- Black Fondant or Candy Melts: For the grad cap square detail; black candy melts can be easier to handle if you’re not comfortable with fondant.
- Yellow or Gold Fondant: For the graduation tassel detail (optional but adds a nice touch).
- White Lollipop Sticks: 10-12 sticks, sturdy enough to hold the cookies.
- Sprinkles or Edible Glitter (optional): To add sparkle and extra festivity to the pops.
- Wax or Parchment Paper: For drying the dipped pops without sticking.
Feel free to swap in dark chocolate for a richer taste or dairy-free chocolate if needed. If fondant isn’t your thing, you can use edible markers or piped royal icing for the tassel and cap details. Just remember, the key is to keep things simple—you don’t need fancy tools or ingredients to nail this.
If you’re preparing for a party and want to pair these with other easy treats, I’d recommend checking out the easy cheesy pasta bake recipe—perfect for feeding a crowd without hassle.
Equipment Needed
- Microwave-safe bowl or double boiler: For melting the chocolate gently without burning.
- Lollipop sticks: Essential for holding the cookie pops together and making them easy to eat.
- Wax or parchment paper: To lay the dipped cookies on while they set and prevent sticking.
- Small paintbrush or toothpick: Handy for applying details with fondant or candy melts.
- Cooling rack (optional): Great for draining excess chocolate and keeping the pops crisp.
If you don’t have a double boiler, a microwave works just fine—just melt the chocolate in short bursts and stir often. I’ve also found that using candy melts for decorations can be easier for beginners since they melt smoothly and set quickly. For a budget-friendly option, regular kitchen utensils and a microwave bowl will do the trick—no fancy gadgets needed.
Preparation Method

- Prepare your workspace: Lay out wax paper on a flat surface and have all ingredients at hand. Insert lollipop sticks carefully into the cream filling of each Oreo cookie—aim for the center. It’s okay if the stick isn’t perfectly straight; just be gentle so the cookie doesn’t crack. (About 10 minutes)
- Melt the chocolate: In a microwave-safe bowl, heat the chocolate chips in 30-second intervals, stirring well each time until smooth. Avoid overheating to prevent seizing. Alternatively, use a double boiler for more control. (About 5 minutes)
- Dip the Oreo pops: Holding the stick, dip each Oreo into the melted chocolate until fully coated. Gently tap the stick on the bowl’s edge to remove excess. Place the dipped cookie on the wax paper to set. (About 15 minutes)
- Create the grad cap: Roll out the black fondant and cut small squares roughly 1 inch (2.5 cm) wide. Attach the squares on top of the dipped Oreo using a dab of melted chocolate as glue. For the tassel, roll a thin strip of yellow fondant or pipe a small line with yellow candy melts next to the square. (About 15-20 minutes)
- Let the chocolate set completely: Allow the cookie pops to rest at room temperature or chill briefly in the fridge for 10 minutes until firm.
Tip: If your chocolate thickens during dipping, warm it a bit longer, but watch closely. Also, if a cookie breaks while inserting the stick, try again with another Oreo—fresh cookies work best. The sensory cue you want is a smooth, glossy coating without drips—if it looks matte or dull, the chocolate might be cooling too fast.
This step-by-step method makes the process manageable and fun, even if you’re juggling party prep like I did once while making fluffy buttermilk biscuits for the same event!
Cooking Tips & Techniques
When working with chocolate dipped Oreo cookie pops, a few kitchen tricks go a long way:
- Temper your chocolate loosely: You don’t need perfect tempering, but melting slowly and stirring often keeps it smooth and shiny.
- Avoid moisture: Any water can cause chocolate to seize—make sure your utensils and hands are dry.
- Stick insertion: Insert lollipop sticks gently and hold the cookie firmly but don’t force it, or the cookie might crack.
- Use candy melts for decorations: They set faster and are easier to control if you’re not comfortable with fondant.
- Work quickly but carefully: Chocolate sets fast, so have your decorations ready before dipping.
Learned the hard way: I once tried assembling all pops first and then dipping, which made it harder to get even coverage. Now, I dip first and decorate while the chocolate’s still tacky. Also, multitasking by melting chocolate in advance and prepping fondant while the dips set saves valuable time.
Variations & Adaptations
These Oreo cookie pops can adapt to different tastes and dietary needs with just a few tweaks:
- Flavor variations: Swap classic Oreos with mint or golden Oreos for a flavor twist.
- Chocolate choices: Use white chocolate or dark chocolate to suit your palette, or mix in a little peanut butter for a richer flavor.
- Allergen-friendly: Use dairy-free chocolate and gluten-free sandwich cookies to make this treat safe for more guests.
- Decoration alternatives: If fondant isn’t your thing, try royal icing or edible markers for the grad cap details.
- Seasonal touches: Add colored sprinkles matching school colors or edible glitter for sparkle.
Personally, I once made a batch using mint Oreos and dark chocolate for a more grown-up feel at a family gathering. It was a hit! Also, when pressed for time, skipping the tassel detail still gives a cute grad cap vibe with just the black square.
Serving & Storage Suggestions
Serve these cookie pops at room temperature for best texture—too cold and the chocolate can lose its shine, too warm and it might get sticky. Arrange them standing up in a decorated vase or foam block for a fun presentation that’s easy for guests to grab.
Pair these with a refreshing iced coffee or a simple punch to balance the sweetness. If you’re planning a graduation brunch, they go well alongside savory options or sweet breakfast favorites like soft Texas roadhouse rolls.
Store leftover pops in an airtight container at room temperature for up to 2 days or in the fridge for up to a week. If refrigerated, let them sit out for 10 minutes before serving to soften the chocolate slightly. Avoid freezing as it can alter texture and cause condensation.
Flavors tend to mellow after a day, making the chocolate a bit less sharp and the cookie softer—sometimes that’s a nice change if you’re prepping ahead.
Nutritional Information & Benefits
Each cookie pop typically contains around 150-180 calories, depending on the size and chocolate used. Though a treat, these pops provide a little boost of energy with the sugar and fat from the chocolate and creamy filling.
Oreos are a fun indulgence, and by using dark chocolate, you can sneak in some antioxidants, making this dessert just a tiny bit more wholesome. For those watching dietary needs, choosing dairy-free or gluten-free alternatives lets more people enjoy them guilt-free.
From a wellness perspective, these cookie pops prove you can celebrate without overcomplicating things. They offer a sweet pause to enjoy special moments—sometimes that’s just as important as what’s on your plate.
Conclusion
So, these Perfect Grad Cap Chocolate Dipped Oreo Cookie Pops for Class of 2026 are more than just treats—they’re little celebrations you can hold in your hand. They’re quick, fun, and bring that festive touch without the stress, which is exactly what makes them stick in my memory.
Feel free to tweak the decorations or chocolate to fit your style or school colors. Honestly, it’s the simple joy of making and sharing these that counts. I love how these pops turn an ordinary cookie into a moment worth savoring, whether it’s for a party or just a quiet celebration at home.
If you try these out, I’d love to hear how you made them your own. And if you’re looking for other easy crowd-pleasers, the easy gourmet charcuterie board ideas can make entertaining feel just as effortless and impressive.
Here’s to sweet celebrations with simple treats that bring everyone together.
Frequently Asked Questions
Can I use other cookies instead of Oreos for these pops?
Absolutely! While Oreos are classic and sturdy, you can use any sandwich cookie that’s firm enough to hold on a stick without crumbling.
How do I prevent the chocolate from melting or getting sticky?
Store the pops at room temperature away from heat and humidity. If you refrigerate, bring them back to room temp before serving to avoid condensation.
What’s the best way to attach the grad cap decoration?
Use a small dab of melted chocolate as “glue” to stick fondant or candy melts onto the dipped cookie. Work while the chocolate is still slightly tacky for better hold.
Can I prepare these ahead of time?
Yes! Make them a day ahead and store in an airtight container. Just avoid freezing to keep texture and appearance intact.
Are there gluten-free or dairy-free options for this recipe?
Yes, you can find gluten-free sandwich cookies and dairy-free chocolate melts to adapt this recipe for allergen-friendly needs.
Pin This Recipe!
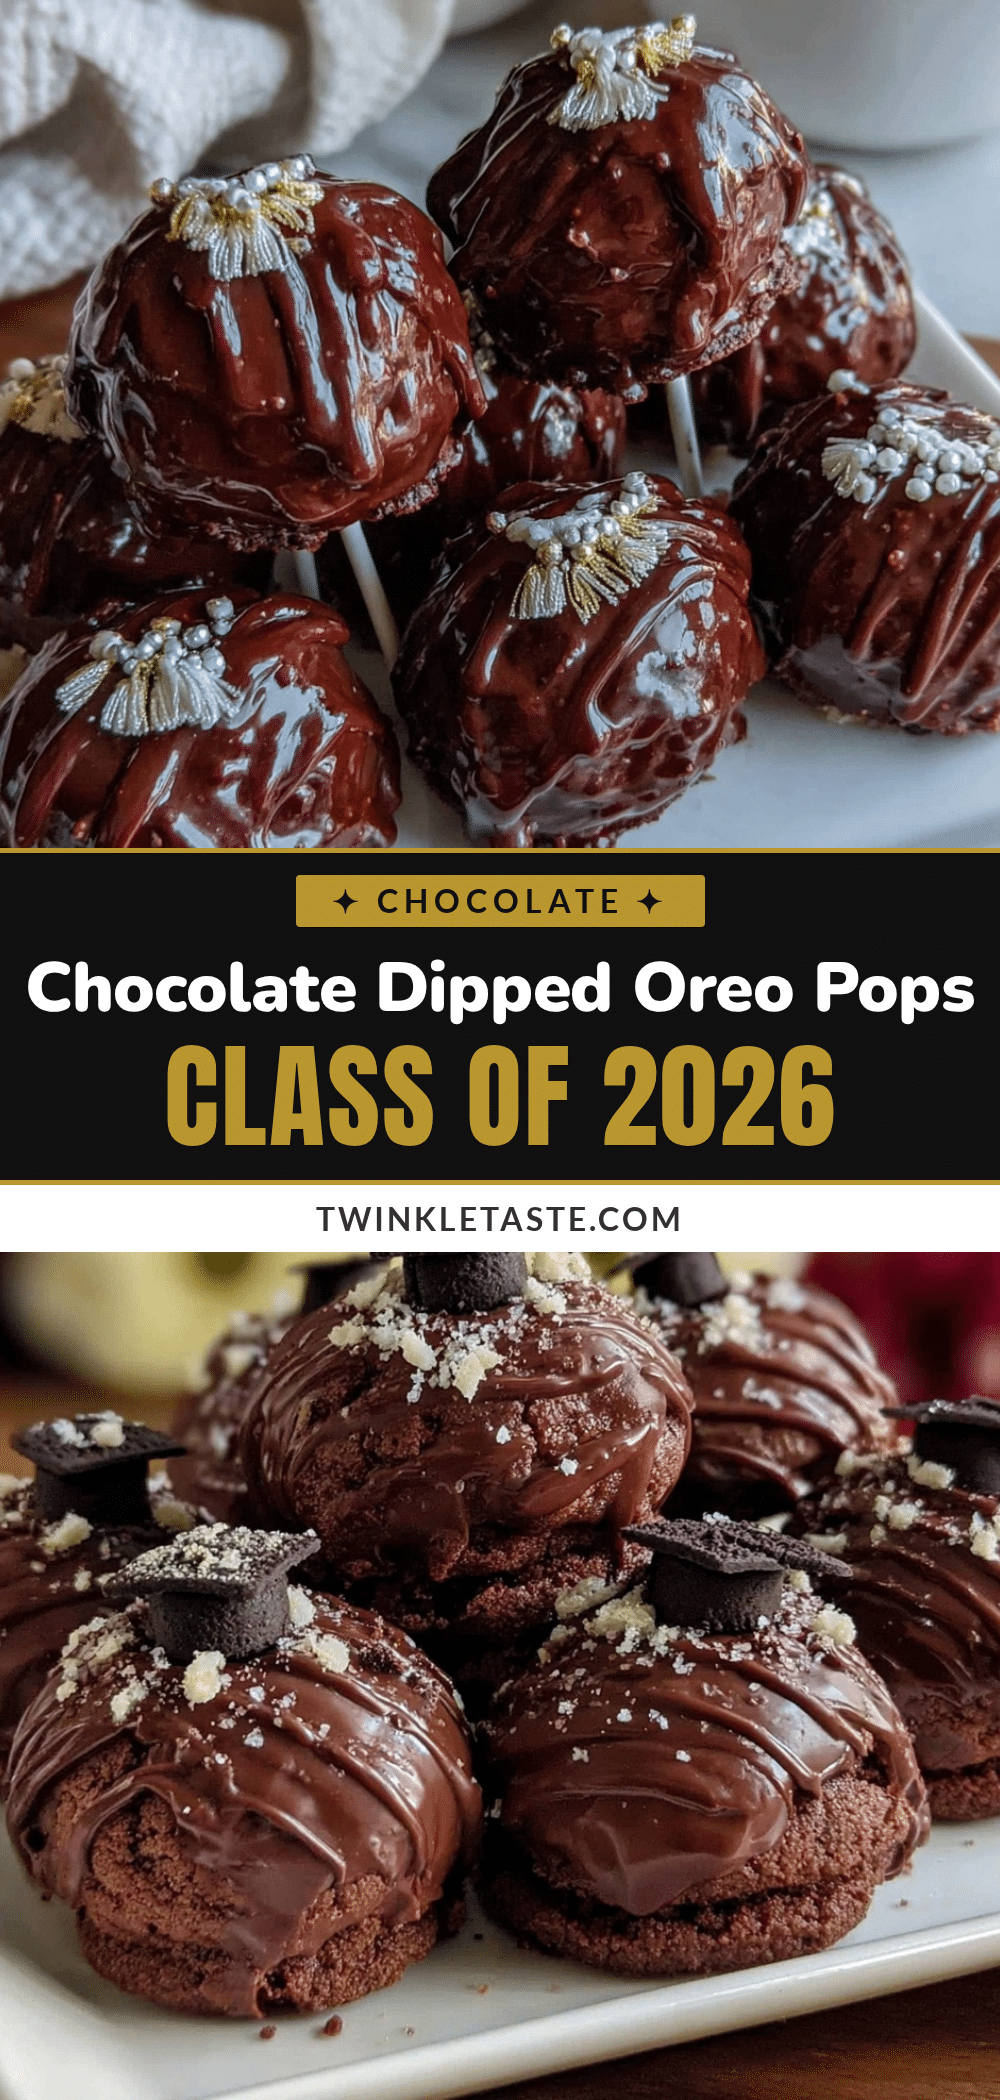
Perfect Grad Cap Chocolate Dipped Oreo Cookie Pops for Class of 2026
These festive Oreo cookie pops are dipped in rich chocolate and decorated with a playful grad cap design, making them a quick and easy treat perfect for graduation celebrations.
- Prep Time: 10 minutes
- Cook Time: 20 minutes
- Total Time: 30 minutes
- Yield: 10-12 servings 1x
- Category: Dessert
- Cuisine: American
Ingredients
- 10–12 Oreo Cookies (classic sandwich cookies with cream filling)
- 12 oz (340 g) semi-sweet or milk chocolate chips or melting wafers
- Black fondant or black candy melts (for grad cap square detail)
- Yellow or gold fondant or yellow candy melts (optional, for tassel detail)
- 10–12 white lollipop sticks
- Sprinkles or edible glitter (optional)
- Wax or parchment paper (for drying)
Instructions
- Prepare your workspace by laying out wax paper on a flat surface and have all ingredients at hand.
- Insert lollipop sticks carefully into the cream filling of each Oreo cookie, aiming for the center. Be gentle to avoid cracking the cookie. (About 10 minutes)
- Melt the chocolate chips in a microwave-safe bowl in 30-second intervals, stirring well each time until smooth. Alternatively, use a double boiler. (About 5 minutes)
- Holding the stick, dip each Oreo into the melted chocolate until fully coated. Gently tap the stick on the bowl’s edge to remove excess chocolate. Place the dipped cookie on the wax paper to set. (About 15 minutes)
- Roll out the black fondant and cut small squares about 1 inch wide. Attach the squares on top of the dipped Oreo using a dab of melted chocolate as glue.
- For the tassel, roll a thin strip of yellow fondant or pipe a small line with yellow candy melts next to the square. (About 15-20 minutes)
- Allow the cookie pops to rest at room temperature or chill briefly in the fridge for 10 minutes until firm.
Notes
If chocolate thickens during dipping, warm it a bit longer but watch closely. Use fresh cookies if one breaks while inserting the stick. Work quickly but carefully as chocolate sets fast. Candy melts can be easier for decorations if fondant is not preferred. Store pops at room temperature or refrigerate and bring to room temp before serving. Avoid freezing to prevent texture changes.
Nutrition
- Serving Size: 1 cookie pop
- Calories: 150180
- Sugar: 15
- Sodium: 90
- Fat: 9
- Saturated Fat: 5
- Carbohydrates: 20
- Fiber: 1
- Protein: 1
Keywords: Oreo cookie pops, graduation treats, chocolate dipped Oreos, easy dessert, party snacks, DIY graduation treats, chocolate pops