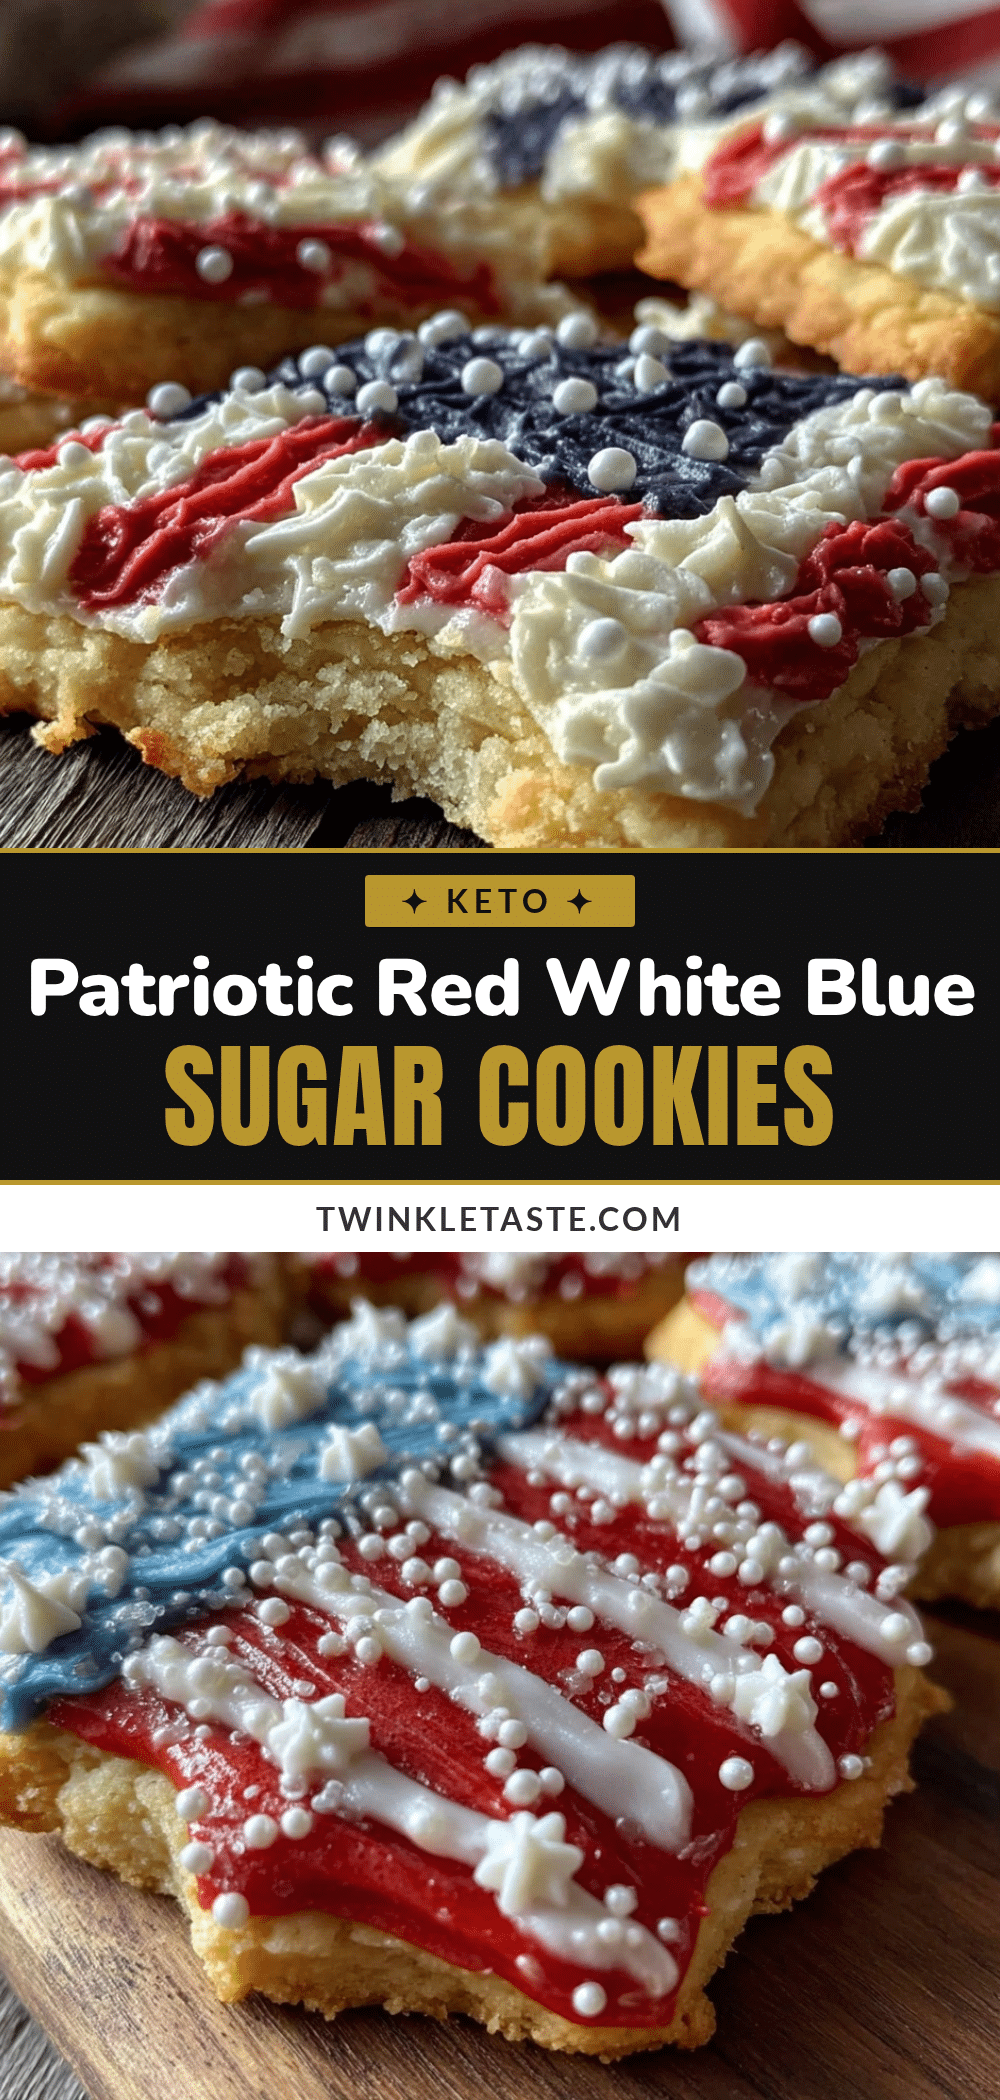
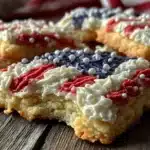
“Can you believe I actually messed up the frosting colors the first time I made these American flag sugar cookies?” That’s what I found myself admitting to a friend over a late afternoon call, laughing at how my usual precision took a little vacation. Honestly, these cookies came about in the middle of a busy weekend — you know how it is — juggling a few things and suddenly remembering the Fourth of July barbecue was just around the corner. I needed something festive, quick, and undeniably charming, but I wasn’t exactly in the mood for complicated baking.
So, I grabbed my trusty sugar cookie recipe, and with a bit of trial and error, plus a lot of patience with royal icing, I ended up with these perfect American flag sugar cookies with red and blue royal icing. The first batch looked a little rough around the edges, but by the third try, they were downright impressive — crisp, buttery cookies topped with vibrant, glossy icing that held every detail of the flag design perfectly. The kids loved them, the neighbors asked for the recipe, and honestly, it felt like the kind of festive treat that could brighten any summer gathering.
These cookies stuck with me because they’re more than just a pretty face. They bring that sweet crunch and soft, smooth icing combo that you want from a classic sugar cookie. Plus, the red and blue royal icing adds that pop of color and patriotic spirit, making them a little celebration all on their own. It’s a recipe I keep coming back to, especially when I want a festive dessert that’s straightforward but looks like I spent hours on it. And isn’t that the kind of cooking win we all want sometimes?
Why You’ll Love This Recipe
After baking these American flag sugar cookies more times than I can count (seriously, I made them three times in one week last summer), here’s why I think you’ll love them just as much:
- Quick & Easy: The dough comes together in under 20 minutes, and the royal icing is simple once you get the hang of it — perfect for last-minute celebrations or impromptu parties.
- Simple Ingredients: No hunting for fancy items, just basic pantry staples like flour, sugar, eggs, and powdered sugar. I usually stick to well-known brands like King Arthur for flour and Domino for sugar, which gives a consistent texture and taste.
- Perfect for Patriotic Holidays: Whether it’s Independence Day, Memorial Day, or even Veterans Day, these cookies bring a festive touch to any occasion.
- Crowd-Pleaser: Kids adore the colorful icing, and adults appreciate the buttery sweetness that’s not too overpowering.
- Unbelievably Delicious: The royal icing dries with a slight crunch but melts beautifully in your mouth, balancing the soft, tender cookie beneath.
This isn’t just another sugar cookie recipe. The royal icing technique I use creates a smooth, vibrant finish that stays bright and doesn’t crack. Plus, I’ve tweaked the dough to be tender yet sturdy enough to hold those clean flag lines, which can be tricky if your cookies spread too much. It’s comfort food with a twist of festive flair — the kind that makes you pause after your first bite and smile quietly to yourself.
What Ingredients You Will Need
This recipe uses straightforward, wholesome ingredients that come together to create bold flavor and a satisfying texture without fuss. Most of these you probably have in your pantry, but I’ll also share a few tips to get the best results.
- For the Sugar Cookies:
- All-purpose flour – 3 cups (360 g), sifted for a tender texture
- Baking powder – 1 teaspoon, to give a slight lift
- Salt – ½ teaspoon, balances sweetness
- Unsalted butter – 1 cup (226 g), softened (I like using European-style butter for a richer flavor)
- Granulated sugar – 1 cup (200 g), for that perfect sweetness
- Large eggs – 2, room temperature (helps with dough consistency)
- Pure vanilla extract – 2 teaspoons (fresh vanilla makes a difference here)
- For the Royal Icing:
- Powdered sugar – 4 cups (480 g), sifted for a smooth finish
- Pasteurized egg whites or meringue powder – 3 tablespoons (I prefer meringue powder for safety and ease)
- Water – 6-8 tablespoons, adjust for consistency
- Red gel food coloring – a few drops (gel is best to keep icing thick)
- Blue gel food coloring – a few drops
- Optional: Lemon juice – 1 teaspoon (adds subtle brightness)
When choosing ingredients, look for fine granulated sugar and powdered sugar without lumps for the smoothest cookies and icing. For the royal icing, I recommend brands like Wilton or AmeriColor gels—they provide vibrant colors without watering down the icing. If you want a gluten-free option, swapping the all-purpose flour for a 1:1 gluten-free baking blend works well, but expect a slightly different texture.
Equipment Needed
To get these American flag sugar cookies just right, here’s what I usually have on hand:
- Mixing bowls – at least two, one for dough and one for icing
- Electric mixer – handheld or stand mixer makes creaming butter and beating icing a breeze
- Measuring cups and spoons – precise measurements really help here
- Rolling pin – a basic wooden or silicone one works fine
- Cookie cutters – a rectangular or flag-shaped cutter is perfect, but a sharp knife can do the job too
- Plastic squeeze bottles or piping bags with small round tips – for detailed royal icing work
- Cooling rack – to let cookies cool evenly without sogginess
If you don’t have piping bags, zip-top bags with a small cut in the corner work surprisingly well. For budget-friendly mixing, a sturdy whisk and some elbow grease can replace an electric mixer, though it takes longer. I’ve found that a silicone spatula is handy for scraping every bit of dough and icing out of bowls — nothing goes to waste! Keeping your tools clean and dry, especially when working with royal icing, helps prevent clumps and gives that smooth finish every time.
Preparation Method

- Mix Dry Ingredients: In a medium bowl, whisk together 3 cups (360 g) of sifted all-purpose flour, 1 teaspoon baking powder, and ½ teaspoon salt. Set aside.
- Cream Butter and Sugar: Using an electric mixer, beat 1 cup (226 g) softened unsalted butter with 1 cup (200 g) granulated sugar until light and fluffy, about 3-4 minutes. This step is crucial for tender cookies.
- Add Eggs and Vanilla: Beat in 2 large eggs, one at a time, followed by 2 teaspoons pure vanilla extract. The mixture may look slightly curdled — that’s normal.
- Combine Dry and Wet: Gradually add the dry ingredients to the wet mixture, mixing on low speed until just combined. Avoid overmixing to keep cookies tender.
- Chill the Dough: Shape the dough into a disc, wrap in plastic wrap, and refrigerate for at least 1 hour (or up to overnight). Chilling prevents spreading and helps with rolling.
- Roll and Cut: Preheat oven to 350°F (175°C). On a lightly floured surface, roll dough to about ¼-inch (6 mm) thickness. Use a rectangular cookie cutter or a sharp knife to cut flag shapes approximately 3×2 inches (7.5×5 cm).
- Bake: Place cookies 1 inch (2.5 cm) apart on parchment-lined baking sheets. Bake for 10-12 minutes or until edges just start to turn golden. Avoid overbaking, or cookies will be dry.
- Cool Completely: Transfer cookies to a wire rack and let cool completely before decorating.
- Make Royal Icing: In a clean bowl, combine 4 cups (480 g) sifted powdered sugar, 3 tablespoons meringue powder, and 6-8 tablespoons water. Beat on high speed until stiff peaks form, about 5-7 minutes. Adjust water to get a thick but pipeable consistency.
- Color and Prepare Icing: Divide icing into three bowls. Leave one bowl white, tint one with red gel food coloring, and another with blue gel food coloring. Mix gently until colors are evenly distributed.
- Decorate: Outline each cookie with white icing, then flood the top with the same color for smooth coverage. Once dry (about 30 minutes), pipe the blue rectangle in the top left corner and add white dots as stars. Use red stripes across the remaining cookie surface. Let the icing dry completely, ideally overnight.
Quick tip: If your royal icing is too runny, add more powdered sugar; if too thick, add a few drops of water. And don’t rush the drying process — patience here means cleaner lines and less cracking. When piping, keep a damp cloth over the unused icing to prevent it from drying out.
Cooking Tips & Techniques
Royal icing can be intimidating, but a few tricks make all the difference:
- Beat to Stiff Peaks: When making the royal icing, make sure to whip it until stiff peaks form. This prevents the icing from running and helps it dry with that classic glossy finish.
- Consistency is Key: For outlining, keep the icing a bit thicker to hold shape. For flooding, thin it with a little water until it flows smoothly but doesn’t run off the cookie edges.
- Use Gel Colors: Gel food coloring is concentrated and won’t thin your icing like liquid dyes do. It also keeps colors vibrant — very important for that bold American flag look.
- Work in Layers: Let the base layer dry before adding details like stripes and stars. This prevents colors bleeding into each other.
- Practice Piping: If you’re new to royal icing, practice piping stars and stripes on parchment paper before working on cookies. It helps build confidence and control.
I learned the hard way that rushing the drying phase leads to smudged designs, so giving yourself enough time is worth it. Also, storing decorated cookies in a single layer prevents icing cracks and smudges. If you want to speed things up, a fan or cool dry place helps icing set faster without humidity messing with the texture.
Variations & Adaptations
These perfect American flag sugar cookies are wonderfully adaptable:
- Dietary Adjustments: Use a gluten-free baking mix instead of all-purpose flour for gluten sensitivity. Substitute meringue powder with aquafaba (chickpea water) to make the royal icing vegan-friendly.
- Seasonal Twists: In summer, swap out the blue royal icing for a turquoise shade to give a fresh ocean vibe, or add edible glitter stars for extra sparkle at festive parties.
- Flavor Variations: Add a teaspoon of almond extract or lemon zest to the dough for a bright, unique flavor. You can also swap classic vanilla for a hint of maple or coconut extract.
- Shape Changes: Instead of rectangles, try star-shaped cookies decorated in the same red, white, and blue scheme for a fun twist.
One variation I’ve tried is pairing these cookies with a batch of brown butter chocolate chip cookies, adding a rich, caramel flavor contrast at summer gatherings. It’s always fun to mix patriotic treats with classic favorites!
Serving & Storage Suggestions
These sugar cookies are best served at room temperature when the royal icing has fully set and hardened. They make a fantastic centerpiece on any dessert table, especially alongside fresh fruit or a cold glass of lemonade.
For storage, keep the cookies in an airtight container layered with parchment paper to prevent sticking. They stay fresh at room temperature for up to 5 days. If you want to store longer, place them in the fridge for up to 2 weeks or freeze for up to 3 months — just thaw completely before serving to avoid condensation on the icing.
Reheating isn’t really recommended as it can soften the icing and make it sticky, but bringing them out of the fridge about 30 minutes before serving helps flavors mellow and the texture soften slightly.
Over time, the flavors deepen, and the cookie becomes a bit chewier while the icing remains crisp. This little patience pays off if you want to prepare ahead for a big event.
Nutritional Information & Benefits
These American flag sugar cookies are a treat to enjoy in moderation. Each cookie (approximately 3×2 inches) contains roughly:
| Calories | 150 |
|---|---|
| Fat | 7 g |
| Carbohydrates | 22 g |
| Protein | 2 g |
| Sugar | 14 g |
Using real butter adds a dose of vitamin A and makes the cookies rich and satisfying, while the egg whites in the royal icing provide a little protein without adding fat. For those with egg allergies, meringue powder or aquafaba are safer alternatives.
Though these cookies are not low-carb or sugar-free, they fit nicely into an occasional indulgence routine. They’re naturally gluten-free when using appropriate flour blends, making them accessible for many dietary needs.
Conclusion
These perfect American flag sugar cookies with red and blue royal icing bring a little sparkle and sweetness to any patriotic celebration. They’re simple enough to make on a busy afternoon but impressive enough to earn compliments from friends and family. I love how they balance that classic buttery sugar cookie flavor with the fun, colorful icing that feels festive yet friendly.
Feel free to tweak the colors, shapes, or flavors to suit your style — these cookies are your canvas. And if you want a savory dish to pair with your sweet treats, you might enjoy trying the crispy tonkatsu pork cutlet I recently made for a casual backyard dinner. It’s a great combo of sweet and savory that makes any get-together shine.
Give this recipe a try, and I’d love to hear how your cookies turn out or what fun variations you come up with. Baking is always better when shared, right? Enjoy the process and those sweet moments at the end.
FAQs
Can I make the sugar cookie dough ahead of time?
Absolutely! You can prepare the dough up to 3 days in advance and keep it wrapped tightly in the fridge. Just bring it to room temperature before rolling out.
How do I prevent royal icing from cracking?
Allow your cookies to dry slowly in a cool, dry place. Avoid humidity, and don’t stack cookies until the icing is fully hardened, ideally overnight.
What if I don’t have meringue powder?
You can use pasteurized egg whites for royal icing, but meringue powder is safer and easier to store. Aquafaba is a vegan alternative that works well too.
Can I use food coloring liquids instead of gel?
Gel coloring is best because it won’t thin out your icing. If you use liquid, add it sparingly to avoid runny icing.
How long do these sugar cookies last?
Stored properly in an airtight container, they stay fresh for up to 5 days at room temperature, 2 weeks refrigerated, and up to 3 months frozen.
Pin This Recipe!
Perfect American Flag Sugar Cookies
Crisp, buttery sugar cookies decorated with vibrant red and blue royal icing to resemble the American flag. Perfect for patriotic holidays and festive gatherings.
- Prep Time: 20 minutes
- Cook Time: 12 minutes
- Total Time: 1 hour 32 minutes
- Yield: 24 cookies 1x
- Category: Dessert
- Cuisine: American
Ingredients
- 3 cups (360 g) all-purpose flour, sifted
- 1 teaspoon baking powder
- ½ teaspoon salt
- 1 cup (226 g) unsalted butter, softened
- 1 cup (200 g) granulated sugar
- 2 large eggs, room temperature
- 2 teaspoons pure vanilla extract
- 4 cups (480 g) powdered sugar, sifted
- 3 tablespoons meringue powder or pasteurized egg whites
- 6–8 tablespoons water
- Red gel food coloring, a few drops
- Blue gel food coloring, a few drops
- Optional: 1 teaspoon lemon juice
Instructions
- Mix dry ingredients: In a medium bowl, whisk together flour, baking powder, and salt. Set aside.
- Cream butter and sugar: Using an electric mixer, beat softened butter with granulated sugar until light and fluffy, about 3-4 minutes.
- Add eggs and vanilla: Beat in eggs one at a time, then add vanilla extract. Mixture may look slightly curdled.
- Combine dry and wet: Gradually add dry ingredients to wet mixture, mixing on low speed until just combined. Avoid overmixing.
- Chill dough: Shape dough into a disc, wrap in plastic wrap, and refrigerate for at least 1 hour or overnight.
- Roll and cut: Preheat oven to 350°F (175°C). Roll dough to ¼-inch thickness on a lightly floured surface. Cut into 3×2 inch flag shapes using a rectangular cutter or knife.
- Bake: Place cookies 1 inch apart on parchment-lined baking sheets. Bake 10-12 minutes until edges start to turn golden. Avoid overbaking.
- Cool completely: Transfer cookies to a wire rack to cool before decorating.
- Make royal icing: In a clean bowl, combine powdered sugar, meringue powder, and water. Beat on high speed until stiff peaks form, about 5-7 minutes. Adjust water for pipeable consistency.
- Color icing: Divide icing into three bowls. Leave one white, tint one red, and one blue with gel food coloring.
- Decorate: Outline each cookie with white icing and flood with the same color. After drying about 30 minutes, pipe blue rectangle in top left corner with white dots as stars, then add red stripes. Let icing dry completely, ideally overnight.
Notes
Use gel food coloring for vibrant colors without thinning icing. Chill dough to prevent spreading. Let royal icing dry slowly in a cool, dry place to avoid cracking. Practice piping on parchment paper if new to royal icing. Store decorated cookies in a single layer to prevent smudging.
Nutrition
- Serving Size: 1 cookie (approximat
- Calories: 150
- Sugar: 14
- Fat: 7
- Carbohydrates: 22
- Protein: 2
Keywords: American flag sugar cookies, patriotic cookies, royal icing cookies, Fourth of July dessert, easy sugar cookies, festive cookies