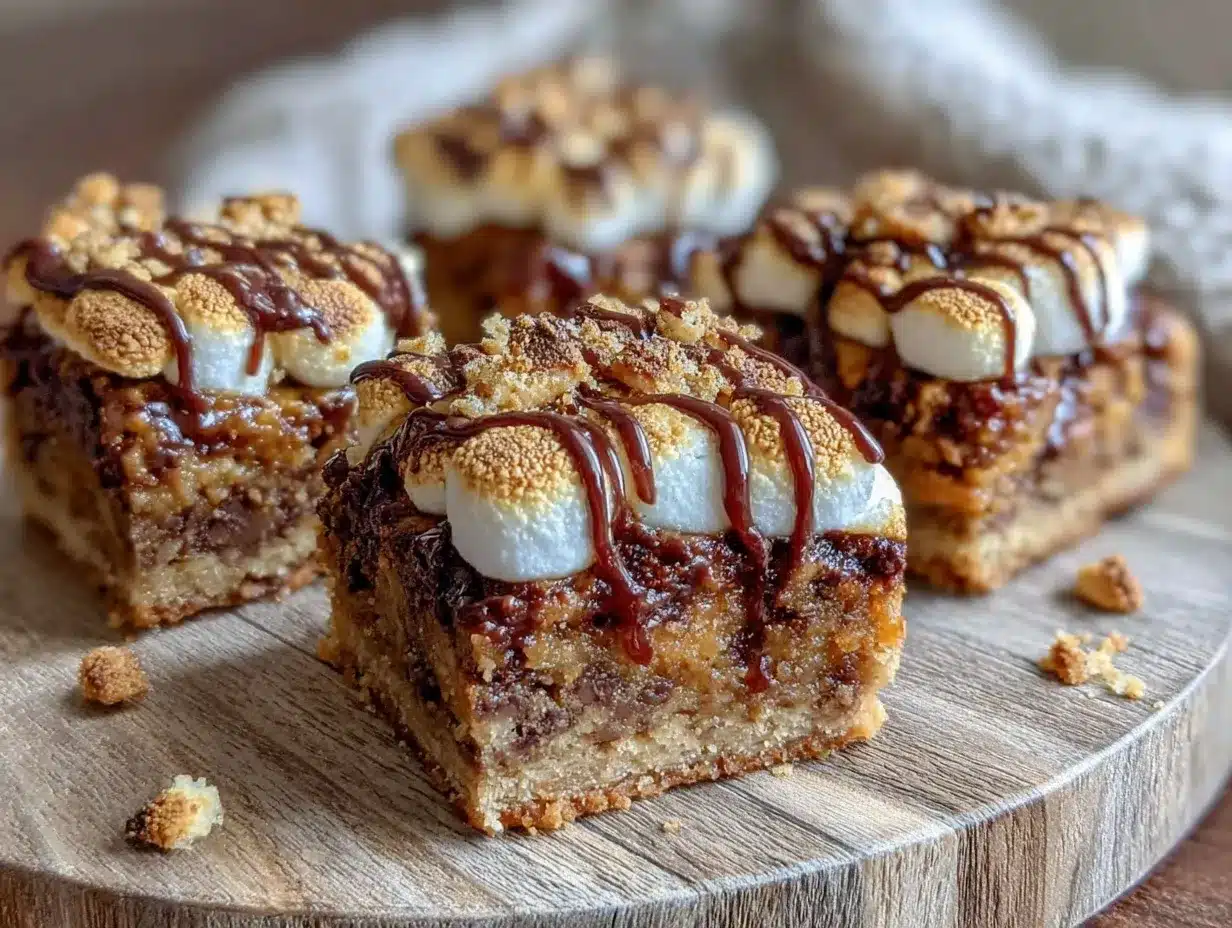
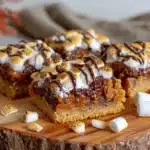
“You sure that’s going to turn out okay?” my friend asked as I slapped a pan full of cookie dough, chocolate chunks, and graham cracker bits into the oven. Honestly, I was half-convinced this gooey s’mores cookie bars experiment would flop. I’d been craving the campfire classic but didn’t have the luxury of an open flame or a bag of marshmallows ready to toast on sticks. So, I tried something a little wild: baking the whole s’mores experience into a bar, topped with marshmallows toasted right in the oven.
The smell that filled my kitchen was like a cozy campfire memory, but without the smoke or the bugs. As the toasted marshmallow top bubbled and browned, I could hardly wait to pull it out and dive in. Turns out, this recipe is pure magic — the kind that gets requested again and again at casual get-togethers or late-night cravings. The crisp edges, the melty chocolate, and that perfectly toasted marshmallow layer? Let’s just say, it’s a gooey s’mores cookie bars dream come true.
It’s not just nostalgia in bar form; it’s a dessert that’s easy enough for a busy weekday but special enough to impress a crowd. I’m pretty sure once you try this, you’ll keep it in your rotation for a while, too.
Why You’ll Love This Recipe
From my kitchen trials to your table, this gooey s’mores cookie bars recipe has been tested and approved by family, friends, and even the pickiest dessert lovers. It’s got that sweet spot between indulgence and ease that I know you’ll appreciate, especially when you want a dessert that feels homemade without the hassle.
- Quick & Easy: Ready in under 40 minutes, making it perfect for those moments when you want something sweet but don’t want to spend hours baking.
- Simple Ingredients: No fancy shopping trips needed — everything is pantry-friendly, with the classic s’mores trio you likely have on hand.
- Perfect for Any Occasion: Whether it’s a casual weekend treat, a potluck contribution, or a cozy night in, these bars fit the bill.
- Crowd-Pleaser: Kids and adults alike rave about the gooey, melty layers and that irresistible toasted marshmallow top.
- Unbelievably Delicious: The texture is spot on — chewy cookie base with pockets of melted chocolate and graham crackers, all crowned by the smoky-sweet marshmallow layer that sets this apart from regular cookies or bars.
This recipe isn’t just a throw-together s’mores dessert; it’s got a little trick up its sleeve. Toasting the marshmallows on top in the oven gives you that campfire flavor without needing a fire pit or skewers. Plus, the cookie base is soft but sturdy enough to hold all that gooey goodness without turning into a mess. Honestly, it’s like having a campfire treat in your kitchen anytime you want.
If you love the idea of a gooey, melty chocolate dessert but want something a bit more substantial than a classic chocolate chip cookie, this is it. For a similar vibe but with a savory twist, I sometimes pair my desserts with easy savory sides like the crowd-favorite easy cheesy pasta bake to balance out a cozy dinner.
What Ingredients You Will Need
This recipe uses simple, wholesome ingredients to deliver bold flavor and satisfying texture without the fuss. Most are pantry staples, with the graham crackers and marshmallows bringing in that classic s’mores feel.
- All-purpose flour: 2 cups (240g) — the base for our cookie bars, providing structure.
- Baking soda: 1 teaspoon — helps the bars rise just enough for softness without puffiness.
- Salt: ½ teaspoon — balances sweetness and enhances flavor.
- Unsalted butter: 1 cup (227g), softened — adds richness and chewiness. I like using Land O’Lakes for consistent results.
- Brown sugar: ¾ cup (150g), packed — gives a deep caramel note and moisture.
- Granulated sugar: ¼ cup (50g) — balances the brown sugar’s molasses flavor with light sweetness.
- Large eggs: 2, room temperature — binds ingredients and adds moisture.
- Vanilla extract: 2 teaspoons — for warm, fragrant background flavor.
- Graham crackers: 1 cup, roughly crushed — adds crunch and true s’mores authenticity. You can swap for gluten-free crackers if needed.
- Milk chocolate chips or chunks: 1 ½ cups (270g) — melty pockets of chocolate bliss. I prefer Ghirardelli for the texture and flavor.
- Large marshmallows: 2 cups (about 40 mini marshmallows or 15 large ones, halved) — for the gooey, toasted top. Use regular marshmallows for best results.
Substitution tips: If you want a dairy-free version, swap butter for coconut oil and use dairy-free chocolate chips. Almond flour can replace all-purpose flour for a gluten-free twist, but the texture will be a little different — still delicious, though!
Equipment Needed
- 9×13 inch baking pan: Perfect size for these bars, giving you that ideal thickness.
- Mixing bowls: One for dry ingredients, another for wet.
- Electric mixer or sturdy whisk: To cream butter and sugars smoothly.
- Spatula or wooden spoon: For folding in chocolate chips and graham crackers.
- Measuring cups and spoons: For accuracy (this really does make a difference).
- Oven mitts: Essential for safely handling the hot pan when toasting marshmallows.
- Optional: Kitchen torch if you want an extra crispy marshmallow top, but the oven broiler works just fine.
I usually stick to a simple electric hand mixer, but if you don’t have one, a whisk will do the job — just takes a bit more muscle. For the pan, I recommend a metal one rather than glass; it browns edges more evenly. If you only have glass, just add a couple extra minutes to baking time.
Preparation Method
- Preheat your oven to 350°F (175°C). Grease or line your 9×13 inch pan with parchment paper for easy removal later. This step helps prevent the bars from sticking and makes cleanup a breeze.
- Mix dry ingredients: In a medium bowl, whisk together 2 cups (240g) all-purpose flour, 1 teaspoon baking soda, and ½ teaspoon salt until evenly combined. Set aside.
- Cream butter and sugars: In a large bowl, beat 1 cup (227g) softened unsalted butter with ¾ cup (150g) packed brown sugar and ¼ cup (50g) granulated sugar until the mixture is light, fluffy, and smooth — about 3-4 minutes. This step is crucial for a tender crumb.
- Add eggs and vanilla: Beat in 2 room temperature large eggs, one at a time, then stir in 2 teaspoons vanilla extract. The batter will look glossy and rich.
- Incorporate dry ingredients: Gradually add the flour mixture to the wet ingredients, folding gently with a spatula or mixing on low speed just until combined. Avoid overmixing to keep the bars soft.
- Fold in s’mores essentials: Gently fold in 1 cup roughly crushed graham crackers and 1 ½ cups milk chocolate chips. The chunks of chocolate and cracker create those delightful pockets of melty, crunchy texture.
- Spread batter evenly: Transfer the dough to your prepared pan and spread it out evenly. Use an offset spatula or the back of a spoon for a smooth surface.
- Bake for 22-25 minutes: Bake until the edges are golden brown and the center looks just set but still soft. A toothpick inserted should come out with a few moist crumbs but no wet batter.
- Add marshmallow topping: Remove from oven and immediately scatter 2 cups of large marshmallows (halved if big) evenly over the top. Return the pan to the oven and broil on high for 1-3 minutes. Watch carefully — marshmallows toast quickly and can burn. The tops should be golden and puffed.
- Cool and slice: Let the bars cool completely in the pan on a wire rack before slicing into squares. This helps the layers set, so you don’t end up with a sticky mess.
A little trick: If you don’t have a broiler, you can use a kitchen torch to toast the marshmallow tops individually after baking. It’s a bit more hands-on but gives you control over toasting.
Cooking Tips & Techniques
To get these gooey s’mores cookie bars just right, I’ve picked up a few tricks over time. First, don’t skip the cooling step after broiling the marshmallows. The bars are super soft when warm and need a bit of time to firm up so they hold their shape better.
Also, keep a close eye during the broil step — marshmallows can go from golden to black in seconds. I usually leave the oven door slightly ajar so I can watch them without opening the door fully, which messes with the heat.
When mixing the dough, be gentle once you add the flour. Overmixing can make the bars tough, and honestly, that would ruin the whole gooey experience.
For an even distribution of the chocolate and graham crackers, fold them in carefully but thoroughly — you want every bite to have a bit of that melty, crunchy goodness. If you want a fancy touch, swap milk chocolate for dark chocolate chunks for a richer flavor.
Lastly, if you prefer a chewier marshmallow top, use mini marshmallows instead of large ones — they toast faster and create a different texture. I’ve made these bars both ways, and each brings its own charm.
Variations & Adaptations
If you want to switch things up, here are some tasty ways to make these gooey s’mores cookie bars your own:
- Peanut Butter Twist: Add ½ cup peanut butter chips to the dough for a nutty depth that pairs perfectly with the marshmallow topping.
- Salted Caramel Drizzle: Once cooled, drizzle warm salted caramel sauce over the bars for an extra layer of indulgence.
- Vegan Version: Use dairy-free butter, vegan chocolate chips, and vegan marshmallows to keep the gooey magic without animal products.
- Seasonal Flare: Swap the milk chocolate chips for pumpkin spice or peppermint-flavored chocolate chips during holidays.
- Grain-Free: Replace all-purpose flour with almond or oat flour for a gluten-free option, but note the texture will be a bit different — still delicious though.
I personally love the salted caramel drizzle version for special occasions — it’s like a grown-up s’mores bar that still hits the nostalgic spot. If you want to experiment, pairing these bars with a gooey chocolate chip skillet cookie is a chocoholic’s dream come true.
Serving & Storage Suggestions
These gooey s’mores cookie bars are best served slightly warm or at room temperature. That toasty marshmallow top is the star, so don’t let it get too cold and chewy before enjoying.
They make a fantastic dessert alongside a cold glass of milk or a hot cup of coffee. For gatherings, you can cut them into bite-sized squares for easy sharing — they’re always a hit at potlucks or casual get-togethers.
Store leftover bars in an airtight container at room temperature for up to 3 days. If you want to keep them longer, wrap tightly and freeze for up to 2 months. Thaw at room temperature before serving.
Reheating in a microwave for 10-15 seconds helps revive that gooey texture, but avoid overheating or the marshmallow top can get tough. If you want to refresh the toasted top, a quick broil (watching carefully) works wonders.
Over time, the marshmallow topping softens, making the bars almost like a chewy candy bar. Both fresh and day-old versions bring joy — it’s just a matter of your marshmallow preference.
Nutritional Information & Benefits
Each gooey s’mores cookie bar (assuming 12 servings) has approximately:
| Calories | 250 |
|---|---|
| Fat | 12g |
| Carbohydrates | 33g |
| Sugars | 22g |
| Protein | 3g |
While these bars are definitely a treat, the recipe includes some nutritional wins from real butter and eggs which add protein and essential fats. Graham crackers contribute some fiber and whole grain goodness if you use the whole grain variety.
For those with dietary concerns, the recipe can be modified to be gluten-free or dairy-free as noted, and marshmallows are generally allergen-friendly (though watch for gelatin if vegan).
Honestly, I see these bars as a special occasion treat — perfect for satisfying a sweet tooth while bringing a bit of joy and nostalgia to your day.
Conclusion
These gooey s’mores cookie bars with toasted marshmallow top have earned a permanent spot in my recipe box. They’re simple, satisfying, and bring that campfire magic indoors without any fuss. Whether you’re baking for a crowd or just because, they hit that perfect balance of chewy, melty, and toasty.
Feel free to tweak the recipe to suit your cravings—whether that’s adding nuts, swapping chocolates, or making them vegan-friendly. I love how versatile they are, and I hope you’ll find your own favorite twist too.
Give them a try, and if you do, drop a comment sharing how yours turned out or what variations you tried. There’s nothing better than swapping dessert stories and recipes with fellow home bakers.
Happy baking—and may your kitchen always smell like toasted marshmallows and chocolate!
Frequently Asked Questions
- Can I use mini marshmallows instead of large ones?
Yes, mini marshmallows work well and toast quickly, creating a slightly different texture on top. - How do I prevent marshmallows from burning under the broiler?
Watch them closely and broil with the oven door slightly open to control the heat better. - Can I make these bars ahead of time?
Absolutely! They store well at room temperature for a few days and can be frozen for longer storage. - What’s the best way to reheat leftover bars?
Microwave for 10-15 seconds or briefly under the broiler to refresh the toasted marshmallow top. - Are these bars gluten-free?
Not as written, but you can substitute almond or oat flour for a gluten-free version, keeping in mind the texture will differ slightly.
Pin This Recipe!
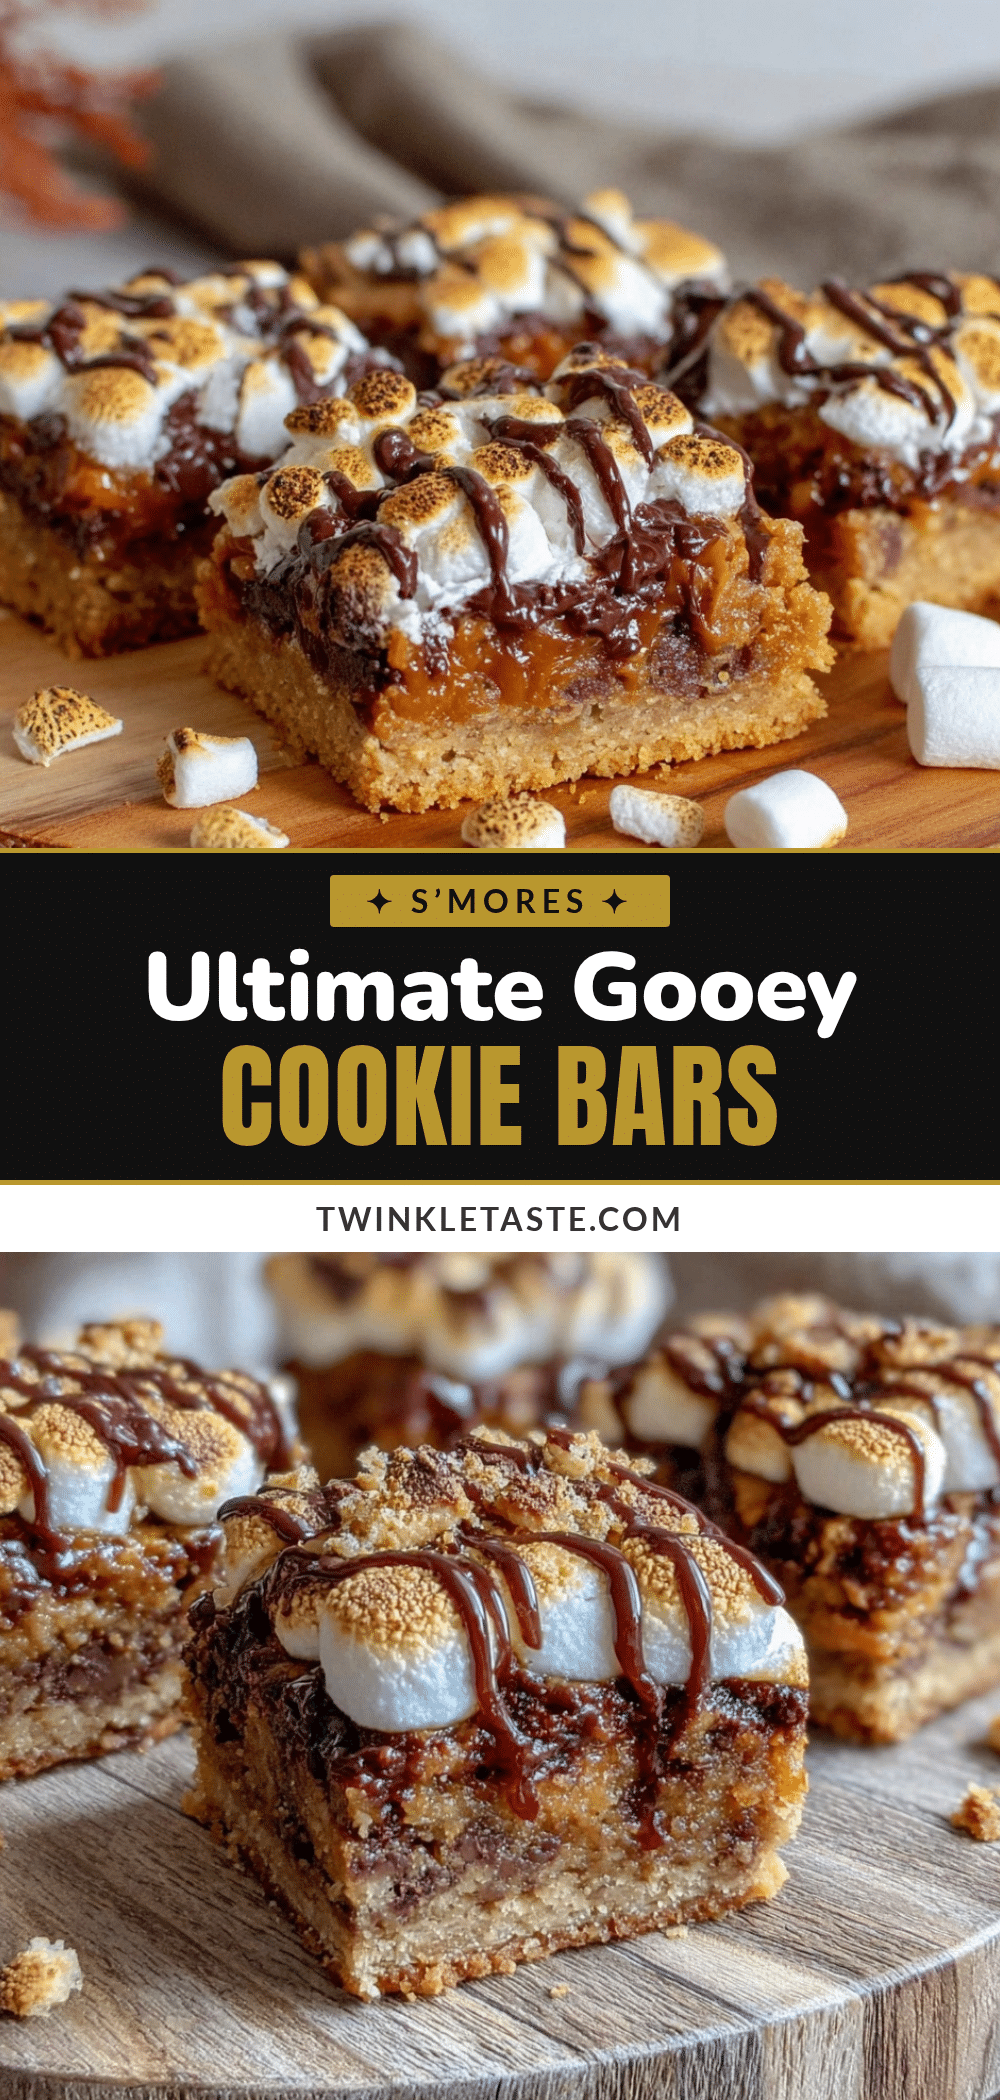
Gooey S’mores Cookie Bars
These gooey s’mores cookie bars combine a chewy cookie base with melty chocolate and a perfectly toasted marshmallow topping, delivering a campfire classic in an easy-to-make dessert bar.
- Prep Time: 15 minutes
- Cook Time: 25 minutes
- Total Time: 40 minutes
- Yield: 12 servings 1x
- Category: Dessert
- Cuisine: American
Ingredients
- 2 cups (240g) all-purpose flour
- 1 teaspoon baking soda
- ½ teaspoon salt
- 1 cup (227g) unsalted butter, softened
- ¾ cup (150g) packed brown sugar
- ¼ cup (50g) granulated sugar
- 2 large eggs, room temperature
- 2 teaspoons vanilla extract
- 1 cup roughly crushed graham crackers
- 1 ½ cups (270g) milk chocolate chips or chunks
- 2 cups large marshmallows (about 40 mini marshmallows or 15 large ones, halved)
Instructions
- Preheat your oven to 350°F (175°C). Grease or line a 9×13 inch pan with parchment paper.
- In a medium bowl, whisk together the flour, baking soda, and salt until evenly combined. Set aside.
- In a large bowl, beat the softened butter with brown sugar and granulated sugar until light, fluffy, and smooth, about 3-4 minutes.
- Beat in the eggs one at a time, then stir in the vanilla extract until the batter is glossy and rich.
- Gradually add the flour mixture to the wet ingredients, folding gently until just combined. Avoid overmixing.
- Fold in the crushed graham crackers and milk chocolate chips gently but thoroughly.
- Spread the batter evenly in the prepared pan using an offset spatula or the back of a spoon.
- Bake for 22-25 minutes until edges are golden brown and the center is set but still soft. A toothpick should come out with a few moist crumbs.
- Remove from oven and immediately scatter the marshmallows evenly over the top. Return to the oven and broil on high for 1-3 minutes until marshmallows are golden and puffed. Watch carefully to prevent burning.
- Let the bars cool completely in the pan on a wire rack before slicing into squares.
Notes
Cool bars completely before slicing to prevent a sticky mess. Watch marshmallows closely when broiling to avoid burning. For a chewier marshmallow top, use mini marshmallows. Use a metal pan for even browning; if using glass, add a couple extra minutes to baking time. Substitute almond flour and dairy-free ingredients for gluten-free and vegan versions.
Nutrition
- Serving Size: 1 bar (1/12th of rec
- Calories: 250
- Sugar: 22
- Fat: 12
- Carbohydrates: 33
- Protein: 3
Keywords: s’mores, cookie bars, toasted marshmallow, chocolate dessert, easy dessert, campfire treat, gooey bars