“Do you remember that frantic afternoon when you realize the graduation party is tomorrow, and the cake situation is a total mess?” That was me, scrambling through my kitchen, eyes darting between the clock and a sticky pile of fondant that refused to behave. Honestly, I never thought I’d be the type to swear off fondant completely, but after that chaotic experience, I found myself searching for easy graduation cakes without fondant that still looked stunning enough to impress every guest.
It wasn’t just about skipping the fancy fondant; it was about finding cakes that felt approachable yet celebratory. Let’s face it, graduation day is hectic. Between last-minute outfit checks, photo ops, and well-wishing, the last thing anyone needs is a complicated cake project. What stuck with me, though, was how simple ingredients and clever decorating tricks can turn a “no-fondant” cake into the centerpiece of a celebration.
Since then, I’ve made these cakes — sometimes more than once a week — tweaking and testing until they hit that perfect balance of wow-factor and easy prep. And honestly? These recipes aren’t just for graduations. They’re for any occasion when you want a cake that looks like you spent hours (but you really didn’t). So if you’re on the lookout for easy graduation cakes without fondant that make a stunning statement without the stress, you’re in the right spot.
Why You’ll Love This Recipe
After countless trials (and a few fondant fails), I can say these cakes offer something special for anyone wanting that flawless celebration cake without the fuss. Here’s why these recipes have earned a permanent spot in my baking rotation:
- Quick & Easy: Each cake can come together in under 90 minutes, perfect for last-minute party plans or busy schedules.
- Simple Ingredients: No exotic or hard-to-find items here — just pantry staples and fresh basics you probably already have.
- Perfect for Graduation Celebrations: They strike just the right note of festivity without looking over-the-top, making them ideal for milestone moments.
- Crowd-Pleaser: From kids to adults, these cakes get rave reviews for their moist crumb and delightful flavors.
- Unbelievably Delicious: The textures and frosting combos hit that sweet spot between classic comfort and a fresh twist.
What sets these recipes apart? Instead of relying on fondant, they lean into creative frosting techniques, fresh toppings, and thoughtful layering to deliver cakes with the same “wow” but less hassle. For instance, blending cream cheese with just the right amount of citrus zest or layering fresh fruits for contrast makes a big difference. Honestly, some cakes even get better a day later — the flavors settle beautifully, making celebrations last longer.
This isn’t just about skipping fondant; it’s about trusting that simple, heartfelt baking can make a party unforgettable. If you’ve ever felt intimidated by the thought of working with fondant, these cakes will give you confidence and smiles all around.
What Ingredients You Will Need
These easy graduation cakes without fondant rely on straightforward, wholesome ingredients that pack a punch in flavor and texture without adding complexity. Whether you’re a seasoned baker or just getting comfortable with cake-making, these basics will set you up for success.
- For the Cake Batter:
- All-purpose flour (or cake flour for a lighter crumb)
- Granulated sugar
- Unsalted butter, softened (I prefer Kerrygold for richness)
- Large eggs, room temperature (they help with structure and moisture)
- Baking powder and baking soda (for perfect rise)
- Salt (balances sweetness)
- Whole milk or buttermilk (buttermilk adds a lovely tang and tenderness)
- Pure vanilla extract (quality matters here; Nielsen-Massey is a favorite)
- For the Frosting:
- Cream cheese, softened (for that creamy tanginess that pairs well with many flavors)
- Unsalted butter, softened
- Confectioners’ sugar (for smooth, sweet frosting)
- Heavy cream or milk (adjusts frosting consistency)
- Optional: Citrus zest (lemon or orange adds freshness)
- Decorative Toppings & Fillings:
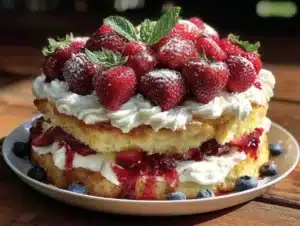
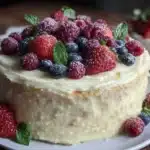
- Fresh berries (strawberries, blueberries, raspberries — seasonal and vibrant)
- Edible flowers (for a delicate, natural finish)
- Chopped nuts or toasted coconut (adds crunch and visual interest)
- Chocolate shavings or sprinkles (because celebrations deserve a little sparkle)
- Jam or curd for filling (optional, adds a lovely surprise layer)
You’ll notice these ingredients are pantry friendly and flexible. For example, if you want a gluten-free option, swapping the flour for a blend like Bob’s Red Mill gluten-free all-purpose works beautifully. Or if dairy is off the table, coconut yogurt can replace cream cheese in a pinch (though texture will vary).
Equipment Needed
For these no-fondant graduation cakes, you don’t need a professional bakery setup—just some trusty basics that you might already own:
- Mixing bowls: At least two—one for dry ingredients and one for wet.
- Electric hand mixer or stand mixer: Helps get the batter and frosting smooth and fluffy. I’ve used both, and honestly, a hand mixer does the job just fine if you’re on a budget.
- Measuring cups and spoons: Precision matters, especially with baking powder and baking soda.
- 8 or 9-inch round cake pans: Non-stick or well-greased pans make cake removal easier.
- Cooling rack: Essential for letting the cakes cool completely before frosting.
- Offset spatula or butter knife: For spreading frosting evenly—you don’t need fancy tools, but an offset spatula makes life easier.
- Parchment paper: Line your pans to avoid any stuck bits and for easy cleanup.
If you don’t have a stand mixer, don’t stress. I’ve made these cakes countless times with just a whisk and elbow grease. Also, keeping your tools clean and dry ensures the frosting whips up just right. A budget-friendly tip: silicone spatulas are versatile and easy to clean, making them perfect for frosting and scraping bowls.
Preparation Method

- Preheat your oven to 350°F (175°C). Grease and line two 8-inch (20 cm) round cake pans with parchment paper.
- Mix Dry Ingredients: In a medium bowl, whisk together 2 ½ cups (312 g) all-purpose flour, 2 ½ teaspoons baking powder, ½ teaspoon baking soda, and ½ teaspoon salt. Set aside.
- Cream Butter and Sugar: In a large bowl, beat 1 cup (227 g) softened unsalted butter with 1 ¾ cups (350 g) granulated sugar using a mixer on medium speed until light and fluffy (about 3-4 minutes). This step is key for a tender crumb.
- Add Eggs: Add 4 large eggs one at a time, mixing well after each. The batter may look slightly curdled — that’s normal.
- Combine Wet and Dry: Reduce mixer speed to low. Alternately add the dry ingredients and 1 cup (240 ml) buttermilk, beginning and ending with the dry. Mix just until combined to avoid overworking the batter.
- Add Vanilla: Stir in 2 teaspoons pure vanilla extract.
- Divide Batter: Evenly pour the batter into the prepared pans. Smooth the tops lightly with a spatula.
- Bake: Place pans in the oven and bake for 30-35 minutes, or until a toothpick inserted in the center comes out clean. Oven temperatures vary — keep an eye on the cakes after 30 minutes.
- Cool: Let cakes cool in the pans for 10 minutes, then turn out onto a wire rack to cool completely before frosting.
- Prepare Frosting: Beat 8 ounces (225 g) softened cream cheese with ½ cup (113 g) unsalted butter until smooth. Gradually add 3 cups (360 g) confectioners’ sugar, beating until fluffy. Adjust consistency with 1-2 tablespoons heavy cream if needed. Add zest of one lemon for a bright note, if desired.
- Assemble and Decorate: Place one cake layer on your serving plate. Spread a generous layer of frosting (or jam) on top. Add the second cake layer, then frost the entire cake evenly. Decorate with fresh berries, edible flowers, or your chosen toppings.
Pro tip: If your frosting feels too soft, chill it for 15 minutes before spreading. Also, when leveling cakes, a serrated knife does wonders for even layers. And if you want to get creative, layering with no-bake peanut butter balls crushed inside adds a fun surprise!
Cooking Tips & Techniques
One thing I learned early on is that easy graduation cakes without fondant shine brightest when you focus on simple, reliable techniques. Here are some lessons from my kitchen:
- Don’t Overmix: Once you add the flour, mix just until combined. Overmixing can lead to dense, tough cakes — nobody wants that on a special day.
- Room Temperature Ingredients: Butter, eggs, and milk should be at room temp. It helps everything blend smoothly and traps air for a lovely rise.
- Even Baking: Rotate your pans halfway through baking if your oven tends to cook unevenly. This little trick saves from one side browning too fast.
- Frosting Consistency: If your frosting is too stiff, add a splash of milk. Too runny? Add more powdered sugar. The goal is spreadable but not drippy.
- Fresh is Best: Use fresh berries and zest close to serving time to keep colors vibrant and flavors bright.
I once tried rushing the cooling step and ended up with frosting melting all over the place — lesson learned! Patience is key. Also, multitasking by preparing frosting while cakes bake saves time and keeps the workflow smooth. If you want to impress without stress, these little habits make a big difference.
Variations & Adaptations
Because no two graduations (or bakers) are alike, these recipes adapt well to preferences, dietary needs, and seasons. Here are a few ways to make them your own:
- Flavor Swaps: Try swapping vanilla for almond extract or adding cocoa powder for a chocolate twist. I once made a lemon-raspberry version that was a hit at a summer party.
- Dairy-Free Option: Use dairy-free cream cheese and coconut milk instead of butter and cream. The texture changes slightly but still tastes great.
- Gluten-Free: Replace all-purpose flour with a 1:1 gluten-free baking blend. Adding a teaspoon of xanthan gum helps with structure.
- Different Frosting Choices: Whipped cream frosting or a simple glaze can make cakes lighter and add variety. I love how a drizzle of lemon glaze brightens things up.
- Decorations: Fresh fruit works year-round, but in fall, roasted nuts and caramel drizzle bring cozy vibes.
I’ve even layered a moist gluten-free banana bread base with cream cheese frosting for a fun mix of textures. The possibilities are endless, and switching things up keeps the celebration fresh.
Serving & Storage Suggestions
These cakes are best served at room temperature — it brings out the full flavor of the frosting and crumb. I usually take them out of the fridge about 30 minutes before serving. Presentation-wise, a simple cake stand or a pretty platter makes a big difference.
Pair with a light beverage, like sparkling water with a slice of citrus or a mild tea, to balance the sweetness. For a richer party spread, these cakes complement savory dishes like a fresh salad or easy weekday dinners like the easy shrimp stir fry beautifully.
Leftovers store well in an airtight container in the refrigerator for 3-4 days. If you want to freeze a cake, wrap it tightly in plastic wrap and foil, then thaw overnight in the fridge before serving. Reheat slices gently in the microwave for 10-15 seconds if you like it slightly warm. Just a heads-up: frosting texture may soften after freezing, so it’s best eaten fresh when possible.
Flavors often deepen after a day in the fridge, so sometimes waiting a bit feels like a little gift to your taste buds.
Nutritional Information & Benefits
While these cakes are a treat, they’re made with real ingredients, so there’s comfort in knowing what’s inside. A typical slice (1/12th of cake) contains approximately:
| Calories | 320 kcal |
|---|---|
| Fat | 18 g |
| Carbohydrates | 38 g |
| Protein | 4 g |
| Sugar | 26 g |
Key ingredients like eggs provide protein and vitamins, while fresh fruits add antioxidants and fiber. Using buttermilk or yogurt in the batter supports tenderness and moisture without excess fat. Also, opting for natural sweeteners or adjusting sugar to taste can make these cakes fit better with your dietary goals.
For those with allergies, easy substitutions like gluten-free flours or dairy-free cream cheese keep these recipes inclusive without losing their celebratory spirit.
Conclusion
Making easy graduation cakes without fondant that still stun guests is totally doable, even if you’re juggling a million other party details. These recipes prove you don’t need fancy, complicated techniques to create something memorable and delicious.
Feel free to personalize each cake with your favorite flavors or decorations — the best cakes tell your story and celebrate the moment uniquely. Honestly, the joy on my graduate’s face when they saw their cake was worth every minute of prep.
If you try one of these recipes, I’d love to hear how it turned out and what creative twists you added. Baking for celebrations is about sharing happiness, and your stories make this journey even sweeter. Here’s to making stunning cakes with less stress and more smiles!
FAQs
Can I prepare these graduation cakes in advance?
Absolutely! You can bake the cakes a day ahead, keep them wrapped tightly, and frost them the next day for fresher frosting. Just store them in the fridge and bring them to room temperature before serving.
How do I keep the frosting from melting in warm weather?
Use a cream cheese frosting with a bit less cream or milk to make it sturdier. Also, keep the cake refrigerated until serving time and avoid direct sunlight or heat.
Is it possible to make these cakes vegan?
Yes! Substitute eggs with flax eggs, use dairy-free cream cheese and butter alternatives, and plant-based milk. The texture will be slightly different but still delicious.
What can I use instead of fresh berries for decoration?
If fresh berries aren’t available, try edible flowers, chopped nuts, or even colorful sprinkles. Toasted coconut flakes also add a lovely texture and look great.
Can I make a larger cake for bigger celebrations?
Of course! Just double or triple the ingredients and bake in larger pans or multiple layers, adjusting baking time accordingly. Use a toothpick test to check doneness.
Pin This Recipe!
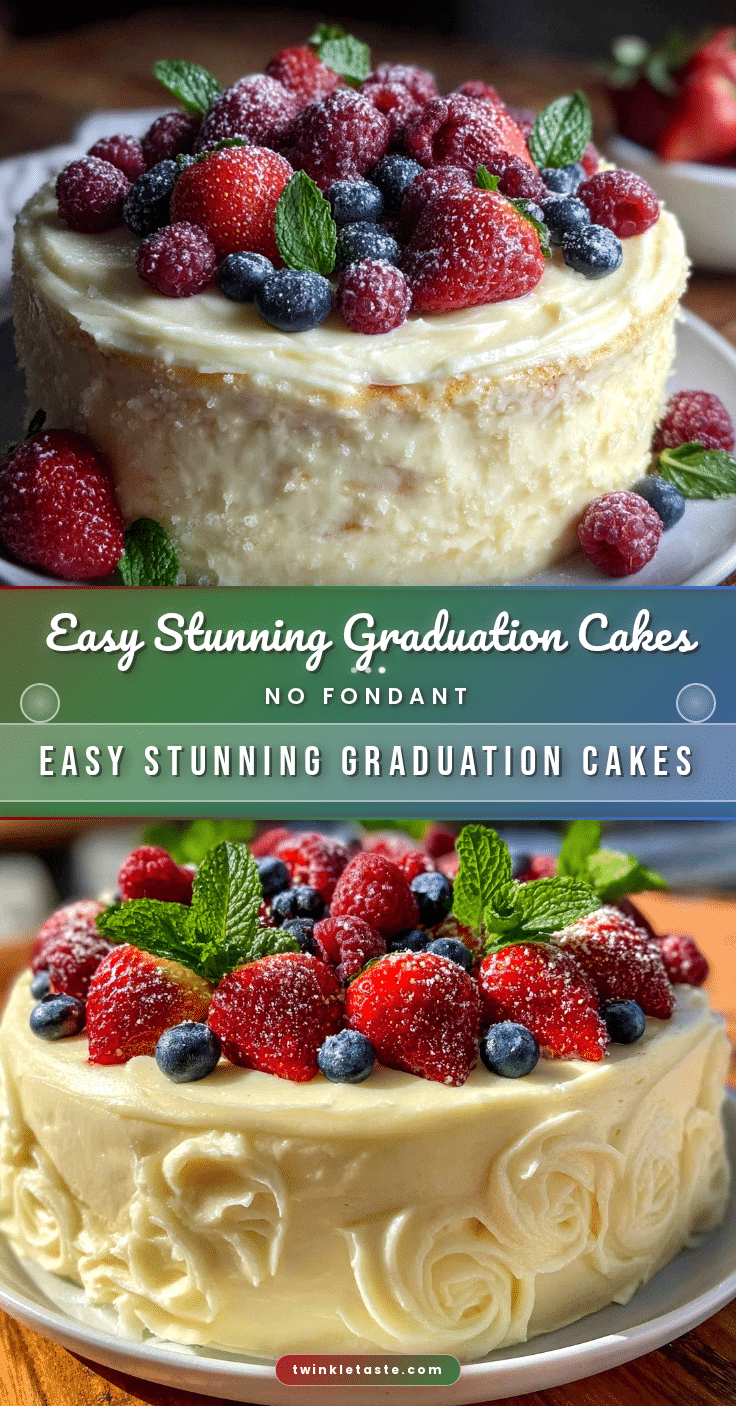
Easy Graduation Cakes Without Fondant
These easy graduation cakes without fondant are quick to prepare, use simple pantry ingredients, and deliver stunning celebration-worthy results with creative frosting and fresh toppings.
- Prep Time: 20 minutes
- Cook Time: 35 minutes
- Total Time: 55 minutes
- Yield: 12 servings 1x
- Category: Dessert
- Cuisine: American
Ingredients
- 2 ½ cups (312 g) all-purpose flour (or cake flour for a lighter crumb)
- 2 ½ teaspoons baking powder
- ½ teaspoon baking soda
- ½ teaspoon salt
- 1 cup (227 g) unsalted butter, softened
- 1 ¾ cups (350 g) granulated sugar
- 4 large eggs, room temperature
- 1 cup (240 ml) buttermilk or whole milk
- 2 teaspoons pure vanilla extract
- 8 ounces (225 g) cream cheese, softened
- ½ cup (113 g) unsalted butter, softened
- 3 cups (360 g) confectioners’ sugar
- 1–2 tablespoons heavy cream or milk (to adjust frosting consistency)
- Zest of one lemon (optional)
- Fresh berries (strawberries, blueberries, raspberries)
- Edible flowers
- Chopped nuts or toasted coconut
- Chocolate shavings or sprinkles
- Jam or curd for filling (optional)
Instructions
- Preheat your oven to 350°F (175°C). Grease and line two 8-inch round cake pans with parchment paper.
- In a medium bowl, whisk together flour, baking powder, baking soda, and salt. Set aside.
- In a large bowl, beat softened butter and granulated sugar on medium speed until light and fluffy, about 3-4 minutes.
- Add eggs one at a time, mixing well after each addition. Batter may look slightly curdled, which is normal.
- Reduce mixer speed to low. Alternately add dry ingredients and buttermilk, beginning and ending with dry ingredients. Mix just until combined.
- Stir in vanilla extract.
- Divide batter evenly between prepared pans and smooth tops with a spatula.
- Bake for 30-35 minutes or until a toothpick inserted in the center comes out clean. Rotate pans halfway through baking if needed.
- Let cakes cool in pans for 10 minutes, then turn out onto a wire rack to cool completely.
- Prepare frosting by beating cream cheese and butter until smooth. Gradually add confectioners’ sugar and beat until fluffy. Adjust consistency with heavy cream or milk. Add lemon zest if desired.
- Place one cake layer on serving plate. Spread a generous layer of frosting or jam on top. Add second cake layer and frost entire cake evenly.
- Decorate with fresh berries, edible flowers, chopped nuts, chocolate shavings, or other toppings as desired.
Notes
Do not overmix batter after adding flour to avoid dense cakes. Use room temperature ingredients for best texture. Rotate pans halfway through baking for even cooking. Chill frosting if too soft before spreading. Fresh berries and zest should be added close to serving time for best flavor and appearance. Cakes can be made a day ahead and stored in the fridge, brought to room temperature before serving. For dairy-free or gluten-free adaptations, substitute ingredients accordingly.
Nutrition
- Serving Size: 1 slice (1/12th of c
- Calories: 320
- Sugar: 26
- Fat: 18
- Carbohydrates: 38
- Protein: 4
Keywords: graduation cake, no fondant cake, easy celebration cake, cream cheese frosting, fresh berry cake, simple cake recipe