Let me tell you, the moment the rich scent of chocolate and vanilla cake mingled with a hint of sweet frosting filled my kitchen, I knew these Easy Festive Cake Pops Graduation Cap Design treats were something special. The first time I crafted these little bites of celebration, I was instantly hooked—the kind of moment where you pause, take a deep breath, and just smile because you know you’re onto something truly special. Years ago, when I was knee-high to a grasshopper, my grandma used to make tiny cakes for holidays, but these cake pops bring that nostalgic feeling into a modern, fun form perfect for any graduation party.
You know what’s dangerous about this recipe? They’re so easy to make, yet they look like you spent hours fussing over them. My family couldn’t stop sneaking them off the cooling rack (and I can’t really blame them). Honestly, these cake pops have become a staple not just for graduations but for potlucks, school events, and even a sweet treat for my kids’ after-school snacks. Let’s face it, nothing brightens up your Pinterest cookie board quite like a perfectly crafted graduation cap cake pop. I’ve tested this recipe more times than I can count—in the name of research, of course—and it never fails to impress. You’re going to want to bookmark this one for your next celebration.
Why You’ll Love This Recipe
After many attempts and tweaks, this Easy Festive Cake Pops Graduation Cap Design recipe has proven to be a winner for so many reasons. Here’s why you’ll appreciate it as much as I do:
- Quick & Easy: These cake pops come together in under an hour, making them perfect for last-minute party prep or busy weeknights.
- Simple Ingredients: No fancy or hard-to-find items here—just cake, frosting, and a handful of decorating supplies you probably already have.
- Perfect for Celebrations: Whether it’s a graduation bash, school event, or family gathering, these cake pops steal the show every time.
- Crowd-Pleaser: Kids, adults, and even the pickiest eaters rave about these adorable and tasty treats.
- Unbelievably Delicious: The moist cake paired with smooth frosting and a crisp chocolate coating is a flavor and texture combo that’s just irresistible.
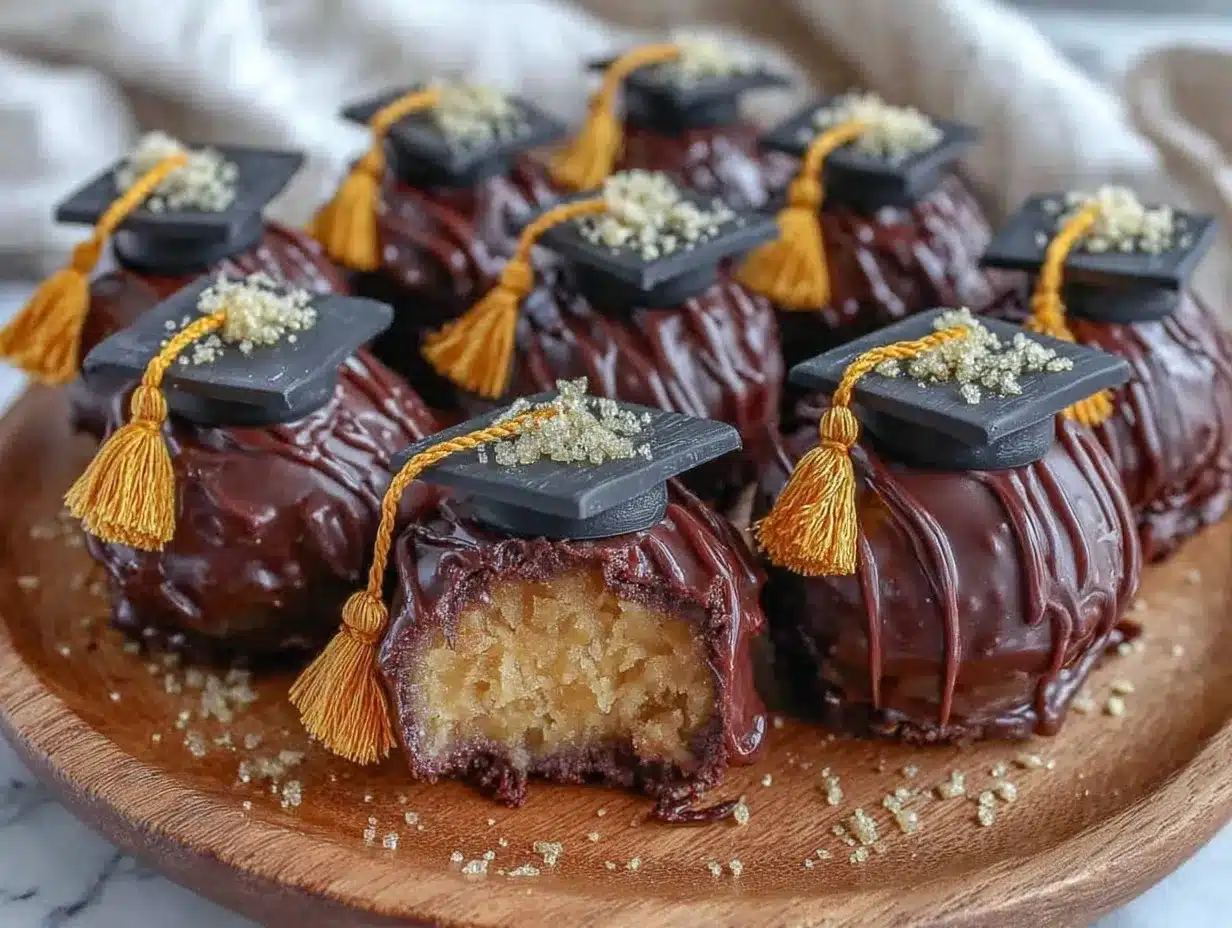
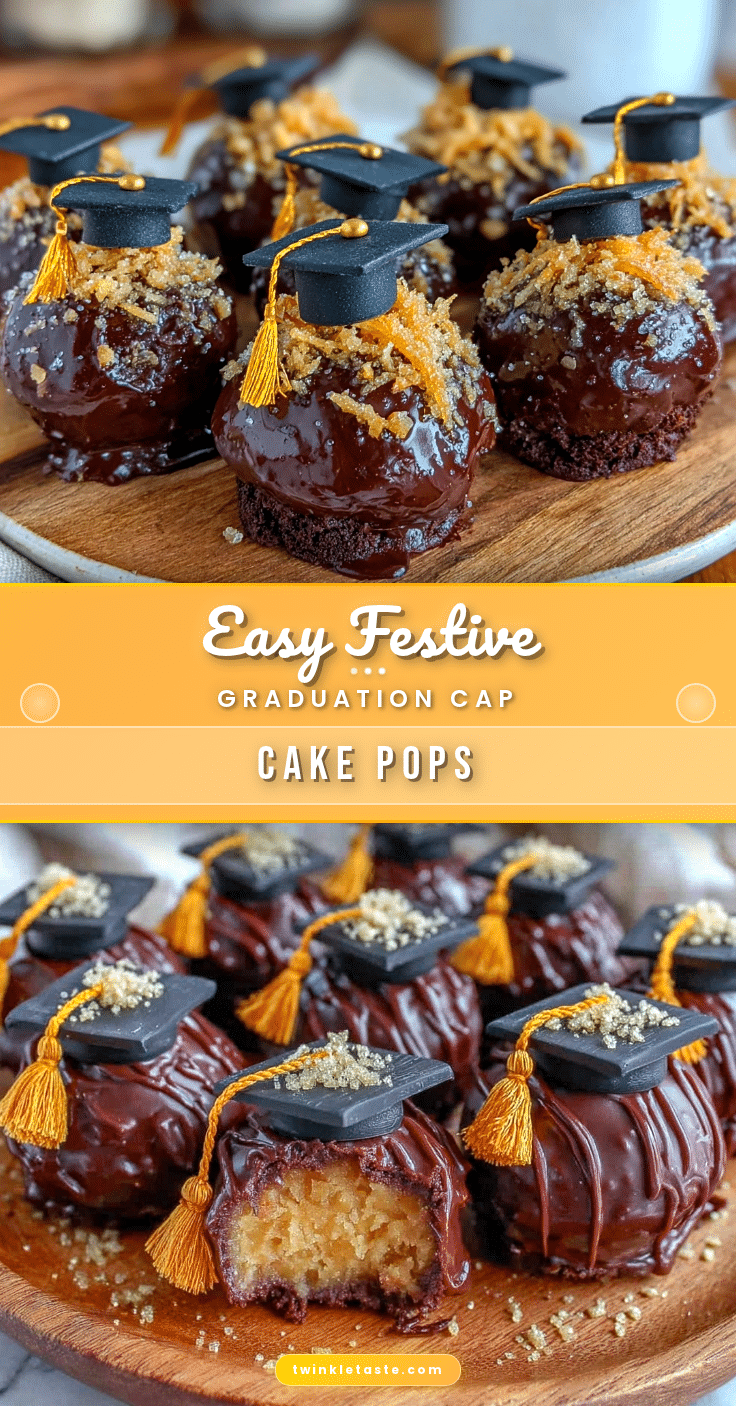
What makes these cake pops stand out is the simple yet clever design that mimics the classic graduation cap—black chocolate coating with a little fondant or candy tassel that just screams celebration. Unlike other cake pops that can be a little messy or bland, this recipe balances flavor and presentation perfectly. It’s comfort food with a festive twist, the kind that makes you close your eyes after the first bite and smile. If you want a party treat that looks impressive but is honestly a breeze to make, this is it.
What Ingredients You Will Need
This recipe uses simple, wholesome ingredients to deliver bold flavor and satisfying texture without the fuss. Most of these are pantry staples or easy to pick up at any grocery store. Here’s what you’ll need to create your Easy Festive Cake Pops Graduation Cap Design:
- For the Cake:
- 1 box of chocolate or vanilla cake mix (or homemade cake, cooled and crumbled)
- Ingredients called for on the cake mix box (usually eggs, oil, water)
- For the Frosting:
- 1 cup unsalted butter, softened (adds richness)
- 3-4 cups powdered sugar, sifted
- 2-3 tablespoons whole milk or cream (use dairy-free milk if needed)
- 1 teaspoon vanilla extract
- For the Decoration:
- 12 oz black candy melts or black melting chocolate (I recommend Wilton for smooth coating)
- Graduation tassel decorations – either black and gold fondant or thin candy ropes
- Cake pop sticks
- Edible gold glitter or sprinkles (optional, for extra festive flair)
If you want a gluten-free option, swap the cake mix with a gluten-free version or use almond flour for a low-carb twist. For a dairy-free version, coconut oil can replace butter in frosting, and dairy-free milk works just fine. In summer months, fresh berries folded into the cake batter add a fresh pop, but for graduation parties, I find the classic chocolate or vanilla combo really hits the spot.
Equipment Needed
To make these festive cake pops, you’ll need a few kitchen tools that keep the process smooth and stress-free. Here’s what I use and recommend:
- Baking Pan: A standard 9×13-inch pan for baking the cake. You can use glass or metal—just grease well.
- Mixing Bowls: At least two bowls—one for the cake batter and one for mixing the frosting.
- Electric Mixer: A hand mixer or stand mixer makes whipping the frosting easy and fluffy.
- Cake Pop Mold or Scoop: Using a small cookie scoop or your hands to form cake balls works perfectly; a cake pop mold is optional but helpful for uniform size.
- Microwave-Safe Bowl: For melting candy melts or chocolate—the microwave is best for quick, even melting.
- Styrofoam Block or Cake Pop Stand: To hold cake pops upright while drying. If you don’t have one, a small glass or bowl with holes poked in foil works in a pinch.
I’ve tried making cake pops without a stand, and trust me, they’re messier and prone to rolling around. Investing in a simple cake pop stand is worth it, but if you’re on a budget, just get creative with household items to hold them steady. Also, keep your candy melts in a cool place before melting to avoid clumping, and use a silicone spatula for smooth stirring.
Preparation Method
- Bake the Cake: Preheat your oven to 350°F (175°C). Prepare your cake mix according to the package directions or your homemade recipe. Pour the batter into a greased 9×13-inch pan and bake for 30-35 minutes, or until a toothpick inserted comes out clean. Let the cake cool completely—this is key to prevent the frosting from melting later.
- Crumble the Cake: Once cooled, crumble the cake into a large mixing bowl using your hands or a fork. The texture should be fine but not powdery—like sand with a few small clumps.
- Make the Frosting: In a separate bowl, beat 1 cup of softened butter until creamy. Gradually add powdered sugar, one cup at a time, mixing on low. Add milk and vanilla extract, then beat on high until fluffy. Adjust consistency if needed—add a splash more milk for softness or more powdered sugar for firmness.
- Combine Cake and Frosting: Add frosting to the crumbled cake gradually, mixing with your hands or a spatula. You want a dough-like consistency that holds together when rolled into balls but isn’t too sticky. This usually takes about 1 to 1 ½ cups of frosting.
- Form Cake Balls: Scoop out small portions (about 1.5 tablespoons or 20-25 grams) and roll them into smooth balls. Place on a parchment-lined baking sheet. Chill in the fridge for 30 minutes or freezer for 15 minutes—this step helps firm them up for dipping.
- Melt Candy Coating: While cake balls chill, melt the black candy melts in a microwave-safe bowl in 30-second intervals, stirring between each until smooth. Be careful not to overheat—it should be fluid but not burnt.
- Insert Sticks and Dip: Dip the tip of each cake pop stick into melted candy, then insert halfway into each cake ball (this acts like glue). Allow to set for 10-15 minutes. Then, dip each cake pop fully into the melted candy, gently tapping off excess. Hold upright and place into your cake pop stand or styrofoam block to dry.
- Create the Graduation Cap Design: Before the coating sets fully, gently press a small square of black fondant or candy melt piece flat on top to mimic the mortarboard. Use a thin candy rope or piped melted candy to form a tassel hanging off one corner. Add a tiny dab of melted candy to secure it. Dust with edible gold glitter if desired.
- Let Set Completely: Allow cake pops to dry completely at room temperature, about 30 minutes. Avoid refrigeration as it may cause condensation and dull the shine of the coating.
Pro tip: If the candy melts start to thicken while dipping, just add a teaspoon of vegetable oil and stir to loosen. Also, don’t rush the chilling steps—firm cake balls make for neater dipping and less cracking.
Cooking Tips & Techniques
When making these festive cake pops, a few tricks from my kitchen can save you some headaches:
- Chill the Cake Balls Properly: This is a must. Too soft, and they’ll fall apart when dipped. Too hard (frozen solid), and they can crack. A firm, cold but slightly pliable texture is golden.
- Use Candy Melts Wisely: They’re designed to set quickly and keep a smooth finish. Avoid overheating to prevent graininess, and stir often. If your kitchen is humid, the coating might take longer to set—be patient!
- Stick Placement: Dipping the stick tip into chocolate before inserting into the cake ball acts like glue—it really helps prevent the cake pops from sliding off.
- Don’t Overmix Cake and Frosting: You want a dough that holds but isn’t gummy. Too much frosting and the cake pops become heavy and sweet; too little and they dry out and crumble.
- Multitask: While cake balls chill, melt your candy melts and prep decorations. This saves time and keeps your workflow smooth.
- Practice Patience: Let each layer set before moving to the next step—rushing can lead to smudges or uneven coating.
Honestly, I’ve learned the hard way that skipping the chilling step or rushing the dipping leads to crumbly cake pops and frustration. Taking your time means you end up with those perfect, glossy, festive graduation caps everyone will ooh and ahh over.
Variations & Adaptations
Want to switch things up? Here are a few ways to make these cake pops uniquely yours:
- Flavor Variations: Try swapping the vanilla or chocolate cake for red velvet or lemon for a tangy twist. You can also add a hint of espresso powder to the chocolate cake for a mocha flair.
- Dietary Adjustments: Use gluten-free cake mixes or make your own almond flour cake for gluten intolerance. For dairy-free, swap butter and milk with coconut oil and almond milk in the frosting.
- Decoration Tweaks: Instead of black candy melts, use navy blue or school colors for the cap. Swap fondant tassels with piped colored royal icing for a simpler finish.
- Alternative Coatings: Try white chocolate with a black cocoa dusting for a marbled cap effect. Or dip half the cake pop in candy melts and half in sprinkles for a playful look.
- Seasonal Adaptations: Add edible flowers or pastel sprinkles for spring graduations, or use metallic edible paint to add shimmer for a glam event.
One variation I tried was using peanut butter frosting mixed with crumbled chocolate cake—dangerously good and a hit with my peanut butter lovers! Feel free to experiment with your favorite flavors and decorations to suit your celebration’s vibe.
Serving & Storage Suggestions
These graduation cap cake pops are best served at room temperature so the coating stays crisp and the cake inside stays moist. Arrange them on a decorative platter or display stand to make a festive centerpiece. Pair with sparkling cider or a fruity punch for a perfect party combo.
To store, place cake pops in an airtight container lined with parchment paper in the refrigerator. They’ll keep fresh for up to 5 days. When ready to serve, remove from fridge 30 minutes ahead to take the chill off and bring back that perfect texture.
For longer storage, freeze cake pops in a single layer on a baking sheet. Once frozen solid, transfer to a freezer-safe container and keep for up to 2 months. Thaw overnight in the fridge before serving. Just a heads up—freezing might slightly dull the candy coating’s shine, but the taste stays just as great.
One of the fun parts is watching how the flavors develop—the cake stays moist and the frosting inside melds beautifully with the coating after resting a day. So if you’re prepping ahead for a party, these cake pops actually get better overnight.
Nutritional Information & Benefits
While cake pops are definitely a treat, here’s a rough idea of what you’re enjoying per pop (~50g):
| Nutrient | Approximate Amount |
|---|---|
| Calories | 180-220 kcal |
| Fat | 9-12 g |
| Sugar | 20-25 g |
| Protein | 1-2 g |
Key ingredients like butter provide some fat-soluble vitamins, and using high-quality chocolate or candy melts adds antioxidants. For dairy- or gluten-free versions, suitable substitutions keep these cake pops inclusive without compromising flavor. Just keep in mind, these are celebration treats best enjoyed in moderation.
From a wellness standpoint, making your own gives you control over ingredient quality and portion size, which is better than store-bought sweets loaded with preservatives. Plus, the joy of making and sharing these cake pops is a boost for the soul—sometimes that’s the best kind of nourishment.
Conclusion
These Easy Festive Cake Pops Graduation Cap Design treats are a perfect blend of fun, flavor, and festivity. They’re simple enough for a novice baker yet impressive enough to wow your guests. You can customize them to fit your party theme, dietary needs, or personal taste, making them a versatile addition to your celebration arsenal.
I love these cake pops because they bring together my childhood memories of homemade treats and the excitement of marking life’s big moments. Plus, crafting them is a fun project that anyone can enjoy—friends, family, or just a solo kitchen adventure.
Give this recipe a try, and please share your results or any creative twists you add in the comments below. Your feedback means the world and helps keep these festive traditions alive! Happy baking and congratulations to all the graduates out there—you deserve a sweet celebration!
FAQs About Easy Festive Cake Pops Graduation Cap Design
How long do cake pops stay fresh?
When stored in an airtight container in the refrigerator, cake pops stay fresh for about 5 days. For longer storage, freeze them for up to 2 months.
Can I make these cake pops ahead of time?
Absolutely! You can prepare the cake balls and decorate them a day or two ahead. Just keep them refrigerated and bring to room temperature before serving.
What if I don’t have candy melts?
You can use good-quality chocolate bars instead. Melt them slowly in the microwave or a double boiler and add a little vegetable oil to thin if needed.
How do I prevent cake pops from falling off the sticks?
Dip the stick tip into melted candy before inserting into the cake ball. This acts like glue and helps secure the pop onto the stick.
Can I use store-bought frosting?
Yes, store-bought frosting works fine, but homemade frosting tends to blend better with the cake for that perfect dough consistency.
Pin This Recipe!
Easy Festive Cake Pops Graduation Cap Design Recipe for Perfect Party Treats
These festive graduation cap cake pops combine moist cake, smooth frosting, and a crisp chocolate coating for an irresistible party treat that’s quick and easy to make.
- Prep Time: 20 minutes
- Cook Time: 35 minutes
- Total Time: 1 hour 5 minutes
- Yield: 24 cake pops 1x
- Category: Dessert
- Cuisine: American
Ingredients
- 1 box of chocolate or vanilla cake mix (or homemade cake, cooled and crumbled)
- Ingredients called for on the cake mix box (usually eggs, oil, water)
- 1 cup unsalted butter, softened
- 3–4 cups powdered sugar, sifted
- 2–3 tablespoons whole milk or cream (or dairy-free milk if needed)
- 1 teaspoon vanilla extract
- 12 oz black candy melts or black melting chocolate
- Graduation tassel decorations – black and gold fondant or thin candy ropes
- Cake pop sticks
- Edible gold glitter or sprinkles (optional)
Instructions
- Preheat oven to 350°F (175°C). Prepare cake mix according to package directions or homemade recipe. Pour batter into greased 9×13-inch pan and bake 30-35 minutes until toothpick comes out clean. Let cake cool completely.
- Crumble cooled cake into a large mixing bowl until texture is fine with a few small clumps.
- In a separate bowl, beat 1 cup softened butter until creamy. Gradually add powdered sugar one cup at a time on low speed. Add milk and vanilla extract, then beat on high until fluffy. Adjust consistency with more milk or powdered sugar as needed.
- Gradually add frosting to crumbled cake, mixing with hands or spatula until dough-like consistency that holds together but is not too sticky (about 1 to 1 ½ cups frosting).
- Scoop about 1.5 tablespoons (20-25 grams) of mixture and roll into smooth balls. Place on parchment-lined baking sheet. Chill in fridge 30 minutes or freezer 15 minutes.
- Melt black candy melts in microwave-safe bowl in 30-second intervals, stirring until smooth and fluid but not burnt.
- Dip tip of each cake pop stick into melted candy, then insert halfway into each cake ball. Let set 10-15 minutes.
- Dip each cake pop fully into melted candy, tap off excess, and hold upright in cake pop stand or styrofoam block to dry.
- Before coating sets fully, press small square of black fondant or candy melt on top to mimic mortarboard. Use thin candy rope or piped melted candy to form tassel on one corner, securing with a dab of melted candy. Dust with edible gold glitter if desired.
- Allow cake pops to dry completely at room temperature for about 30 minutes. Avoid refrigeration to prevent condensation.
Notes
Chill cake balls properly to avoid falling apart or cracking during dipping. Use candy melts carefully to avoid overheating and graininess. Dip stick tip in melted candy before inserting to secure cake pop. Avoid refrigeration after coating to maintain shine. Add a teaspoon of vegetable oil to candy melts if thickening during dipping.
Nutrition
- Serving Size: 1 cake pop (~50g)
- Calories: 200
- Sugar: 22.5
- Sodium: 150
- Fat: 10.5
- Saturated Fat: 6
- Carbohydrates: 23
- Fiber: 1
- Protein: 1.5
Keywords: cake pops, graduation treats, party desserts, chocolate cake pops, festive cake pops, easy cake pops, homemade cake pops