Let me tell you, the scent of fresh herbs mingling with tangy cream cheese and crunchy nuts wafting from my kitchen is enough to make anyone’s mouth water. The first time I shaped this creamy egg-shaped cheese ball, it was a rainy Saturday afternoon, and honestly, I was just looking for a fun snack to brighten up the gloomy day. The moment I took that first bite, I was instantly hooked—the kind of moment where you pause, take a deep breath, and just smile because you know you’re onto something truly special.
Years ago, when I was knee-high to a grasshopper, my grandma used to whip up cheesy snacks for every holiday and family gathering. This recipe feels like a modern twist on those nostalgic bites, blending her old-school charm with a fresh, herbal punch. My family couldn’t stop sneaking bits off the serving platter (and I can’t really blame them). Honestly, this cheese ball is dangerously easy to make and delivers pure, nostalgic comfort with a fresh, nutty crunch.
You know what? Whether it’s for potlucks, a sweet treat for your kids, or just to brighten up your Pinterest cookie board with something savory, this creamy egg-shaped cheese ball with fresh herbs and nuts nails it every time. I’ve tested this recipe more times than I can count (in the name of research, of course), and it’s become a staple for family gatherings, gifting, and those moments when you want to impress without the stress. If you’re looking for a snack that feels like a warm hug and tastes even better than it sounds, you’re going to want to bookmark this one.
Why You’ll Love This Creamy Egg-Shaped Cheese Ball Recipe
After countless batches and happy taste testers, I can confidently say this cheese ball stands out in a sea of party snacks. Here’s why I think you’ll love it just as much as I do:
- Quick & Easy: Comes together in under 20 minutes — perfect for busy weeknights or last-minute cravings.
- Simple Ingredients: No fancy grocery trips needed; you likely already have everything in your kitchen.
- Perfect for Any Occasion: Whether it’s brunch, potlucks, cozy dinners, or holiday mornings, this cheese ball fits right in.
- Crowd-Pleaser: Always gets rave reviews from kids and adults alike — seriously, it disappears fast.
- Unbelievably Delicious: The creamy texture paired with fresh herbs and crunchy nuts creates a next-level comfort food experience.
What makes this recipe different? Well, it’s all about that perfectly balanced seasoning and the fresh herb combo that cuts through the richness like a charm. Plus, the egg shape adds a festive touch that makes it ideal for Easter or any spring-themed gathering. Instead of just tossing herbs in, I blend them in finely, creating an even flavor distribution that feels like a secret weapon. And trust me, blending the cream cheese for extra smoothness is a game changer.
This isn’t just another cheese ball—it’s the one that makes you close your eyes after the first bite and say, “Yep, that’s the stuff.” It’s comfort food reimagined—healthier, faster, but with the same soul-soothing satisfaction that makes you want to share it with everyone you know.
What Ingredients You Will Need
This recipe uses simple, wholesome ingredients to deliver bold flavor and satisfying texture without the fuss. Most are pantry staples, with a few fresh touches that bring everything to life.
- Cream Cheese (8 oz / 225 g, softened) – The creamy base that holds everything together. I prefer Philadelphia brand for its smooth texture.
- Sour Cream (¼ cup / 60 ml) – Adds tang and richness.
- Fresh Herbs (about ¼ cup / 10 g total, finely chopped) – Usually a mix of parsley, chives, and dill for brightness.
- Garlic Powder (½ tsp) – Gives a subtle savory kick without overpowering.
- Onion Powder (½ tsp) – Adds depth of flavor.
- Salt (to taste, about ½ tsp) – Enhances all the flavors.
- Black Pepper (freshly ground, ¼ tsp) – For mild heat.
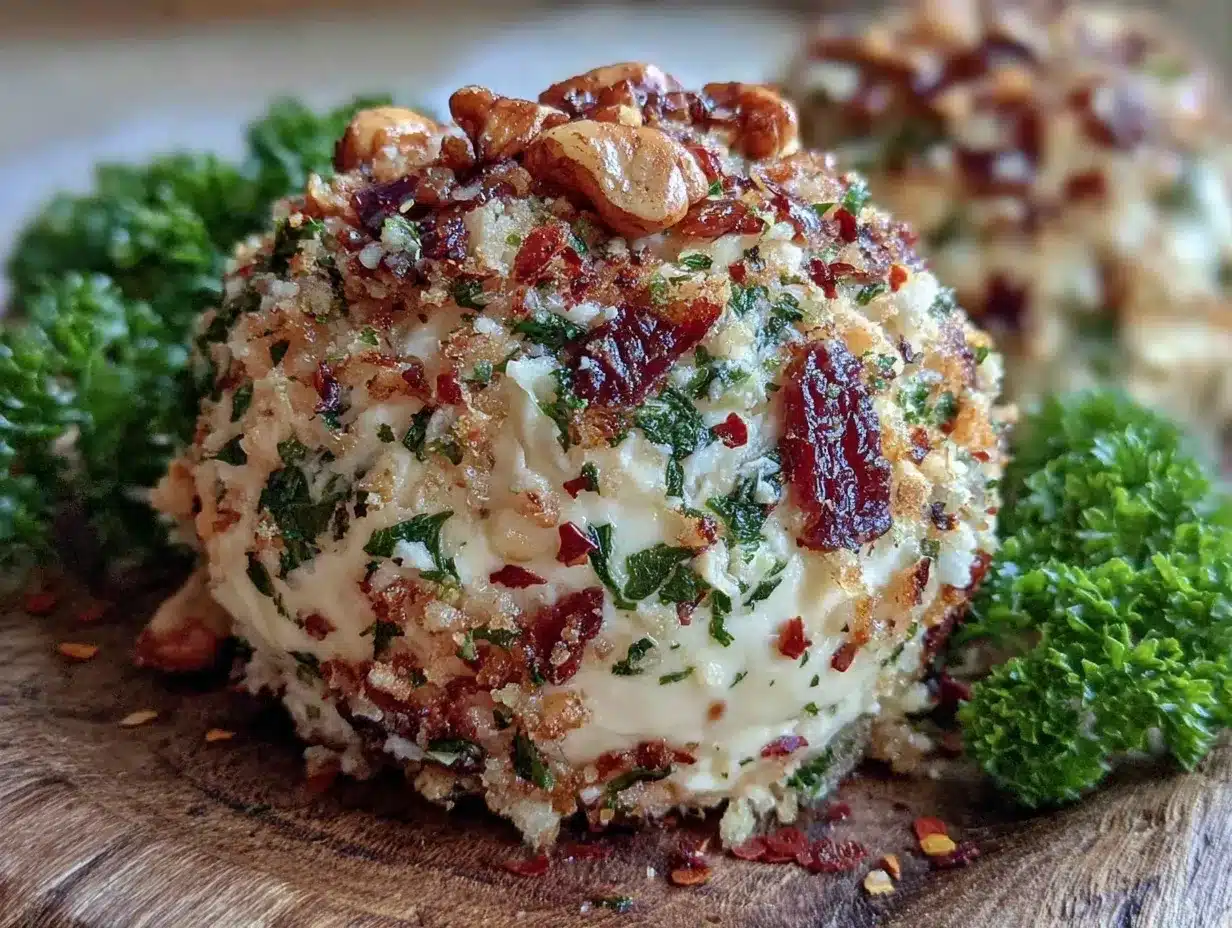
- Chopped Nuts (½ cup / 60 g) – Walnuts or pecans work beautifully for crunch and nutty flavor.
- Grated Sharp Cheddar Cheese (½ cup / 60 g) – Optional, but adds a lovely sharpness and body.
- Chopped Green Onions (2 tbsp) – For a fresh, mild onion bite.
Substitution tips: Use plain Greek yogurt instead of sour cream if you want a lighter option. For a dairy-free twist, swap cream cheese with a plant-based alternative and use coconut yogurt. Almonds or sunflower seeds can replace nuts to accommodate allergies. Fresh herbs can be swapped seasonally—try basil or tarragon for a different flair. Just make sure to finely chop them for even flavor distribution.
Equipment Needed
- Mixing Bowl: A medium-sized bowl to combine all ingredients comfortably. I like glass or stainless steel for easy cleanup.
- Electric Mixer or Hand Whisk: Helps blend the cream cheese and sour cream smoothly. If you don’t have a mixer, a sturdy whisk will do, but it takes more elbow grease.
- Chopping Board and Sharp Knife: For finely chopping herbs and nuts. A small paring knife works great for precision.
- Plastic Wrap or Parchment Paper: To shape and chill the cheese ball without sticking.
- Serving Platter or Board: For presentation. A wooden board adds rustic charm.
If you don’t have a mixer, no worries. Just soften the cream cheese well ahead of time and mix thoroughly with a fork. For the nuts, a food processor can chop them quickly, but a good knife and steady hand work just fine. Keeping your knife sharp also makes chopping safer and easier—trust me, I’ve learned that one the hard way!
Preparation Method
- Soften the Cream Cheese: Leave the 8 oz (225 g) cream cheese out at room temperature for about 30 minutes before starting. This makes mixing easier and gives you a creamier texture.
- Mix Cream Cheese and Sour Cream: In your mixing bowl, combine softened cream cheese and ¼ cup (60 ml) sour cream. Beat with an electric mixer or whisk for about 2-3 minutes until smooth and creamy. You want no lumps here—smooth is the goal.
- Add Seasonings: Stir in ½ tsp garlic powder, ½ tsp onion powder, ½ tsp salt, and ¼ tsp freshly ground black pepper. Mix until evenly incorporated. Taste a small bit and adjust salt or pepper as desired.
- Fold in Fresh Herbs, Cheddar, and Green Onions: Gently fold in ¼ cup (10 g) finely chopped fresh herbs, ½ cup (60 g) shredded sharp cheddar cheese (if using), and 2 tbsp chopped green onions. Be careful not to overmix; you want the herbs and cheese to stay distinct.
- Shape the Cheese Ball: Lay out a large piece of plastic wrap or parchment paper. Scoop the mixture onto the center and use the wrap to shape it into a smooth, oval egg shape about 5 inches (12 cm) long. Wrap tightly and chill in the refrigerator for at least 2 hours, ideally overnight. This helps it set and flavors meld.
- Prepare the Nut Coating: While the cheese ball chills, chop ½ cup (60 g) of nuts (walnuts or pecans) into small pieces. Spread them out on a plate or shallow bowl.
- Coat the Cheese Ball: After chilling, unwrap the cheese ball and roll it gently in the chopped nuts until completely covered. Press lightly so nuts stick well.
- Final Chill: Return the coated cheese ball to the refrigerator for 30 minutes to firm up before serving.
Pro tip: If your cheese mixture feels too stiff to shape, let it sit out for 5-10 minutes or add a splash more sour cream. If it’s too soft, add a little more shredded cheese or chill longer.
Cooking Tips & Techniques
This recipe is more about finesse than fire, but a few tricks make all the difference. First, always use room temperature cream cheese—it blends smoother and avoids lumps. When chopping herbs, fine is key; large pieces can overwhelm bites and make shaping tricky. I learned that the hard way during my first batch when my parsley bits poked out like tiny green spikes!
Rolling the cheese ball in nuts is a bit of a balancing act. Too big chunks and they fall off; too fine, and you lose that satisfying crunch. I like chopping nuts roughly by hand for texture variety. If you want to save time, pre-chopped nuts from the store work fine, just check for freshness.
Chilling is crucial. Don’t skip the 2-hour minimum (overnight is best). The flavors blend and the cheese firms up, making it easier to handle and improving taste. When shaping, use plastic wrap to avoid sticky fingers and get a smooth finish. If you want a glossier look, you can lightly mist the outside with water before rolling in nuts.
Lastly, you can prepare this cheese ball a day ahead—just keep it tightly wrapped in the fridge. It also travels well, making it a perfect potluck contribution.
Variations & Adaptations
- Herb Variations: Swap parsley, chives, and dill with basil, tarragon, or cilantro for a different fresh twist. I once made a Mediterranean version with oregano and sun-dried tomatoes folded in—delicious!
- Nut-Free Option: For nut allergies, roll the cheese ball in toasted sesame seeds, crushed pretzels, or finely chopped roasted chickpeas for crunch without nuts.
- Spicy Kick: Add 1 tsp of finely chopped jalapeño or a dash of cayenne powder to the mix for a subtle heat that wakes up the palate.
- Cheese Swap: Use smoked gouda or pepper jack instead of cheddar to change the flavor profile. I’ve found smoked gouda offers a lovely depth without overpowering the herbs.
- Vegan Version: Use vegan cream cheese and sour cream alternatives, and swap nuts with seeds like pumpkin or sunflower for coating. Fresh herbs remain the star.
Serving & Storage Suggestions
This creamy egg-shaped cheese ball is best served chilled or at room temperature. Take it out of the fridge about 15 minutes before serving to soften up slightly—this brings out the flavors beautifully. Pair it with crisp crackers, crusty baguette slices, or fresh veggie sticks like celery and cucumber for a colorful platter.
For drinks, it pairs wonderfully with a crisp white wine, light beer, or even sparkling water with a twist of lemon. I love serving it alongside a fresh spring salad or a bowl of mixed olives to round out the spread.
To store, wrap it tightly in plastic wrap or keep in an airtight container in the refrigerator for up to 4 days. Freezing is possible but not ideal, as texture can change. Reheat gently by letting it thaw overnight in the fridge and serving slightly softened.
Flavors actually deepen after a day or two, so leftovers (if there are any!) taste even better. Just be mindful to keep it well covered to avoid absorbing fridge odors.
Nutritional Information & Benefits
Each serving (about 2 tablespoons) of this cheese ball contains approximately:
| Calories | Protein | Fat | Carbohydrates |
|---|---|---|---|
| 120 kcal | 4g | 10g | 2g |
The key ingredients, like cream cheese and nuts, provide healthy fats and protein, making this a satisfying snack. Fresh herbs add antioxidants and vitamins, boosting the nutritional profile subtly. This recipe is naturally gluten-free (check your crackers!), low in carbs, and can be adapted for dairy-free diets.
From a wellness perspective, the fresh herbs help with digestion and bring a fresh lift, while nuts contribute heart-healthy fats. It’s a snack that feels indulgent but also offers some nutritional value—perfect for guilt-free entertaining.
Conclusion
So, why is this creamy egg-shaped cheese ball recipe worth your time? Because it’s quick, simple, and downright delicious with a touch of elegance thanks to fresh herbs and crunchy nuts. It’s the kind of snack that brings people together, whether at holiday gatherings or casual get-togethers. Plus, it’s easily customizable to fit your tastes or dietary needs.
I love this recipe because it reminds me of family, warmth, and good times shared around the table. It’s a little bit nostalgic and a little bit fresh, with a texture and flavor combo that’s hard to beat. Give it a try, and I promise you’ll find yourself making it again and again.
Go ahead—try it out, tweak it your way, and let me know how it turns out! Drop your comments, share your variations, or tell me about your favorite way to serve this creamy egg-shaped cheese ball. Your next perfect party snack might just be a few clicks away.
Frequently Asked Questions
Can I make the cheese ball ahead of time?
Absolutely! In fact, chilling it overnight improves the flavor and makes shaping easier. Just keep it wrapped tightly in the fridge.
What nuts work best for coating?
Walnuts and pecans are classic choices for their flavor and texture, but almonds, pistachios, or even crushed pretzels make tasty alternatives.
How do I keep the cheese ball from sticking to my hands?
Use plastic wrap to help shape the ball and lightly wet your hands with water if shaping by hand. This keeps things neat and less sticky.
Can I freeze this cheese ball?
While you can freeze it, the texture may change slightly. If you do freeze, thaw overnight in the fridge and serve softened.
Is this recipe suitable for gluten-free diets?
Yes! Just serve with gluten-free crackers or veggies to keep it safe for gluten-free guests.
Pin This Recipe!

Creamy Egg-Shaped Cheese Ball Recipe with Fresh Herbs and Nuts

A quick and easy creamy cheese ball blended with fresh herbs and crunchy nuts, shaped like an egg for a festive and perfect party snack.
- Prep Time: 10 minutes
- Cook Time: 0 minutes
- Total Time: 2 hours 40 minutes
- Yield: About 12 servings 1x
- Category: Snack
- Cuisine: American
Ingredients
- 8 oz (225 g) cream cheese, softened
- 1/4 cup (60 ml) sour cream
- 1/4 cup (10 g) fresh herbs (parsley, chives, dill), finely chopped
- 1/2 tsp garlic powder
- 1/2 tsp onion powder
- 1/2 tsp salt, or to taste
- 1/4 tsp freshly ground black pepper
- 1/2 cup (60 g) chopped nuts (walnuts or pecans)
- 1/2 cup (60 g) grated sharp cheddar cheese (optional)
- 2 tbsp chopped green onions
Instructions
- Soften the cream cheese by leaving it out at room temperature for about 30 minutes.
- In a mixing bowl, combine softened cream cheese and sour cream. Beat with an electric mixer or whisk for 2-3 minutes until smooth and creamy.
- Stir in garlic powder, onion powder, salt, and black pepper until evenly incorporated. Taste and adjust seasoning as desired.
- Gently fold in fresh herbs, cheddar cheese (if using), and chopped green onions without overmixing.
- Lay out a large piece of plastic wrap or parchment paper. Scoop the mixture onto the center and shape it into a smooth, oval egg shape about 5 inches (12 cm) long. Wrap tightly and chill in the refrigerator for at least 2 hours or overnight.
- While chilling, chop nuts into small pieces and spread them on a plate.
- Unwrap the chilled cheese ball and roll it gently in the chopped nuts until completely covered, pressing lightly to adhere.
- Return the coated cheese ball to the refrigerator for 30 minutes to firm up before serving.
Notes
Use room temperature cream cheese for smooth mixing. Finely chop herbs for even flavor. Chill at least 2 hours or overnight for best flavor and shaping. If mixture is too stiff, add a splash more sour cream; if too soft, add more shredded cheese or chill longer. Can prepare a day ahead and keep tightly wrapped in fridge. For nut allergies, roll in toasted sesame seeds, crushed pretzels, or roasted chickpeas. Vegan and dairy-free substitutions available.
Nutrition
- Serving Size: About 2 tablespoons
- Calories: 120
- Fat: 10
- Carbohydrates: 2
- Protein: 4
Keywords: cheese ball, party snack, creamy cheese ball, fresh herbs, nuts, easy appetizer, holiday snack, potluck recipe