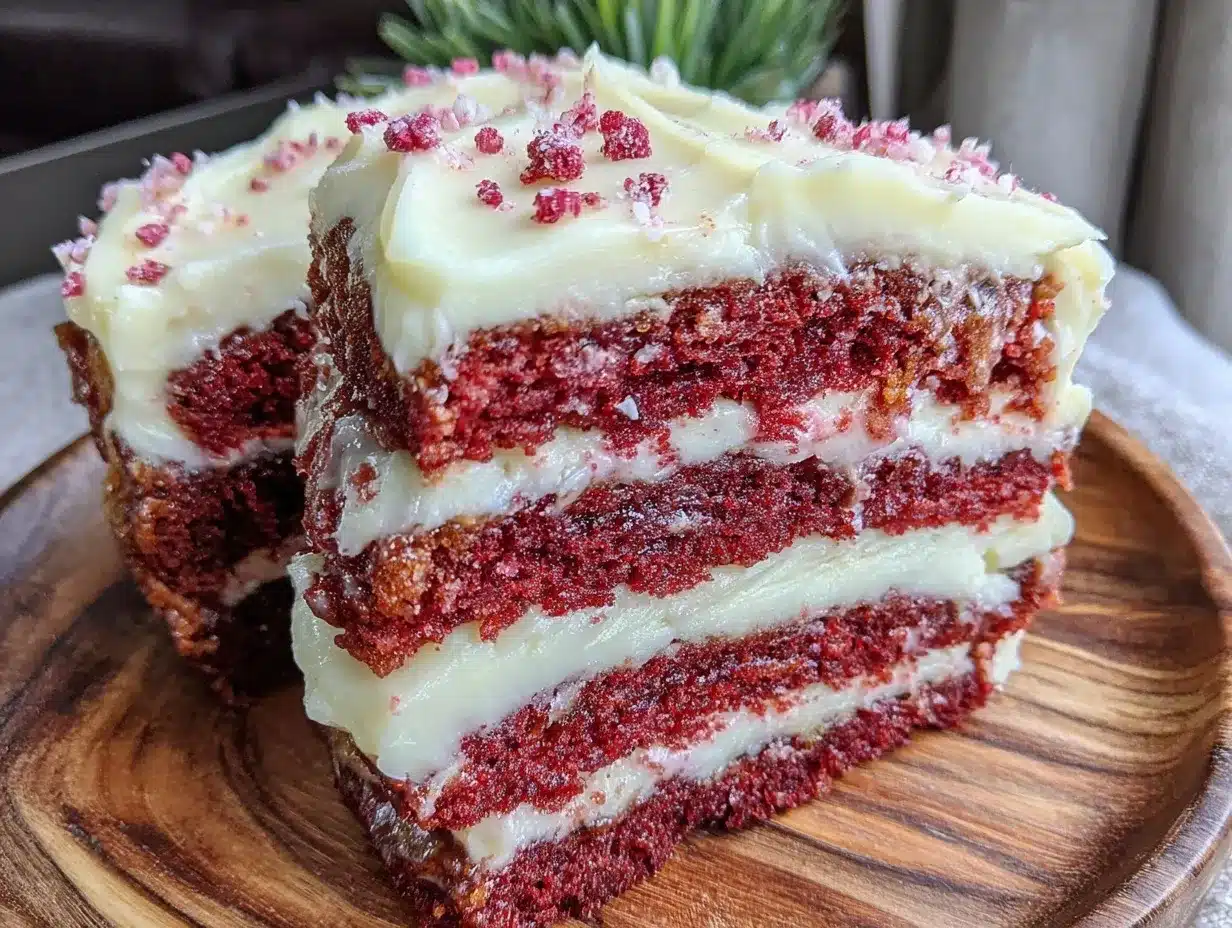
This craving for the perfect red velvet flag cake with cream cheese frosting is real—and it’s loud in my head. I want that velvety crumb, those vibrant layers, and the sweet tang of frosting that feels like a soft, cool hug. I’ve got the cocoa, the buttermilk, and the red food coloring, but there’s this small voice nagging me—will it come together the way I imagine? Honestly, every time I make red velvet, it’s a gamble between too dry or too dense. But today, I’m not just baking another red velvet cake; I’m crafting a flag cake that feels celebratory and special, something that commands attention on the dessert table with its bold red-and-white stripes and creamy frosting stars. The texture matters—a subtle crumb that’s moist without being heavy, and that frosting? It can’t be too sweet or runny. It’s got to have that perfect balance of cream cheese tang and just enough sweetness to make me want a second slice.
It’s funny how food can get inside your head like that, becoming a quiet obsession until you nail it. I remember trying a few versions before—some ended up looking more like a red blob than a flag, others were so sweet the cream cheese flavor was lost. But this recipe? It sticks because it’s the kind of homemade dessert that makes you pause, close your eyes, and savor the moment. The red velvet flag cake is more than just a festive showstopper; it’s comfort food with a twist, a nostalgic bite that feels new every time.
What really sells me on this recipe is how approachable it is. It’s not an intimidating layer cake with a million steps; it’s straightforward enough for a weekday bake yet special enough for celebrations. Plus, the cream cheese frosting tutorial here is easy—no weird tricks, just a smooth, luscious icing you can spread or pipe with confidence. If you’ve ever wondered how to make a red velvet cake that looks stunning and tastes even better, this is the one you’ll want to keep on hand.
By the end of this, you’ll have a cake that’s not only beautiful but also reliable—a recipe I’ve tweaked through trial, error, and a lot of frosting smudges. So, if you’ve ever felt unsure about tackling a red velvet layer cake, or if you just want to impress guests with a dessert that’s as tasty as it is eye-catching, you’re in the right place.
Why You’ll Love This Recipe
After countless attempts, this perfect red velvet flag cake recipe with cream cheese frosting stands out because it hits all the right notes. Here’s why it’s become a go-to dessert in my kitchen:
- Quick & Easy: This cake comes together in about 1 hour of active prep time, making it manageable even on busy days.
- Simple Ingredients: No need for exotic items—just pantry staples like cocoa powder, buttermilk, and cream cheese.
- Perfect for Celebrations: The flag design makes it ideal for patriotic holidays, birthdays, or any occasion that calls for a wow factor.
- Crowd-Pleaser: The balance of mild cocoa flavor and tangy frosting consistently gets rave reviews from kids and adults alike.
- Unbelievably Delicious: The cake layers are moist yet light, with a texture that practically melts in your mouth.
What sets this apart is the way the cream cheese frosting is handled—blended just right to be silky without being too sweet or runny. Plus, the red velvet batter uses a subtle vinegar and cocoa reaction that gives it that classic tang and tender crumb. I’ve also made sure the layers stack neatly, so the flag design really pops. It’s not just another red velvet cake—it’s a recipe that feels thoughtful in every bite.
Honestly, this cake is one I trust to impress without stress. Whether I’m bringing it to a summer cookout or a cozy family gathering, it’s the dessert that gets talked about long after the last crumb disappears.
What Ingredients You Will Need
This recipe uses simple, wholesome ingredients to deliver bold flavor and that signature red velvet charm without fuss. Most of these are pantry staples, and you can find everything easily at your local store.
- For the Cake Layers:
- All-purpose flour (2 ½ cups / 315 grams) – I prefer King Arthur brand for consistent texture
- Cocoa powder (2 tablespoons / 15 grams), unsweetened – Dutch-process works best for deep color
- Baking soda (1 teaspoon)
- Salt (½ teaspoon)
- Unsalted butter (1 cup / 226 grams), softened – room temperature for smooth creaming
- Granulated sugar (1 ¾ cups / 350 grams)
- Large eggs (2), room temperature
- Buttermilk (1 cup / 240 ml), room temperature – adds tang and moisture
- Red food coloring (2 tablespoons) – gel or liquid, depending on your preference
- Vanilla extract (1 teaspoon)
- White vinegar (1 teaspoon)
- For the Cream Cheese Frosting:
- Cream cheese (8 oz / 226 grams), softened – I trust Philadelphia brand for best tang
- Unsalted butter (½ cup / 113 grams), softened
- Powdered sugar (4 cups / 480 grams), sifted for smoothness
- Vanilla extract (1 teaspoon)
- Pinch of salt (optional, to balance sweetness)
You can swap buttermilk with a mix of milk and a tablespoon of lemon juice if you’re in a pinch. For a dairy-free twist, use coconut yogurt instead of cream cheese and vegan butter, but expect some texture differences. The red food coloring is key to that iconic red velvet look; I recommend gel food coloring as it won’t thin the batter.
Equipment Needed
- Two 9-inch (23 cm) round cake pans – metal pans work best for even baking
- Electric mixer (stand or hand) – makes creaming butter and mixing frosting a breeze
- Mixing bowls – at least two, medium and large size
- Measuring cups and spoons – for precise ingredient amounts
- Rubber spatula – perfect for scraping down the bowl and folding ingredients gently
- Cooling racks – essential for letting the cake layers cool completely before frosting
- Offset spatula or butter knife – helps spread frosting smoothly
- Parchment paper – to line cake pans and prevent sticking
If you don’t have cake pans, you can use square pans but adjust baking time slightly. I’ve used silicone pans before, but metal ones give a better crust. For frosting, if you want to pipe decorative stars or stripes, a basic piping bag with a star tip works well, but you can also keep it casual and just spread the frosting with an offset spatula.
Preparation Method
- Preheat and Prepare Pans: Preheat your oven to 350°F (175°C). Grease two 9-inch round cake pans and line the bottoms with parchment paper. This step ensures easy cake removal and clean edges.
- Sift Dry Ingredients: In a medium bowl, sift together 2 ½ cups (315 g) all-purpose flour, 2 tablespoons (15 g) unsweetened cocoa powder, 1 teaspoon baking soda, and ½ teaspoon salt. Set aside. This removes lumps and aerates the mix for a tender crumb.
- Cream Butter and Sugar: In a large bowl, beat 1 cup (226 g) softened unsalted butter and 1 ¾ cups (350 g) granulated sugar until light and fluffy—about 3-4 minutes on medium speed. The mixture should be pale and airy; this traps air for lift.
- Add Eggs and Vanilla: Beat in 2 large eggs, one at a time, mixing well after each addition. Stir in 1 teaspoon vanilla extract. This ensures smooth incorporation and prevents curdling.
- Mix Red Food Coloring and Vinegar: In a small bowl, combine 2 tablespoons red food coloring and 1 teaspoon white vinegar. This vinegar enhances the cocoa’s flavor and reacts with baking soda for lift.
- Alternate Adding Dry Ingredients and Buttermilk: With the mixer on low, add the dry ingredients in three additions alternating with 1 cup (240 ml) buttermilk (start and end with dry). Mix just until combined—overmixing can make the cake tough.
- Fold in Red Coloring Mixture: Gently fold the red food coloring and vinegar blend into the batter until evenly distributed. The batter should be vibrant red and smooth.
- Divide and Bake: Evenly divide the batter between the two prepared pans. Smooth the tops with a spatula. Bake for 25-30 minutes or until a toothpick inserted in the center comes out clean. Rotate pans halfway through baking for even cooking.
- Cool Completely: Let the cakes cool in pans for 10 minutes, then invert onto cooling racks to cool completely. This prevents the frosting from melting on warm cakes.
- Make the Cream Cheese Frosting: Beat 8 oz (226 g) softened cream cheese and ½ cup (113 g) softened unsalted butter together until creamy. Gradually add 4 cups (480 g) powdered sugar, beating on low speed to prevent mess. Stir in 1 teaspoon vanilla extract and a pinch of salt. Beat until smooth and fluffy.
- Assemble the Flag Cake: Place one cake layer on your serving plate. Spread a generous layer of cream cheese frosting evenly. Top with the second cake and frost the entire cake with a thin crumb coat. Chill for 15 minutes, then add a final thick layer of frosting. Use an offset spatula to create smooth stripes for the flag effect.
Note: For the classic flag look, you can pipe or spread stars with leftover frosting tinted lightly with blue gel food coloring, or use edible star decorations. The key is even layers and smooth frosting to let the colors pop.
Cooking Tips & Techniques
Making a red velvet cake that’s moist and vibrant can be tricky, but a few tricks help every time:
- Room Temperature Ingredients: Butter, eggs, and buttermilk should be at room temperature for better mixing and texture. Cold ingredients can cause the batter to curdle or bake unevenly.
- Don’t Overmix: When adding dry ingredients, mix just until combined. Overmixing develops gluten, leading to a dense cake, which you definitely want to avoid.
- Use Gel Food Coloring: It gives a richer, deeper red without watering down the batter. Liquid food coloring can alter texture slightly.
- Test for Doneness: Insert a toothpick in the center; it should come out with a few moist crumbs, not wet batter.
- Chill Before Frosting: Cooling layers completely and chilling between crumb coat and final frosting prevents melting and keeps your flag design sharp.
- Beat Frosting Well: Cream cheese frosting should be whipped long enough to be light and fluffy but not overbeaten, or it may become too soft.
I’ve learned the hard way that skipping the parchment paper lining turns cake removal into a nightmare, and rushing the cooling stage makes the frosting slide off. Patience here pays off in a professional-looking cake.
Variations & Adaptations
This perfect red velvet flag cake recipe is versatile enough to suit different tastes and dietary needs:
- Gluten-Free Option: Substitute the all-purpose flour with a 1:1 gluten-free baking flour blend. The texture may be slightly different, but the flavor remains fantastic.
- Vegan Version: Use plant-based butter and cream cheese alternatives, flax eggs instead of eggs, and dairy-free milk with vinegar as a buttermilk substitute. Expect a slightly denser crumb.
- Flavor Twists: Add a teaspoon of espresso powder to the batter to deepen the cocoa flavor without making it taste like coffee. For a fruity touch, serve with fresh strawberries or raspberries on the side.
- Different Frosting: Swap cream cheese frosting for a whipped mascarpone cream or even a stabilized whipped cream for a lighter option.
- Seasonal Touch: In summer, try layering the cake with fresh berries between layers for a juicy surprise, a little like my fresh Mediterranean quinoa bowl with grilled chicken brings fresh flavors to the table.
Personally, I once tried piping the flag stars with blueberry frosting for a natural blue tint—turned out beautifully and added a subtle berry flavor. Feel free to get creative with your decorating style!
Serving & Storage Suggestions
This cake is best served slightly chilled or at room temperature, allowing the cream cheese frosting to be soft but not runny. For a neat presentation, slice with a sharp, warm knife (dip in hot water and wipe dry between cuts).
Complement the cake with simple sides like fresh berries or a light sparkling beverage to balance the richness. It pairs wonderfully with a cup of coffee or a glass of milk.
Store leftover cake covered in the refrigerator for up to 4 days. The flavors actually meld and improve after a day, making it perfect for making ahead. For longer storage, wrap tightly and freeze for up to 1 month; thaw in the fridge overnight before serving.
Reheat slices gently at room temperature for 30 minutes before enjoying to bring back that creamy frosting texture. Just like with my favorite creamy whipped feta dip, a little patience with serving temperature goes a long way.
Nutritional Information & Benefits
Each serving of this red velvet flag cake (assuming 12 slices) roughly contains:
| Nutrient | Amount per Serving |
|---|---|
| Calories | 360 |
| Fat | 18g |
| Saturated Fat | 10g |
| Carbohydrates | 45g |
| Sugar | 33g |
| Protein | 4g |
Red velvet’s key ingredients like cocoa powder provide antioxidants, while the buttermilk adds calcium and vitamin B12. Cream cheese brings protein and calcium but also saturated fat, so moderation is key.
This cake is gluten-containing due to all-purpose flour and contains dairy and eggs, so it’s not suitable for those with allergies to those ingredients. For a healthier spin, consider pairing it with fresh fruit or a light salad like the fresh Mediterranean quinoa bowl with grilled chicken for a balanced meal.
Conclusion
This perfect red velvet flag cake with cream cheese frosting has earned its spot in my recipe box because it’s both stunning and reliably delicious. It’s a recipe that makes you feel confident in the kitchen without glossing over the little details that make all the difference. You can customize it to suit your preferences or occasion, and it always brings a cheerful, festive vibe to any gathering.
I love this cake because it’s a reminder that simple ingredients, handled thoughtfully, can produce something truly special. Whether you’re baking for a holiday, a birthday, or just because, this cake promises a slice of joy in every bite.
If you try it, I’d love to hear how your flag cake turned out or any creative twists you put on it. There’s something about sharing these recipes that makes baking feel like a community.
Frequently Asked Questions
Can I make the cake layers ahead of time?
Yes, you can bake the cake layers up to 2 days in advance. Wrap them tightly in plastic wrap and store in the refrigerator. Bring to room temperature before frosting.
How do I get the red color to be vibrant without tasting food coloring?
Use gel food coloring instead of liquid; it provides stronger color without altering the batter’s consistency or flavor.
What’s the best way to prevent the cream cheese frosting from being too runny?
Make sure the cream cheese and butter are softened but not melted. Beat them well and gradually add powdered sugar. Chill the frosting if it feels too soft before using.
Can I freeze the assembled cake?
It’s best to freeze the cake layers separately before frosting. After freezing, thaw overnight in the fridge and then frost and assemble fresh.
Is there a substitute for buttermilk?
Yes, mix 1 cup of milk with 1 tablespoon of lemon juice or white vinegar. Let it sit for 5-10 minutes before using to mimic buttermilk’s acidity.
For other decadent desserts that are easy to make and crowd-pleasing, you might enjoy my dark cherry cheesecake swirl brownies or the lemon lavender shortbread cookies—both bring something a little extra to the dessert table without fuss.
Pin This Recipe!

Perfect Red Velvet Flag Cake Recipe with Easy Cream Cheese Frosting Tutorial
A moist and light red velvet flag cake with vibrant layers and a perfectly balanced cream cheese frosting. This recipe is approachable, festive, and ideal for celebrations.
- Prep Time: 30 minutes
- Cook Time: 30 minutes
- Total Time: 1 hour
- Yield: 12 servings 1x
- Category: Dessert
- Cuisine: American
Ingredients
- 2 ½ cups (315 grams) all-purpose flour
- 2 tablespoons (15 grams) unsweetened cocoa powder (Dutch-process preferred)
- 1 teaspoon baking soda
- ½ teaspoon salt
- 1 cup (226 grams) unsalted butter, softened
- 1 ¾ cups (350 grams) granulated sugar
- 2 large eggs, room temperature
- 1 cup (240 ml) buttermilk, room temperature
- 2 tablespoons red food coloring (gel or liquid)
- 1 teaspoon vanilla extract
- 1 teaspoon white vinegar
- 8 oz (226 grams) cream cheese, softened
- ½ cup (113 grams) unsalted butter, softened
- 4 cups (480 grams) powdered sugar, sifted
- 1 teaspoon vanilla extract
- Pinch of salt (optional)
Instructions
- Preheat oven to 350°F (175°C). Grease two 9-inch round cake pans and line bottoms with parchment paper.
- Sift together flour, cocoa powder, baking soda, and salt in a medium bowl; set aside.
- In a large bowl, beat softened butter and granulated sugar on medium speed until light and fluffy, about 3-4 minutes.
- Add eggs one at a time, beating well after each addition. Stir in vanilla extract.
- In a small bowl, mix red food coloring and white vinegar.
- With mixer on low, alternately add dry ingredients and buttermilk to the butter mixture in three additions, starting and ending with dry ingredients. Mix just until combined.
- Gently fold in the red food coloring and vinegar mixture until batter is evenly colored.
- Divide batter evenly between prepared pans and smooth tops.
- Bake 25-30 minutes or until a toothpick inserted in the center comes out clean. Rotate pans halfway through baking.
- Cool cakes in pans for 10 minutes, then invert onto cooling racks to cool completely.
- For frosting, beat cream cheese and softened butter until creamy. Gradually add powdered sugar, beating on low speed. Stir in vanilla extract and pinch of salt. Beat until smooth and fluffy.
- Place one cake layer on serving plate. Spread a generous layer of frosting evenly.
- Top with second cake layer and apply a thin crumb coat of frosting. Chill for 15 minutes.
- Add a final thick layer of frosting and use an offset spatula to create smooth stripes for the flag effect.
- Optional: Pipe or spread stars with leftover frosting tinted with blue gel food coloring or use edible star decorations.
Notes
Use room temperature ingredients for best texture. Do not overmix batter to avoid dense cake. Gel food coloring is recommended for vibrant color without altering texture. Chill cake layers before frosting to prevent melting. For gluten-free or vegan versions, substitute ingredients as noted in variations.
Nutrition
- Serving Size: 1 slice (1/12 of cak
- Calories: 360
- Sugar: 33
- Fat: 18
- Saturated Fat: 10
- Carbohydrates: 45
- Protein: 4
Keywords: red velvet cake, flag cake, cream cheese frosting, layered cake, patriotic dessert, easy red velvet, celebration cake