Introduction
“You’re telling me I don’t have to knead this bread? Seriously?” I remember standing in my kitchen, flour-dusted hands hesitating over the bowl, skeptical but curious. I had been chasing the perfect sourdough boule for months—tweaking hydration, stressing over starter activity, and wrestling with dough that felt like glue. Then a friend texted me this no-knead Dutch oven method, promising a crust so golden it practically sings. I shrugged, figured why not, and gave it a shot on a chaotic Saturday afternoon when I had zero energy for fussing over dough.
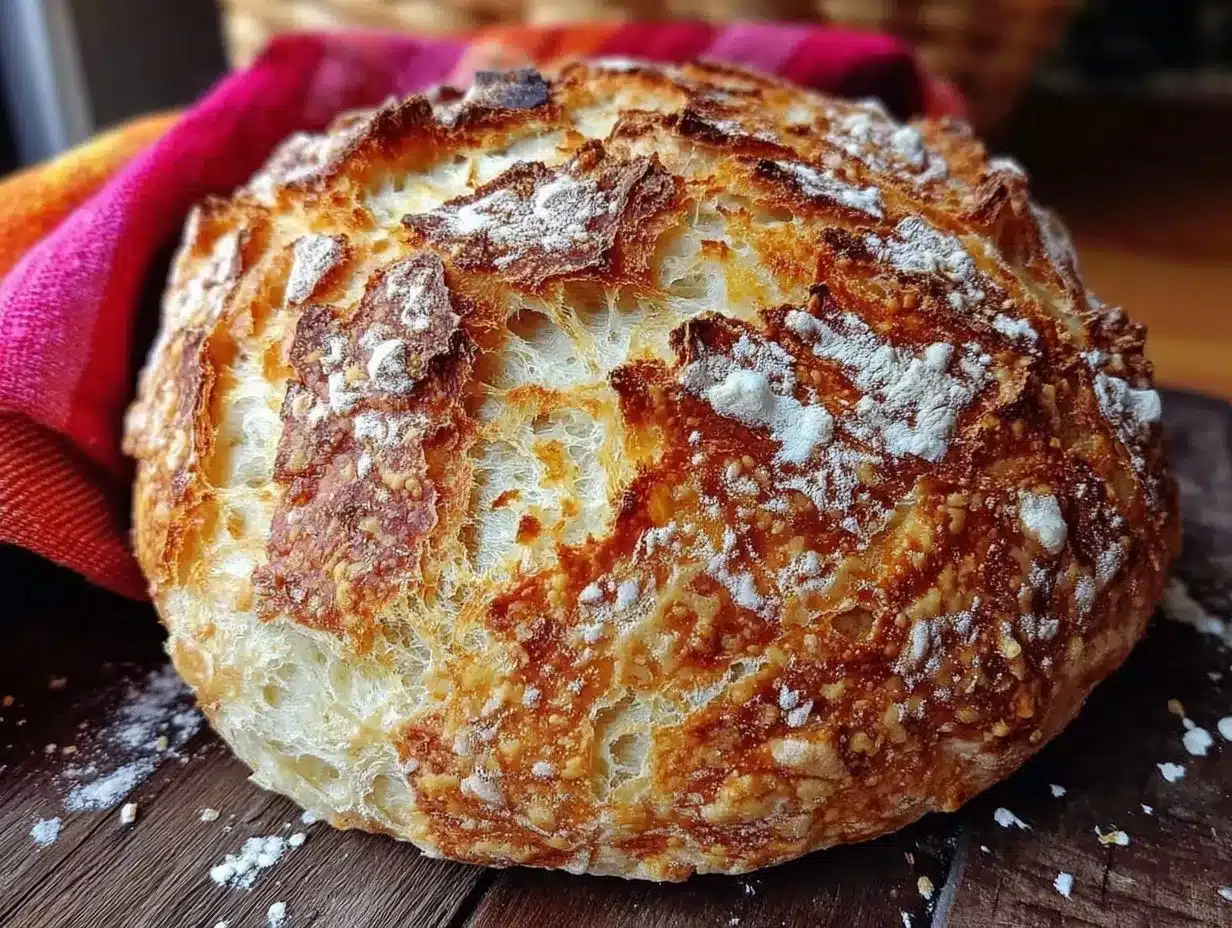
The magic happened overnight, while I caught up on a book and ignored the clock. The next morning, lifting that heavy, steaming Dutch oven lid revealed a boule with a crackling, golden crust that looked like it belonged in a bakery window. Honestly, I was stunned. The crumb was airy and tangy, just the way my taste buds had been pining for. From that moment, this recipe quietly took over my weekend baking routine—no stress, no elaborate shaping, just simple ingredients and a crispy crust that never disappoints.
It’s not just bread; it’s the kind of loaf that makes you pause, butter a slice slowly, and savor the moment. Maybe it’s the cozy comfort of homemade sourdough or the thrill of that crust crackle as you slice. Either way, this crispy no-knead Dutch oven sourdough boule has stuck around in my kitchen—and heart—for good.
Why You’ll Love This Recipe
Let me tell you, this isn’t your run-of-the-mill sourdough boule. Having baked it countless times, I’ve learned what really sets this recipe apart and why it’s become a go-to for anyone wanting bakery-worthy bread without the usual fuss.
- Quick & Easy: While traditional sourdough can be intimidating, this no-knead version comes together with minimal hands-on time—just mix, rest, and bake. Perfect for busy weekends or when you want fresh bread without marathon sessions.
- Simple Ingredients: Flour, water, salt, and your trusty sourdough starter. These pantry staples work together to create flavor and texture that’s surprisingly complex.
- Perfect for Cozy Gatherings: Whether you’re serving it alongside a homemade soup or a charcuterie spread (similar to the easy gourmet Trader Joe’s charcuterie board ideas I love), this boule elevates the table effortlessly.
- Crowd-Pleaser: The crust’s crunch and the chewy interior never fail to impress family and friends—even those who usually shy away from sourdough’s tang.
- Unbelievably Delicious: The Dutch oven traps steam to create that signature golden crust, and the slow fermentation builds a flavor that’s deep and satisfying without needing fancy techniques.
This recipe isn’t just a shortcut; it’s a careful balance of timing and technique that delivers consistent results. The secret? The magic of the Dutch oven’s heat retention and the slow rise that lets the dough develop flavor naturally. Honestly, this boule is like the cozy cousin to my fluffy buttermilk biscuits—comforting, golden, and begging to be shared.
What Ingredients You Will Need
This crispy no-knead Dutch oven sourdough boule uses simple, wholesome ingredients that come together to create bold flavor and a satisfying texture without any fuss. Most of these should be pantry staples if you’re a regular baker or even if you’re just starting out.
- Active sourdough starter (100g / 3.5oz): Use a bubbly, well-fed starter. I usually feed mine 12 hours before mixing for best rise. If you’re curious about starters, the process is easier than it sounds!
- All-purpose flour (400g / 3 1/4 cups): I prefer King Arthur flour for consistent results and great gluten development.
- Water (300g / 1 1/4 cups), lukewarm: Helps activate the yeast and hydrates the flour perfectly.
- Fine sea salt (10g / 1 3/4 tsp): Balances the flavor and strengthens the dough structure.
Optional but recommended:
- Rice flour or additional all-purpose flour: For dusting the banneton or proofing basket to prevent sticking.
If you want to experiment, you can swap part of the all-purpose flour with whole wheat or rye flour for a deeper flavor, but keep in mind the hydration might need slight tweaking. For a gluten-free twist, try a gluten-free sourdough starter and a mix of gluten-free flours, though the texture will be different.
Equipment Needed
- Dutch oven (5 to 6-quart size): The key to that crispy crust. Cast iron with a lid works best to trap steam and mimic professional bread ovens. If you don’t have one, a heavy oven-safe pot with a tight-fitting lid will do.
- Mixing bowl: Large enough to hold the dough comfortably during fermentation.
- Banneton or proofing basket (optional): Helps shape the boule and creates those lovely flour patterns. If you don’t have one, a bowl lined with a well-floured kitchen towel works fine.
- Dough scraper or spatula: For folding and handling sticky dough without frustration.
- Kitchen scale: Precise measurements make a huge difference in baking success.
From personal experience, a Dutch oven is worth investing in if you bake bread often. I’ve had mine for years, and it’s a game-changer, especially compared to baking on plain sheet pans. For a budget-friendly option, some brands offer enameled cast iron at reasonable prices, and it’s easy to care for by hand washing and drying thoroughly after use.
Preparation Method
- Mix the dough: In your mixing bowl, combine 100g (3.5oz) active sourdough starter with 300g (1 1/4 cups) lukewarm water. Stir until the starter dissolves. Add 400g (3 1/4 cups) all-purpose flour and 10g (1 3/4 tsp) sea salt. Mix with a spatula or your hands until there are no dry patches; the dough will be shaggy and sticky. This step takes about 5 minutes.
- Bulk fermentation: Cover the bowl with a damp cloth or plastic wrap. Let it rest at room temperature (around 70°F / 21°C) for 12 to 18 hours. The dough will double in size and develop bubbles. Don’t worry if it looks loose—that’s totally normal for no-knead dough.
- Shape the boule: Lightly flour your work surface. Using a dough scraper, gently turn the dough out onto the surface. With floured hands, fold the edges into the center to create tension on the surface. Shape it into a round ball by cupping your hands and rotating. This shaping takes about 10 minutes.
- Proof the dough: Place the dough seam-side up into a floured banneton or a bowl lined with a floured kitchen towel. Cover and let it proof for 1 to 2 hours until it slightly puffs up but doesn’t double. You want it to be springy to the touch.
- Preheat the oven and Dutch oven: About 30 minutes before baking, place your Dutch oven with its lid inside your oven and preheat to 475°F (246°C). Preheating the pot is essential for that crispy crust.
- Bake the boule: Carefully remove the hot Dutch oven from the oven. Gently invert the dough onto parchment paper, seam-side down. Score the top with a sharp knife or lame to allow expansion. Transfer the dough with parchment into the Dutch oven. Cover with the lid and bake for 20 minutes.
- Finish baking: Remove the lid and bake for another 20 to 25 minutes until the crust is deeply golden and crackly. The internal temperature should reach about 210°F (99°C). Cool the boule on a wire rack for at least an hour before slicing to let the crumb set properly.
Tip: If your dough feels too sticky or loose during shaping, wet your hands slightly to prevent sticking instead of adding extra flour, which can dry out the bread.
Cooking Tips & Techniques
Baking this crispy no-knead Dutch oven sourdough boule can feel like a magical process, but a few insider tips go a long way:
- Starter strength matters: Using a well-fed, bubbly sourdough starter is crucial. If your starter is sluggish, the dough won’t rise well. I usually feed mine twice before baking days to keep it lively.
- Don’t rush the fermentation: The long, slow rise develops flavor and texture. If you’re in a hurry, you can shorten bulk fermentation slightly but expect a milder flavor.
- Preheat your Dutch oven: This step creates steam inside the pot, which is essential for that golden, crackly crust. Skipping this leads to a duller crust.
- Scoring matters: Don’t skip scoring the dough. It helps control expansion in the oven and creates those beautiful patterns. Use a sharp blade or bread lame for best results.
- Cooling is key: I know it’s tempting, but slicing too soon ruins the crumb texture. Let the boule cool fully on a wire rack.
I learned the hard way that baking at too low a temperature or skipping the lid step results in a pale crust and dense crumb. Also, be patient with the dough—sometimes it looks like it’s not moving, but a little time makes all the difference.
Variations & Adaptations
Want to switch things up? Here are some tasty ways to customize this sourdough boule:
- Whole wheat or rye blend: Replace up to 50% of the all-purpose flour with whole wheat or rye flour for a nuttier flavor and denser crumb. Adjust water slightly as these flours absorb more moisture.
- Add herbs or seeds: Mix in rosemary, thyme, or toasted sesame seeds at the mixing stage for extra aroma and texture. Sunflower seeds or flaxseeds can also add a nice crunch.
- Gluten-free version: Use a gluten-free sourdough starter and a blend of gluten-free flours such as brown rice, sorghum, and tapioca starch. Baking time may vary, and the texture will be different but still delicious.
Once, I tried swirling in caramelized garlic and fresh thyme for a savory twist that paired wonderfully with soup. If you’re looking to go beyond bread, this boule is fantastic with a spread of homemade butter or alongside dishes like the easy cheesy pasta bake.
Serving & Storage Suggestions
This crispy no-knead Dutch oven sourdough boule shines best fresh from the oven, but here’s how to enjoy and keep it:
- Serving: Serve at room temperature with quality butter or olive oil. It pairs beautifully with soups, stews, or a cheese platter. For a casual snack, toasting slices brings out the crunchy crust and warm crumb.
- Storage: Store bread wrapped loosely in a clean kitchen towel or paper bag at room temperature for up to 2 days. Avoid plastic bags as they soften the crust.
- Freezing: Cool completely, slice if desired, and freeze in airtight bags for up to 3 months. Toast slices directly from the freezer for convenience.
- Reheating: To revive crustiness, sprinkle water lightly on the surface and warm in a 350°F (177°C) oven for 5-10 minutes.
Over a day or two, the sourdough flavor deepens and the texture softens slightly but remains delicious. I often slice extra to make garlic bread or croutons, so nothing goes to waste.
Nutritional Information & Benefits
Here’s a rough estimate per 100g serving of this sourdough boule:
| Calories | 230 kcal |
|---|---|
| Carbohydrates | 45g |
| Protein | 7g |
| Fat | 1g |
| Fiber | 2g |
Sourdough fermentation helps break down gluten and phytates, making the bread easier to digest and helping with mineral absorption. The natural fermentation process also adds beneficial acids that can support gut health.
This bread is naturally vegan and can be adapted to gluten-free diets with the right flours. Just keep in mind that gluten-free sourdough will have a different texture.
Conclusion
Making this crispy no-knead Dutch oven sourdough boule is like having your own little artisan bakery at home, minus the intimidating kneading and complex steps. It’s a recipe that’s approachable yet rewarding, yielding a loaf with that golden crust and tangy crumb that makes every bite memorable.
Feel free to experiment with flours, add-ins, or even pair it with your favorite dishes—like the crispy everything bagel salmon for a brunch spread with depth. Baking bread should be joyful and stress-free, and this boule hits that sweet spot every time.
I’d love to hear how your boule turns out or any tweaks you make—share your thoughts and adaptations below. Here’s to many cozy mornings filled with the crackle of fresh sourdough crust and the warmth of homemade comfort.
FAQs
Can I use instant yeast instead of sourdough starter?
This recipe relies on the natural fermentation of sourdough starter for flavor and texture. Using instant yeast would require adjusting the recipe and proofing times. For a quick fix, you might try a no-knead yeast bread recipe instead.
How do I know when my sourdough starter is ready to use?
A ready starter should be bubbly, have doubled in size within 4-6 hours after feeding, and pass the “float test” (a spoonful floats in water). This indicates it’s active and strong enough for baking.
Why is my boule dense and not airy?
Dense crumb usually means the dough didn’t ferment long enough or the starter was weak. Make sure to give the dough enough time to rise and use a lively starter. Also, avoid deflating the dough too much when shaping.
Can I bake this boule without a Dutch oven?
You can bake on a baking stone or sheet, but the crust won’t be as crispy or golden since the steam from the Dutch oven is key. To mimic steam, you can place a pan of water in the oven, but results vary.
How should I store leftover sourdough boule?
Wrap the loaf loosely in a kitchen towel or paper bag and keep at room temperature for up to 2 days. For longer storage, slice and freeze the bread in airtight bags.
Pin This Recipe!
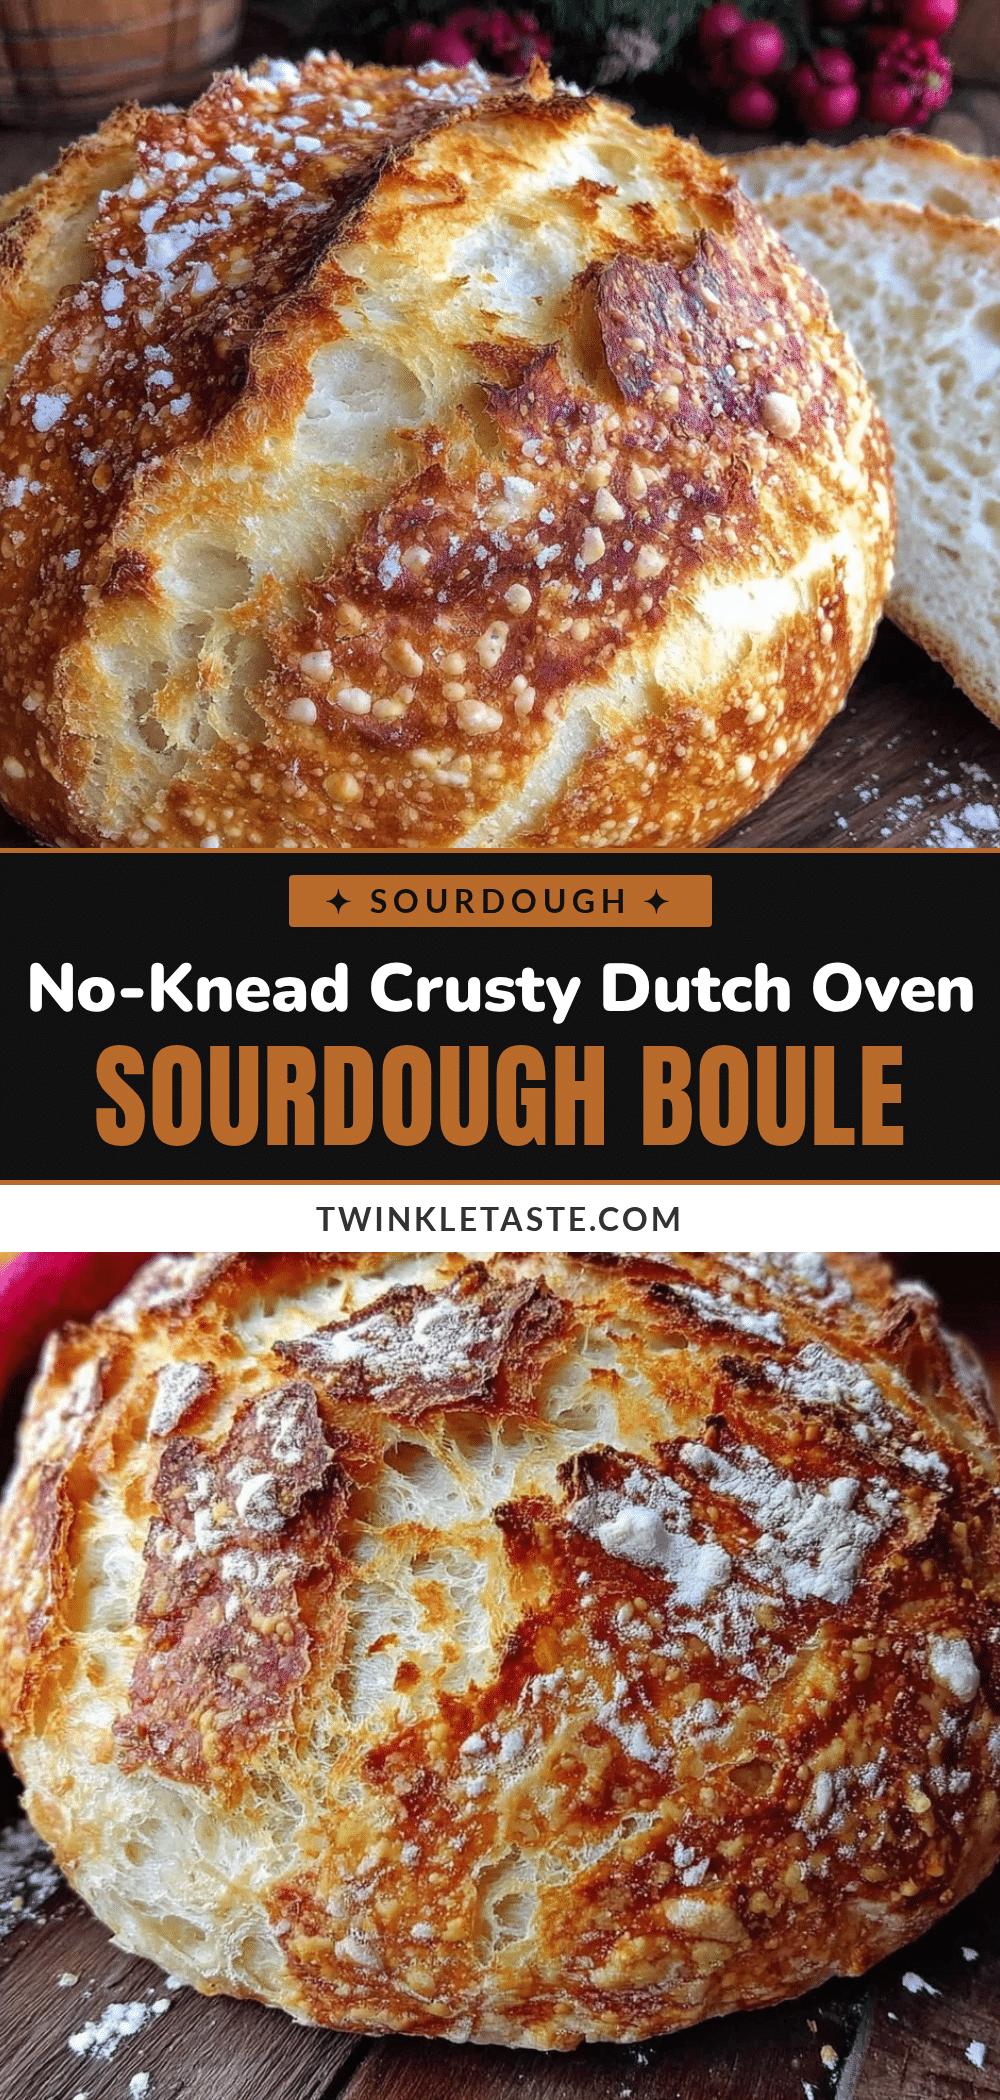
Crispy No-Knead Dutch Oven Sourdough Boule Recipe Perfect Golden Crust

A simple no-knead sourdough boule baked in a Dutch oven to achieve a perfect golden, crispy crust and airy, tangy crumb with minimal hands-on time.
- Prep Time: 15 minutes
- Cook Time: 45 minutes
- Total Time: 13 hours
- Yield: 1 boule (about 8-10 servings) 1x
- Category: Bread
- Cuisine: American
Ingredients
- 100g (3.5 oz) active sourdough starter
- 400g (3 1/4 cups) all-purpose flour
- 300g (1 1/4 cups) lukewarm water
- 10g (1 3/4 tsp) fine sea salt
- Optional: rice flour or additional all-purpose flour for dusting
Instructions
- Mix the dough: In a mixing bowl, combine 100g (3.5 oz) active sourdough starter with 300g (1 1/4 cups) lukewarm water. Stir until the starter dissolves. Add 400g (3 1/4 cups) all-purpose flour and 10g (1 3/4 tsp) sea salt. Mix with a spatula or hands until no dry patches remain; dough will be shaggy and sticky. Takes about 5 minutes.
- Bulk fermentation: Cover bowl with damp cloth or plastic wrap. Let rest at room temperature (around 70°F) for 12 to 18 hours until dough doubles in size and bubbles form.
- Shape the boule: Lightly flour work surface. Turn dough out using a dough scraper. Fold edges into center to create surface tension. Shape into a round ball by cupping hands and rotating. Takes about 10 minutes.
- Proof the dough: Place dough seam-side up into a floured banneton or bowl lined with floured kitchen towel. Cover and proof for 1 to 2 hours until slightly puffy and springy to touch.
- Preheat oven and Dutch oven: Place Dutch oven with lid inside oven and preheat to 475°F (246°C) about 30 minutes before baking.
- Bake the boule: Remove hot Dutch oven carefully. Invert dough onto parchment paper, seam-side down. Score top with sharp knife or lame. Transfer dough with parchment into Dutch oven. Cover and bake 20 minutes.
- Finish baking: Remove lid and bake another 20 to 25 minutes until crust is deeply golden and crackly. Internal temperature should reach about 210°F (99°C). Cool on wire rack at least 1 hour before slicing.
Notes
Use a well-fed, bubbly sourdough starter for best rise. Preheat the Dutch oven to trap steam for a crispy crust. Score the dough before baking to control expansion. Let the bread cool fully before slicing to set crumb. Wet hands slightly during shaping to prevent sticking instead of adding extra flour.
Nutrition
- Serving Size: Approximately 100g p
- Calories: 230
- Sodium: 0.4
- Fat: 1
- Carbohydrates: 45
- Fiber: 2
- Protein: 7
Keywords: sourdough, no-knead bread, Dutch oven bread, crispy crust, artisan bread, homemade sourdough, easy sourdough boule