“Can you really make a stunning graduation sheet cake in under an hour?” That’s what my cousin texted me one frantic afternoon, just two days before her daughter’s big day. Honestly, I was skeptical—graduations call for something special, not a last-minute fix. But the chaos of juggling work, kids, and party prep meant shortcuts were welcome if they didn’t scream “store-bought.” So I pulled out a tried-and-true recipe that’s been my go-to whenever I need a crowd-pleaser with a splash of personality.
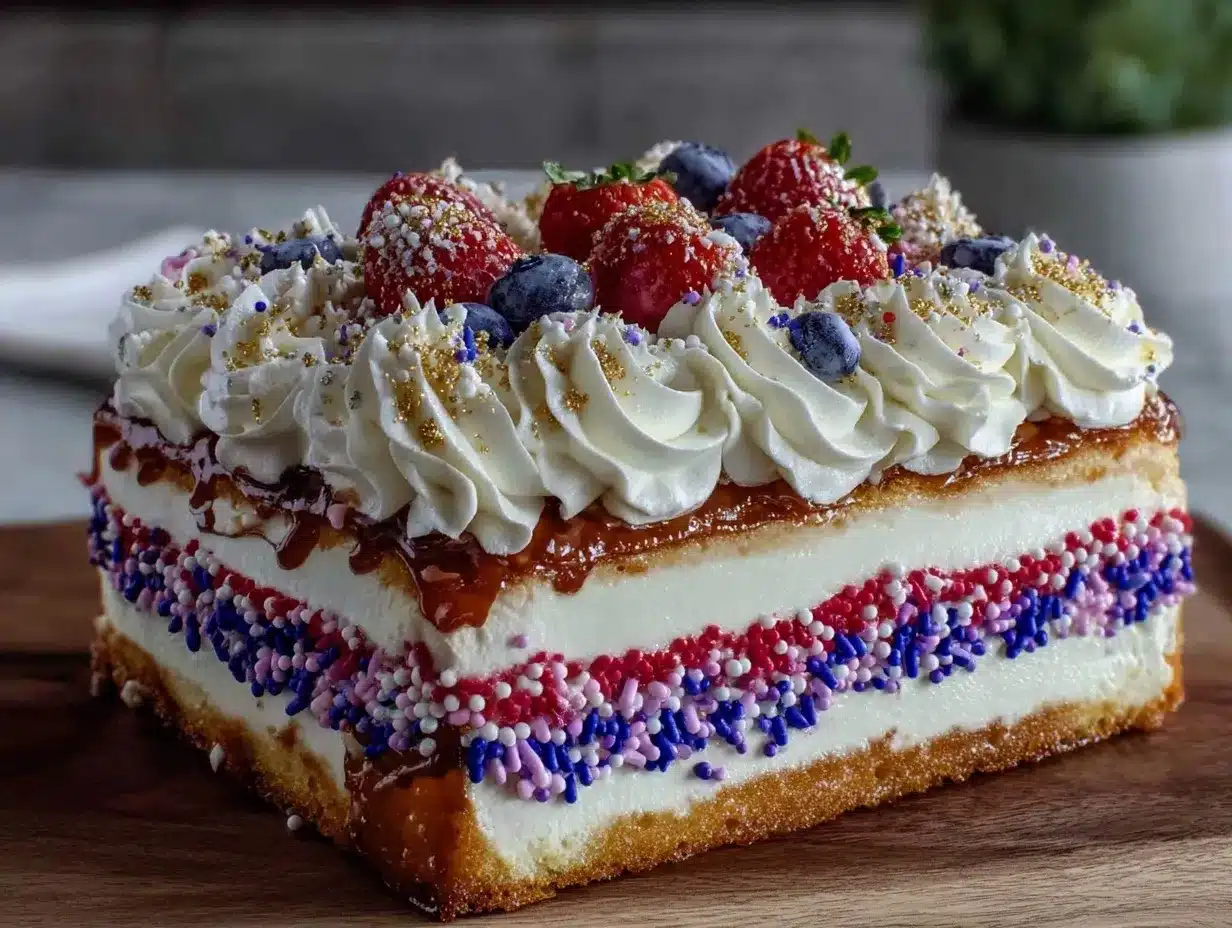
What makes this graduation sheet cake stand out is how it wears the school colors like a badge of honor, bold and bright. The frosting isn’t just slathered on—it’s carefully piped and layered to bring those vibrant hues to life in a way that feels festive, yet effortlessly elegant. I remember the moment my cousin’s daughter saw the cake—eyes wide, mouth smiling—she said it looked like it belonged on a magazine cover. That quiet win in the middle of a hectic week made me realize how this simple recipe could become a graduation tradition.
This stunning graduation sheet cake is honestly the kind of recipe that turns a rushed day into a celebration worth savoring. It’s fuss-free enough for anyone feeling short on time but detailed enough to feel like a real statement piece. And the best part? The flavors are just as lively as the colors, blending classic vanilla and chocolate with a creamy frosting that’s not too sweet. It’s a reminder that sometimes, the best celebrations come from a little bit of planning and a whole lot of heart.
Why You’ll Love This Recipe
After making this stunning graduation sheet cake several times for friends and family, I’ve seen firsthand how it wins over even the pickiest dessert lovers. Here’s why it might just become your go-to for school celebrations, birthday parties, or any time you want to impress without stress:
- Quick & Easy: Ready in about 45 minutes from start to finish, making it perfect for last-minute party plans or busy weeknights.
- Simple Ingredients: Uses pantry staples like flour, sugar, and eggs, with frosting colors that can be mixed from basic food coloring—no specialty shopping needed.
- Perfect for Graduations & Celebrations: The vibrant school colors add a personal touch that makes the cake feel custom-made and festive.
- Crowd-Pleaser: Balances classic vanilla and chocolate flavors, appealing to kids, adults, and just about anyone with a sweet tooth.
- Unbelievably Delicious: The moist cake pairs perfectly with a fluffy buttercream frosting that isn’t overly sweet, giving that just-right bite every time.
- Distinctive Design: Unlike other sheet cakes, this one uses a layering technique for the frosting that gives a smooth, professional look—think of it as your homemade cake that looks like it came from a bakery.
What sets this recipe apart is that it’s the one I return to when I want a cake that’s festive yet manageable. It’s not about complicated piping or exotic ingredients; it’s about getting the colors just right and making sure each slice feels like a celebration. After trying many other recipes, I find this one strikes the perfect balance of flavor, texture, and visual impact. Plus, it’s flexible enough to tweak for different school colors or themes, which has come in handy more times than I can count.
What Ingredients You Will Need
This stunning graduation sheet cake relies on simple, wholesome ingredients that come together to create a tender, flavorful base with a creamy, colorful frosting. Most of these items are likely already in your pantry or fridge, making this recipe a breeze to prepare without extra trips to the store.
- For the Cake Batter:
- All-purpose flour, 2 ½ cups (310g) — for that classic, soft crumb
- Granulated sugar, 2 cups (400g) — provides sweetness and structure
- Baking powder, 2 ½ teaspoons — helps the cake rise evenly
- Baking soda, ½ teaspoon — adds lift and tenderness
- Salt, ½ teaspoon — balances sweetness
- Unsalted butter, ¾ cup (170g), softened — adds richness and moisture; I usually use Land O Lakes for consistent results
- Whole milk, 1 cup (240ml), room temperature — for moistness; swap with almond milk if dairy-free
- Vanilla extract, 2 teaspoons — boosts flavor depth
- Large eggs, 3, room temperature — the binding agent
- For the Buttercream Frosting:
- Unsalted butter, 1 cup (225g), softened — the base of a creamy, fluffy frosting
- Powdered sugar, 4 cups (480g), sifted — for smoothness and sweetness
- Whole milk or heavy cream, 3–4 tablespoons (45–60ml) — to adjust consistency
- Vanilla extract, 1 teaspoon — flavor enhancer
- Gel food coloring in your school’s colors — I prefer gel over liquid for vibrant hues without thinning the frosting
Sometimes I swap out half the butter for cream cheese for a tangier frosting that pairs beautifully with the vanilla cake. For a richer cake, adding a tablespoon of cocoa powder to the batter creates a subtle chocolate twist—perfect if your school colors include darker shades. Also, if you want a gluten-free option, using a 1:1 gluten-free baking flour blend works well without sacrificing texture.
Equipment Needed
To make this stunning graduation sheet cake, you don’t need fancy gadgets, but a few basics will help you get the best results:
- 9×13-inch (23×33 cm) sheet pan: This size is perfect for sharing and baking evenly. If you don’t have this exact size, a similar rectangular pan works; just adjust baking time slightly.
- Electric mixer: A stand mixer is ideal for smooth batter and fluffy frosting, but a hand mixer does the job just fine (I’ve used both on different occasions).
- Mixing bowls: Several sizes help with separating batter and frosting preparation.
- Rubber spatula: Essential for scraping down the bowl and folding ingredients without losing volume.
- Offset spatula or butter knife: Key for spreading frosting evenly and smoothing the colorful layers.
- Piping bags and round or star tips (optional): For adding decorative touches with the colored frosting. If you don’t have piping bags, zip-top bags with a corner snipped off work just as well.
My favorite budget-friendly tip: lining the sheet pan with parchment paper makes cleanup a breeze and helps lift the cake out easily. Also, if you want to keep your mixer in tip-top shape after all that frosting whipping, a quick wipe-down before the butter hardens saves time later.
Preparation Method
- Preheat and prep: Set your oven to 350°F (175°C). Lightly grease your 9×13-inch (23×33 cm) sheet pan and line it with parchment paper, letting some overhang for easy cake removal.
- Mix dry ingredients: In a large bowl, whisk together 2 ½ cups (310g) all-purpose flour, 2 cups (400g) sugar, 2 ½ teaspoons baking powder, ½ teaspoon baking soda, and ½ teaspoon salt. This ensures even distribution of leavening agents for a uniform rise.
- Cream butter and eggs: Using an electric mixer, beat ¾ cup (170g) softened unsalted butter on medium speed until creamy (about 2 minutes). Add 3 large eggs, one at a time, beating well after each addition to incorporate air and achieve a light texture.
- Combine wet and dry: Alternately add the dry ingredients and 1 cup (240ml) whole milk to the butter-egg mixture, starting and ending with the dry. Mix on low speed just until combined—overmixing can make the cake tough.
- Add vanilla: Stir in 2 teaspoons vanilla extract by hand for even flavor distribution.
- Pour and smooth: Transfer batter to the prepared pan, using a spatula to level the surface. The batter should be thick but pourable.
- Bake: Place in the oven and bake for 35–40 minutes. Check doneness by inserting a toothpick in the center—it should come out clean or with a few moist crumbs. Avoid overbaking to keep the cake moist.
- Cool: Let the cake cool in the pan for 15 minutes, then lift out using parchment paper and transfer to a wire rack. Cool completely before frosting to prevent melting.
- Prepare frosting: Beat 1 cup (225g) softened unsalted butter until fluffy (about 3 minutes). Gradually add 4 cups (480g) powdered sugar and 3 tablespoons (45ml) milk or cream, mixing well. Add 1 teaspoon vanilla extract. Adjust consistency with more milk if needed—frosting should be spreadable but not runny.
- Color your frosting: Divide frosting into bowls and mix in gel food coloring for your school’s colors. Add colors gradually until vibrant but natural-looking.
- Frost the cake: Spread a thin crumb coat layer of white or a neutral color frosting first, then chill for 15 minutes. This seals crumbs and creates a smooth base for your colorful layers.
- Decorate: Using an offset spatula or piping bags, layer or pipe the colored frosting in stripes, swirls, or blocks to resemble the school colors vividly. Don’t stress about perfection; a little imperfection makes it look homemade and charming.
- Final chill: Refrigerate the frosted cake for at least 30 minutes to set the frosting before serving.
One tip I learned the hard way: make sure your cake is completely cool before frosting or the buttercream will melt into a mess. Also, if you want to save time, prepping the frosting while the cake bakes works like a charm. And if you want to try a little extra flair, adding edible glitter or sprinkles in matching colors can really make this cake pop.
Cooking Tips & Techniques
Getting this stunning graduation sheet cake just right is mostly about timing and a few small tricks I picked up over the years. First, creaming the butter and sugar well is key to a tender crumb. I usually give it a good 3 minutes—don’t rush this step or the cake can turn out dense.
Another tip: when mixing the batter, avoid overmixing once you combine wet and dry ingredients. It’s tempting to get every lump out, but a few lumps are fine, and overmixing can cause a tough texture. I’ve made this mistake more than once, so trust the process!
For frosting, gel food coloring beats liquid every time. It’s more concentrated, which means vibrant colors without watering down the buttercream. Plus, a little goes a long way, so start small and build up the shade.
When piping or spreading the frosting for the school colors, chilling the cake after a crumb coat really helps. It stops crumbs from mixing into your decorative layers and keeps colors crisp. If you don’t have a piping bag, I often use a sturdy zip-top bag with a tiny corner cut—easy and no special equipment needed.
Finally, remember that the cake tastes even better a few hours after frosting because the flavors meld. If you can, make the cake a day ahead and store it in the refrigerator, just bring it to room temperature before serving for the best experience.
Variations & Adaptations
This stunning graduation sheet cake is a great canvas for a few different twists depending on your taste and dietary needs. Here are some ideas I’ve tried or would recommend:
- Flavor variations: Swap half the vanilla extract for almond or coconut extract for a subtle flavor change. Adding a tablespoon of instant espresso powder to the batter also enhances the chocolate notes if you go for a chocolate base.
- Dietary adaptations: Use a gluten-free baking mix to make it safe for gluten sensitivities. For a dairy-free version, substitute the butter and milk with coconut oil and almond milk, adjusting frosting accordingly with vegan butter.
- Frosting alternatives: Try cream cheese frosting for tanginess, or whipped ganache if you want a richer finish. Both take well to food coloring, though ganache may need a bit of white chocolate added for color vibrancy.
- Design choices: Instead of stripes, consider polka dots, ombré fades, or even simple bold blocks of color. If you’re feeling fancy, edible gold leaf adds a sophisticated touch.
- Size adjustments: This recipe scales well. For smaller gatherings, try a 9-inch square pan and reduce baking time to 25–30 minutes.
One personal favorite variation was making this cake for a friend’s graduation party where the school colors included purple. I mixed a little lemon zest into the batter for a bright note that cut through the sweetness, and it was a big hit! If you want ideas for quick side dishes to pair with your celebration, my easy baked salmon with lemon and herbs is a straightforward crowd-pleaser worth considering.
Serving & Storage Suggestions
This stunning graduation sheet cake shines best served at room temperature after it’s rested out of the fridge for 20–30 minutes. That way, the frosting softens slightly, and the flavors come through fully. Serve it on a simple platter to let the vibrant colors pop.
Pair it with fresh berries or a light sparkling fruit punch to balance the richness. If you want to offer a warm side, a cup of coffee or tea complements the vanilla and buttercream beautifully.
For storage, keep the cake covered loosely with plastic wrap or in an airtight container in the refrigerator. It will stay fresh for 3–4 days. If you need to freeze it, wrap tightly in plastic and foil; thaw overnight in the fridge before serving.
Reheating the slices gently in the microwave for 15 seconds softens the frosting nicely without melting it. Over time, the colors may dull slightly, but the taste remains just as delightful.
And if you’re planning a full celebration menu, this cake pairs well with light, fresh dishes like the fresh summer roll bowls with peanut sauce—a nice contrast to the sweet indulgence.
Nutritional Information & Benefits
Each serving of this stunning graduation sheet cake (assuming 12 generous slices) contains approximately:
| Calories | 420 |
|---|---|
| Fat | 20g |
| Carbohydrates | 58g |
| Protein | 4g |
| Sugar | 38g |
While this cake is definitely a treat, it includes wholesome ingredients like real butter and eggs, which provide fat-soluble vitamins and protein. Using whole milk adds calcium, and you can tweak sugar levels slightly depending on your sweetness preference.
For those watching allergens, this recipe contains gluten, dairy, and eggs. Substituting gluten-free flour and non-dairy alternatives can make it suitable for many special diets.
From a wellness perspective, celebrations are about joy and sharing, and this cake fits perfectly into that ethos. Enjoying a slice with friends or family is as nourishing for the soul as it is for the body.
Conclusion
This stunning graduation sheet cake with vibrant school colors isn’t just a dessert—it’s a celebration centerpiece that brings people together. Its simple ingredients, straightforward method, and bold look make it ideal for last-minute party prep or planned festivities alike. I love how this recipe manages to feel both special and approachable—something that’s become a favorite in my circle for years.
Feel free to customize the colors, flavors, or size to suit your own celebration needs. And if you make it, I’d be thrilled to hear how you put your own spin on this cake. Sharing these moments and recipes is what makes cooking so rewarding.
Here’s to sweet memories and beautiful celebrations ahead!
FAQs
Can I make this graduation sheet cake ahead of time?
Yes! You can bake the cake a day in advance and store it covered at room temperature or in the fridge once frosted. Just bring to room temperature before serving for the best flavor and texture.
What’s the best way to get vibrant school colors in the frosting?
Gel food coloring is the way to go. It provides bright colors without thinning the frosting. Add a little at a time until you reach the desired shade.
Can I use a different size pan?
You can, but baking times will vary. For smaller pans, reduce baking time and start checking doneness at 25 minutes. For larger pans, bake longer, but test with a toothpick regularly.
How do I avoid the cake being dry?
Don’t overbake! Check the cake a few minutes before the time is up by inserting a toothpick. Also, make sure not to overmix the batter once you add the dry ingredients to keep it tender.
Can I add a filling inside this sheet cake?
Absolutely! You can slice the cake horizontally and add jam, whipped cream, or chocolate ganache. Just be sure to chill the cake first to make slicing easier.
Pin This Recipe!
Stunning Graduation Sheet Cake
A quick and easy sheet cake recipe perfect for graduations, featuring vibrant school colors and a moist vanilla base with creamy buttercream frosting.
- Prep Time: 15 minutes
- Cook Time: 35-40 minutes
- Total Time: 50-55 minutes
- Yield: 12 servings 1x
- Category: Dessert
- Cuisine: American
Ingredients
- 2 ½ cups (310g) all-purpose flour
- 2 cups (400g) granulated sugar
- 2 ½ teaspoons baking powder
- ½ teaspoon baking soda
- ½ teaspoon salt
- ¾ cup (170g) unsalted butter, softened
- 1 cup (240ml) whole milk, room temperature
- 2 teaspoons vanilla extract
- 3 large eggs, room temperature
- 1 cup (225g) unsalted butter, softened (for frosting)
- 4 cups (480g) powdered sugar, sifted
- 3–4 tablespoons (45–60ml) whole milk or heavy cream
- 1 teaspoon vanilla extract (for frosting)
- Gel food coloring in school colors
Instructions
- Preheat oven to 350°F (175°C). Lightly grease a 9×13-inch (23×33 cm) sheet pan and line with parchment paper, leaving overhang for easy removal.
- In a large bowl, whisk together flour, sugar, baking powder, baking soda, and salt.
- Using an electric mixer, beat ¾ cup softened unsalted butter on medium speed until creamy, about 2 minutes.
- Add eggs one at a time, beating well after each addition.
- Alternately add dry ingredients and milk to the butter-egg mixture, starting and ending with dry ingredients. Mix on low speed just until combined.
- Stir in vanilla extract by hand.
- Pour batter into prepared pan and smooth the surface with a spatula.
- Bake for 35–40 minutes or until a toothpick inserted in the center comes out clean or with a few moist crumbs.
- Cool cake in pan for 15 minutes, then lift out using parchment paper and transfer to a wire rack to cool completely.
- For frosting, beat 1 cup softened unsalted butter until fluffy, about 3 minutes.
- Gradually add powdered sugar and 3 tablespoons milk or cream, mixing well.
- Add vanilla extract and adjust consistency with more milk if needed.
- Divide frosting into bowls and mix in gel food coloring to desired vibrant school colors.
- Spread a thin crumb coat layer of white or neutral frosting on the cake and chill for 15 minutes.
- Decorate with colored frosting using an offset spatula or piping bags in stripes, swirls, or blocks.
- Refrigerate the frosted cake for at least 30 minutes to set before serving.
Notes
Ensure cake is completely cool before frosting to prevent melting. Use gel food coloring for vibrant colors without thinning frosting. Chill cake after crumb coat to keep colors crisp. Cake tastes better after resting a few hours or overnight. Variations include adding cocoa powder for chocolate flavor, cream cheese frosting, or gluten-free and dairy-free substitutions.
Nutrition
- Serving Size: 1 slice (1/12 of cak
- Calories: 420
- Sugar: 38
- Fat: 20
- Carbohydrates: 58
- Protein: 4
Keywords: graduation cake, sheet cake, buttercream frosting, school colors, easy cake recipe, vanilla cake, party dessert