Let me tell you, the smell of melted cheese mingling with tangy tomato sauce and a hint of oregano is enough to make anyone’s mouth water. The first time I put together this Easy Homemade Lunchables Pizza Snack, I was instantly hooked — the kind of moment where you pause, take a deep breath, and just smile because you know you’re onto something truly special. It takes me back to when I was knee-high to a grasshopper, sneaking little bites of my mom’s homemade pizza snacks during Saturday afternoons. Years ago, I stumbled on the idea of making my own Lunchables-style snack to avoid all those preservatives and mystery ingredients. Honestly, I wish I’d discovered this recipe back then—it’s dangerously easy and packed with pure, nostalgic comfort.
My family couldn’t stop sneaking these pizza snacks off the cooling rack (and I can’t really blame them). The kids love assembling their own little pizza bites, and it’s a sweet treat that brightens up the lunchbox without any fuss. You know what? This recipe is perfect for busy school mornings, last-minute after-school snacks, or even fun potlucks. It’s quickly become a staple for family gatherings and gifting to friends (in the name of research, of course).
Why You’ll Love This Recipe
Having tested this recipe more times than I can count, I’ve learned a few things that make this Easy Homemade Lunchables Pizza Snack stand out from the rest. Here’s why it’s a winner:
- Quick & Easy: Comes together in under 20 minutes, perfect for those busy mornings or last-minute cravings.
- Simple Ingredients: You likely already have everything in your kitchen, no fancy trips required.
- Perfect for Kids’ Lunches: Great for school days, playdates, or even as a fun snack during weekend movie marathons.
- Crowd-Pleaser: Always gets rave reviews from both kids and adults – it’s a universal favorite.
- Unbelievably Delicious: The combo of melty cheese, savory sauce, and crispy crackers or mini crusts hits all the right comfort notes.
This recipe isn’t just another pizza snack; it’s the best version because of the fresh ingredients and the option to customize toppings. Whether you blend your own sauce or use a trusted brand like Muir Glen for that rich tomato flavor, or swap out pepperoni for turkey slices for a leaner option, this recipe feels like comfort food reimagined—faster, healthier, but still soul-soothing. It’s perfect for impressing guests without stress or turning a simple lunch into something memorable.
What Ingredients You Will Need
This recipe uses simple, wholesome ingredients to deliver bold flavor and satisfying texture without the fuss. Most are pantry staples, and you can easily swap a few to suit your preferences or dietary needs.
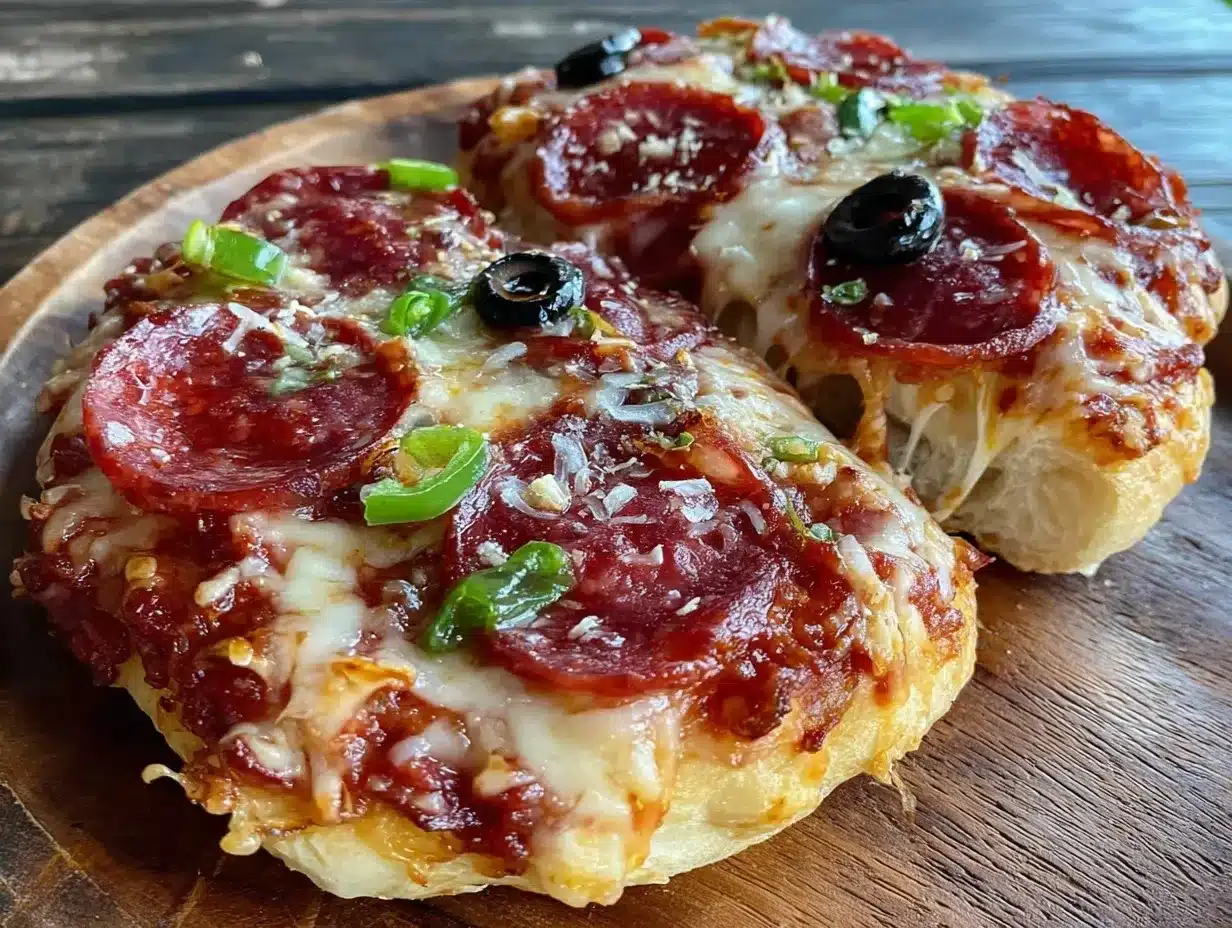
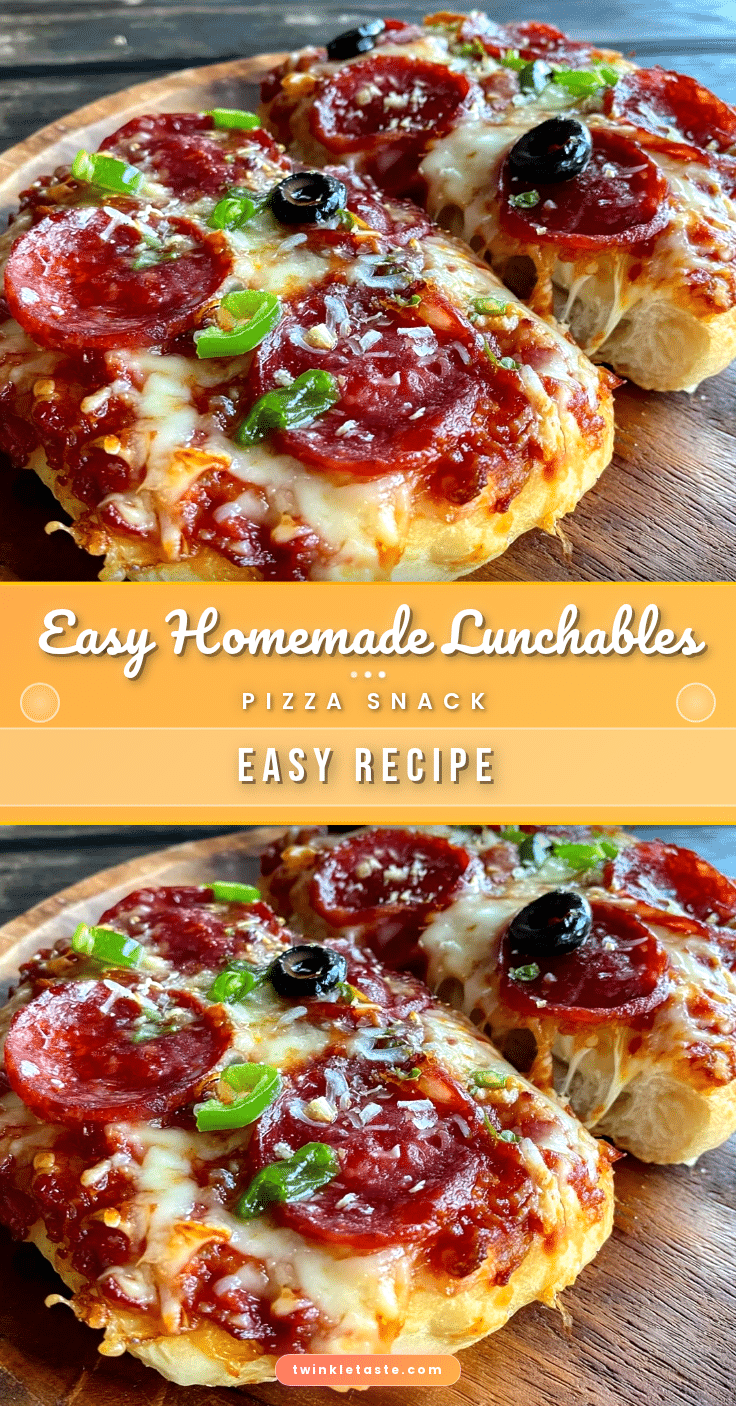
- Mini Pizza Crusts or Crackers: Use mini pita rounds, flatbreads, or sturdy crackers as the base (I prefer Stacy’s Pita Chips for the crunch).
- Tomato Sauce: About ¼ cup (60 ml) per batch; go for a smooth marinara or pizza sauce (store-bought or homemade).
- Shredded Mozzarella Cheese: 1 to 1½ cups (100-150 g); fresh shredded cheese melts best, and I recommend Sargento for reliable meltiness.
- Pepperoni Slices: Approximately 20 small slices; turkey pepperoni works great for a lighter version.
- Mini Bell Pepper Rings or Olives: Optional, for added color and flavor.
- Dried Oregano or Italian Seasoning: A pinch or two for that classic pizza aroma.
- Olive Oil: Just a light brush for crisping the crusts (optional).
Substitution tips: Use dairy-free cheese and gluten-free mini crusts to make this recipe allergy-friendly. In summer, swap in fresh cherry tomato halves instead of sauce for a fresher bite. You can also swap pepperoni for cooked sausage crumbles or omit meat for a vegetarian snack.
Equipment Needed
- Baking Sheet: A rimmed sheet to hold your pizza snacks while baking. I like to line mine with parchment paper for easier cleanup.
- Oven or Toaster Oven: For melting cheese and crisping the crust. A toaster oven works wonders if you’re just making a small batch.
- Small Bowls and Spoons: For portioning sauce and toppings.
- Pastry Brush: Optional, if you want to lightly brush olive oil on the crusts.
If you don’t have a pastry brush, a clean finger works just fine! Also, using an adjustable oven rack can help you control how close the snacks get to the heating element for perfect browning. For budget-friendly options, any non-stick baking sheet will get the job done.
Preparation Method
- Preheat your oven to 375°F (190°C). This temp crisps the edges nicely without burning the cheese.
- Arrange your mini crusts or crackers on the baking sheet. Leave a little space between each to avoid sticking.
- Lightly brush the crusts with olive oil (optional). This adds a subtle richness and helps the bottom get golden and crisp.
- Spread about 1 teaspoon (5 ml) of tomato sauce on each crust. Not too much—you want to keep them from getting soggy. Use the back of a spoon to spread evenly.
- Sprinkle 1 to 2 tablespoons (15-30 g) of shredded mozzarella cheese over the sauce. Covering the sauce well means every bite gets that melty goodness.
- Top with pepperoni slices and any optional veggies like bell peppers or olives. Keep it kid-friendly or add a little flair with colorful toppings.
- Sprinkle a pinch of dried oregano or Italian seasoning on top. This little touch makes a big flavor difference.
- Bake in the preheated oven for 8-10 minutes. Look for bubbling cheese and golden crust edges—that’s your cue!
- Remove from oven and let cool for a few minutes. They’ll firm up slightly and be safer for little hands.
Pro tip: If your cheese isn’t melting evenly, give the pan a gentle shake mid-bake to redistribute toppings. Also, watch the edges closely near the end to avoid over-browning. These snacks taste best fresh but hold up well for a day or two if stored properly.
Cooking Tips & Techniques
Here are some things I’ve learned the hard way making these pizza snacks:
- Don’t overload the sauce: Too much can make the crust soggy. A thin, even layer is key.
- Use fresh shredded cheese: Pre-shredded often contains anti-caking agents that affect melt and texture.
- Watch your oven temps: If your oven runs hot, lower the temp to 350°F (175°C) to avoid burnt edges.
- Try the toaster oven for small batches: It heats faster and saves energy.
- Double-check your crusts: Thin crackers will crisp up quickly, so reduce bake time to avoid burning.
Timing is everything here—start prepping toppings while the oven preheats to keep things moving smoothly. And honestly, letting the snacks cool just a bit helps the cheese set so they don’t fall apart when packed for lunch.
Variations & Adaptations
Want to mix it up? Here are a few fun twists I’ve tried and loved:
- Gluten-Free Version: Swap the mini crusts with gluten-free crackers or small rice cakes. The texture changes, but the flavor stays on point.
- Vegetarian Option: Skip the pepperoni and add mini mushrooms, spinach, or sun-dried tomatoes for a veggie boost.
- Spicy Kick: Add a dash of crushed red pepper flakes or swap regular pepperoni for spicy chorizo slices.
- Cheese Blend: Mix mozzarella with a bit of sharp cheddar or provolone for a richer flavor.
- DIY Sauce: Whip up your own quick sauce with canned tomatoes, garlic, and herbs to adjust sweetness and tanginess.
Personally, I like to add a sprinkle of parmesan right before serving for an extra salty pop. You can also try using naan bread cut into small rounds for a fluffier base—just adjust baking time accordingly.
Serving & Storage Suggestions
These pizza snacks are best enjoyed warm, but they’re also great at room temperature, making them perfect for lunchboxes. Serve them with fresh fruit or carrot sticks for a balanced meal your kids will love. A cold glass of milk or a sparkling water with a splash of juice pairs nicely.
Store leftovers in an airtight container in the refrigerator for up to 3 days. Reheat in a toaster oven or conventional oven at 350°F (175°C) for about 5 minutes to regain that crispiness. Avoid microwaving if you want to keep the crust from getting soggy.
Flavors actually deepen a bit overnight, so if you pack these the night before, they’ll taste even better the next day. Just remember to warm them slightly for the best experience.
Nutritional Information & Benefits
Each serving of this Easy Homemade Lunchables Pizza Snack provides a balanced mix of protein, carbs, and fats, making it a satisfying little meal. The mozzarella offers calcium and protein, while the tomato sauce delivers a dose of lycopene—an antioxidant known for its health benefits.
Using whole-grain crackers or mini pita breads can add fiber to the snack. For those watching carbs or dairy, the recipe easily adapts with gluten-free crusts and dairy-free cheeses. Just be mindful of sodium content in processed meats like pepperoni if you’re packing these regularly.
From a wellness standpoint, creating your own lunchable-style snack helps you control ingredients and avoid unnecessary additives, which is a win in my book.
Conclusion
This Easy Homemade Lunchables Pizza Snack is a keeper. It’s simple, tasty, and fun for kids to assemble or enjoy straightaway. Whether you’re looking to brighten up school lunches or whip up a quick snack that feels like a treat, this recipe has got your back.
Feel free to customize it with your favorite toppings or try some of the variations I mentioned—you really can’t go wrong. Honestly, I love how this recipe brings a little joy and nostalgia into busy days, and I hope it does the same for your family.
If you give it a try, please drop a comment and share your favorite tweaks or how it went. I’d love to hear your stories and see how you make it your own. Happy snacking!
FAQs About Easy Homemade Lunchables Pizza Snack
Can I make these pizza snacks ahead of time?
Yes! You can assemble them and store in the fridge for a few hours before baking. Just cover tightly to keep them fresh.
What can I use instead of pepperoni?
Try turkey slices, cooked sausage, ham, or keep it vegetarian with veggies like mushrooms or bell peppers.
Is there a dairy-free cheese option?
Absolutely! Many brands offer dairy-free shredded cheese that melts well, like Daiya or Follow Your Heart.
How long do leftovers last?
Store in an airtight container in the fridge for up to 3 days. Reheat before serving for best texture.
Can I freeze these pizza snacks?
It’s best to freeze them before baking. Arrange on a tray to freeze individually, then transfer to a bag. Bake from frozen, adding a few extra minutes to the cook time.
Pin This Recipe!
Easy Homemade Lunchables Pizza Snack Recipe Perfect for Kids Lunches
A quick and easy homemade pizza snack perfect for kids’ lunches, featuring mini crusts or crackers topped with tomato sauce, melted mozzarella, and pepperoni. This recipe is customizable, healthy, and nostalgic.
- Prep Time: 10 minutes
- Cook Time: 10 minutes
- Total Time: 20 minutes
- Yield: 20 mini pizza snacks 1x
- Category: Snack
- Cuisine: American
Ingredients
- Mini pizza crusts or crackers (mini pita rounds, flatbreads, or sturdy crackers; Stacy’s Pita Chips recommended)
- ¼ cup (60 ml) tomato sauce (smooth marinara or pizza sauce, store-bought or homemade)
- 1 to 1½ cups (100–150 g) shredded mozzarella cheese (fresh shredded recommended)
- Approximately 20 small pepperoni slices (turkey pepperoni for lighter option)
- Mini bell pepper rings or olives (optional)
- Pinch or two of dried oregano or Italian seasoning
- Olive oil (optional, for brushing crusts)
Instructions
- Preheat your oven to 375°F (190°C).
- Arrange your mini crusts or crackers on a baking sheet, leaving space between each.
- Lightly brush the crusts with olive oil (optional).
- Spread about 1 teaspoon (5 ml) of tomato sauce on each crust evenly.
- Sprinkle 1 to 2 tablespoons (15-30 g) of shredded mozzarella cheese over the sauce.
- Top with pepperoni slices and optional veggies like bell peppers or olives.
- Sprinkle a pinch of dried oregano or Italian seasoning on top.
- Bake in the preheated oven for 8-10 minutes until cheese bubbles and crust edges turn golden.
- Remove from oven and let cool for a few minutes before serving.
Notes
Do not overload sauce to avoid soggy crusts. Use fresh shredded cheese for best melt. Adjust oven temperature to 350°F (175°C) if your oven runs hot. Toaster oven works well for small batches. Let snacks cool slightly before packing for lunch. Store leftovers in an airtight container in the fridge for up to 3 days and reheat in oven or toaster oven to maintain crispiness. Avoid microwaving to prevent soggy crusts.
Nutrition
- Serving Size: 1 mini pizza snack
- Calories: 90
- Sugar: 1
- Sodium: 180
- Fat: 5
- Saturated Fat: 2.5
- Carbohydrates: 8
- Fiber: 1
- Protein: 5
Keywords: pizza snack, kids lunch, homemade lunchables, easy snack, mini pizza, pepperoni snack, quick lunch, school lunch ideas