Let me tell you, the scent of rich cocoa mingling with cream cheese wafting from my oven is enough to make anyone’s mouth water. The first time I baked these Perfect Small Batch Red Velvet Cheesecake Bars, I was instantly hooked—the kind of moment where you pause, take a deep breath, and just smile because you know you’re onto something truly special. Years ago, when I was knee-high to a grasshopper, my grandma used to make red velvet cake for every holiday, but these bars bring that nostalgic flavor into a new, dangerously easy form.
Honestly, my family couldn’t stop sneaking them off the cooling rack (and I can’t really blame them). These bars have become a staple for family gatherings and gifting during the holidays. You know what? They’re perfect for those cozy nights when you want a sweet treat without the fuss of a full cake, or to brighten up your Pinterest cookie board with something a little different. Tested multiple times in the name of research, of course, this recipe feels like a warm hug you’re going to want to bookmark—trust me on this one!
Why You’ll Love This Recipe
Having put this recipe through its paces, I can say with confidence that these Perfect Small Batch Red Velvet Cheesecake Bars offer a delightful twist on classic comfort food. Here’s why they stand out:
- Quick & Easy: Comes together in under 45 minutes, perfect for busy weeknights or last-minute cravings.
- Simple Ingredients: No fancy grocery trips needed; you likely already have everything in your kitchen.
- Perfect for Any Occasion: Great for potlucks, holiday mornings, or just a sweet pick-me-up.
- Crowd-Pleaser: Always gets rave reviews from kids and adults alike—seriously, they vanish fast.
- Unbelievably Delicious: The creamy cheesecake layer paired with tender, cocoa-infused red velvet is next-level comfort food.
This recipe isn’t just another red velvet dessert—it’s the best version I’ve found that balances rich cream cheese tang with that classic cocoa flavor, thanks to a secret blend of vanilla and a touch of buttermilk powder. It’s that moment when you close your eyes after the first bite and savor pure nostalgia. If you want something that feels indulgent but is actually straightforward and fuss-free, this recipe is for you.
What Ingredients You Will Need
This recipe uses simple, wholesome ingredients to deliver bold flavor and satisfying texture without the fuss. Most are pantry staples, and substitutions are easy if you need them.
- For the Crust:
- 1 cup all-purpose flour (125 g)
- 2 tablespoons unsweetened cocoa powder (use Dutch-processed for richer flavor)
- 1/4 cup granulated sugar (50 g)
- 1/4 teaspoon salt
- 1/4 cup unsalted butter, melted (57 g; I love using KerryGold for richness)
- For the Cheesecake Layer:
- 8 oz cream cheese, softened (226 g; Philadelphia brand works beautifully)
- 1/4 cup granulated sugar (50 g)
- 1 large egg, room temperature
- 1 teaspoon vanilla extract (pure vanilla is key here)
- 1 tablespoon buttermilk or whole milk
- 1 tablespoon all-purpose flour (optional, adds structure)
- 1/2 teaspoon white vinegar (balances sweetness)
- For the Red Velvet Batter:
- 1/3 cup all-purpose flour (40 g)
- 1/4 cup unsweetened cocoa powder (22 g)
- 1/4 cup granulated sugar (50 g)
- 1/4 cup vegetable oil (60 ml)
- 1 large egg, room temperature
- 1 tablespoon red food coloring (gel works best for vibrant color)
- 1/2 teaspoon vanilla extract
- 1/4 teaspoon baking soda
- Pinch of salt
Substitution notes: Use almond flour for a gluten-free crust option, and swap regular cream cheese with dairy-free cream cheese if needed. For a less intense red color, reduce food coloring by half. In summer, try adding fresh raspberries on top for a tangy twist!
Equipment Needed
- 8×8 inch (20×20 cm) square baking pan – glass or metal works fine; metal heats faster for a crisper crust.
- Mixing bowls – at least two, one for batter, one for cheesecake layer.
- Electric hand mixer or stand mixer – helps get that creamy cheesecake texture without lumps.
- Measuring cups and spoons – precise measurements matter here!
- Rubber spatula – for scraping bowls clean and folding gently.
- Whisk – to combine dry ingredients thoroughly.
- Cooling rack – to let bars cool evenly and avoid sogginess.
If you don’t have a mixer, no worries—just be prepared for a bit more elbow grease. I’ve found a good silicone spatula to be a budget-friendly essential for smooth batter blending.
Preparation Method
- Preheat your oven to 325°F (163°C). Line the 8×8 inch baking pan with parchment paper, leaving an overhang on two sides to easily lift the bars out later.
- Make the crust: In a medium bowl, whisk together 1 cup all-purpose flour, 2 tablespoons cocoa powder, 1/4 cup sugar, and 1/4 teaspoon salt until combined. Pour in 1/4 cup melted butter and stir until the mixture looks like wet sand. Press this mixture firmly into the bottom of the prepared pan. Bake for 12 minutes to set the crust, then remove from oven and let cool slightly.
- Prepare the cheesecake layer: Using a mixer, beat 8 oz softened cream cheese with 1/4 cup sugar until smooth and creamy—no lumps! Add 1 large egg, 1 teaspoon vanilla, 1 tablespoon buttermilk, 1 tablespoon flour, and 1/2 teaspoon white vinegar. Mix on low speed until combined, scraping down the sides as needed. Pour this layer evenly over the warm crust. It should look luscious and glossy.
- Mix the red velvet batter: In a separate bowl, whisk together 1/3 cup flour, 1/4 cup cocoa powder, 1/4 cup sugar, 1/4 teaspoon baking soda, and a pinch of salt. In another small bowl, beat 1 egg with 1/4 cup vegetable oil, 1 tablespoon red food coloring, and 1/2 teaspoon vanilla extract. Slowly add the dry ingredients to the wet and whisk just until combined—don’t overmix or the bars get tough.
- Layer the red velvet batter: Spoon the red velvet batter over the cheesecake layer in dollops. Use a knife or skewer to gently swirl the two layers together, creating a marbled effect without fully mixing.
- Bake the bars: Place the pan in the oven and bake for 35-40 minutes until the edges are set but the center still jiggles slightly when nudged. Avoid overbaking to keep the bars creamy and tender.
- Cool completely: Remove from oven and let cool on a wire rack for at least 2 hours, then chill in the fridge for another 2 hours or overnight. Chilling helps the bars set perfectly for slicing.
- Cut and serve: Use the parchment overhang to lift the bars from the pan. Slice into 12 squares with a sharp knife, wiping the blade clean between cuts for neat edges.
Pro tip: If your cheesecake layer cracks slightly, don’t stress—it adds character and doesn’t affect taste. Also, using room temperature ingredients really helps with smooth mixing and texture.
Cooking Tips & Techniques
Getting these bars just right requires a few tricks I’ve picked up over time. First, always soften your cream cheese completely before mixing. Cold cream cheese can lead to lumpy cheesecake layers, and honestly, no one wants that.
Another tip is to bake at a slightly lower temperature (325°F/163°C) to prevent cracking and ensure even cooking. I learned the hard way that higher temps make the edges tough and the center undercooked.
Swirling the red velvet batter gently is key—you want a pretty marbled effect, not a full mix. Use a toothpick or knife and don’t overdo it. Also, let the bars cool fully before slicing; cutting warm bars usually leads to messy edges. Trust me, patience pays off here.
Finally, don’t skip the chilling step. The fridge time lets the cheesecake layer firm up and flavors meld. I like to prep these bars a day ahead for best results, which also makes serving stress-free.
Variations & Adaptations
You can easily switch things up with these bars to suit your taste or dietary needs. Here are a few ideas:
- Gluten-Free: Swap all-purpose flour with a 1:1 gluten-free baking blend. The texture stays lovely and rich.
- Vegan Version: Use vegan cream cheese and substitute the egg with a flax egg (1 tablespoon ground flaxseed + 3 tablespoons water, chilled). Use dairy-free milk for buttermilk replacement.
- Flavor Twists: Add a teaspoon of espresso powder to the red velvet batter for a mocha touch. Or sprinkle chopped white chocolate chips on top before baking for extra sweetness.
- Baking Method: Try baking in mini muffin tins for adorable single servings. Adjust baking time to 18-20 minutes.
- Personal Favorite: I sometimes add a teaspoon of cinnamon to the cheesecake layer for a warm spice note that pairs beautifully with the cocoa.
Serving & Storage Suggestions
Serve these Perfect Small Batch Red Velvet Cheesecake Bars chilled or at room temperature. Honestly, I prefer them cold straight from the fridge for that creamy, firm bite. Plate them with a dusting of powdered sugar or a dollop of whipped cream for a fancy touch.
They pair wonderfully with a cup of coffee or a glass of cold milk—classic combo you can’t go wrong with. For a festive twist, try serving alongside fresh berries or raspberry sauce.
Store leftover bars in an airtight container in the refrigerator for up to 5 days. They also freeze well—wrap tightly and place in a freezer-safe container for up to 3 months. Thaw overnight in the fridge before serving. Reheat gently for 10-15 seconds if you want them slightly warm, but I think they’re best enjoyed chilled.
Flavors actually deepen and become more harmonious after a day or two, so if you can wait, they get even better!
Nutritional Information & Benefits
Each bar (assuming 12 servings) contains approximately:
| Calories | 230 kcal |
|---|---|
| Fat | 15 g |
| Carbohydrates | 20 g |
| Protein | 3 g |
The cream cheese provides a good source of calcium and protein, while the cocoa powder adds antioxidants. This dessert is a treat but uses simple ingredients without artificial fillers. It’s gluten-containing unless you swap flours, and contains dairy and eggs. For those watching sugar, you can reduce sugar slightly or use a sugar substitute, though texture may vary.
From a wellness standpoint, this recipe is a sweet indulgence balanced with real ingredients, making it a satisfying choice when you want dessert that feels homemade and honest.
Conclusion
So, why give these Perfect Small Batch Red Velvet Cheesecake Bars a try? Because they bring together the best of rich red velvet flavor and creamy cheesecake in one easy, no-fuss package. Whether you’re baking for a crowd or just craving a little sweet comfort, this recipe hits the spot every time.
Feel free to tweak the flavors, swap ingredients, or make it your own. I love how versatile and forgiving this recipe is—it’s become one of my favorite go-to desserts. If you try it, please leave a comment or share your variations; I’m always eager to hear how you make it your own.
Go ahead, treat yourself and those you love to a slice of nostalgic bliss. You’re going to want to keep coming back for these bars!
FAQs
Can I make these bars without cream cheese?
You can substitute with a dairy-free cream cheese for a vegan or lactose-free option, but regular cream cheese gives the best texture and flavor.
How do I store leftover bars?
Store in an airtight container in the fridge for up to 5 days or freeze for up to 3 months. Thaw overnight in the fridge before enjoying.
Can I use natural cocoa powder instead of Dutch-processed?
Yes, but the flavor will be a bit more acidic and less smooth. You might want to add a pinch of baking soda to balance it out.
What if I don’t have red food coloring?
You can skip it, but the signature red color will be missing. Beet juice is a natural alternative but may slightly alter flavor.
Can I double the recipe for a larger batch?
Absolutely! Just double all ingredients and bake in a 9×13 inch pan, increasing baking time to about 50-60 minutes. Check doneness with a gentle jiggle in the center.
Pin This Recipe!
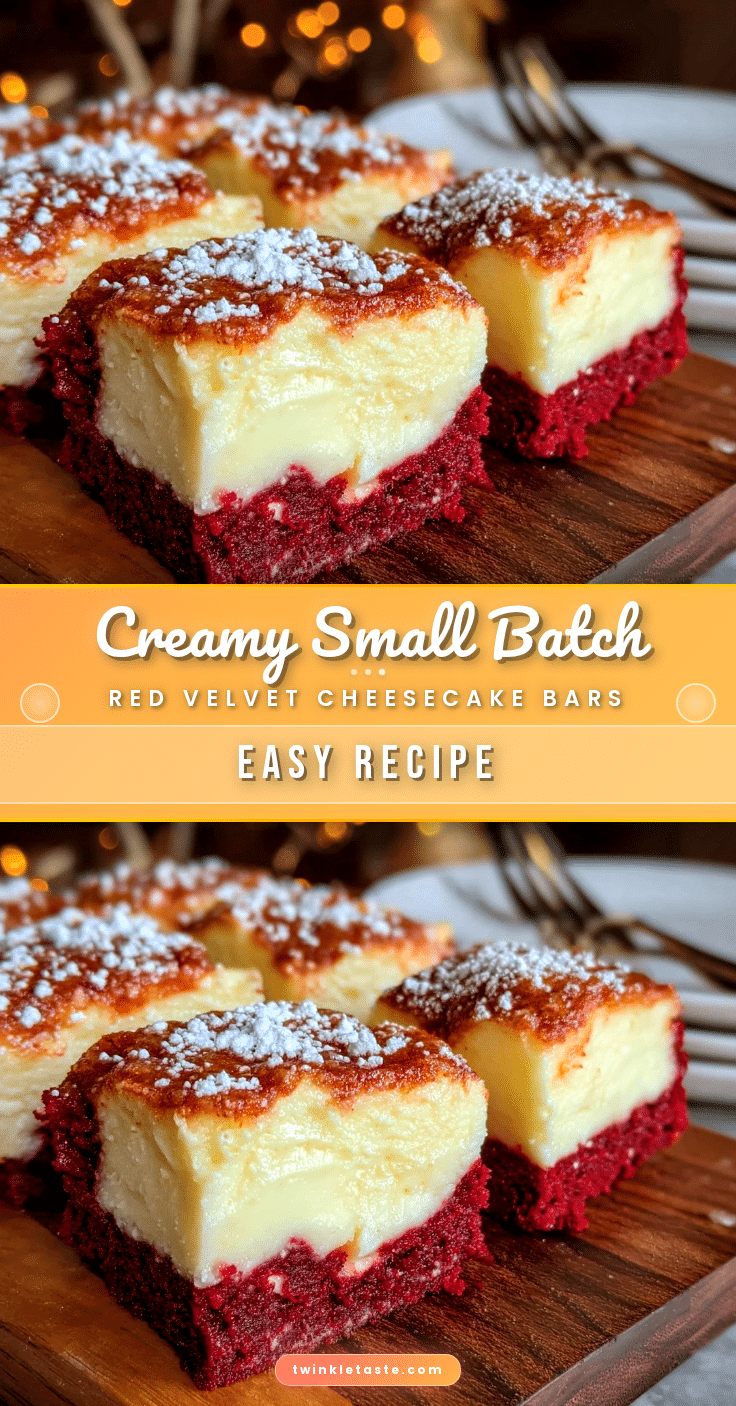
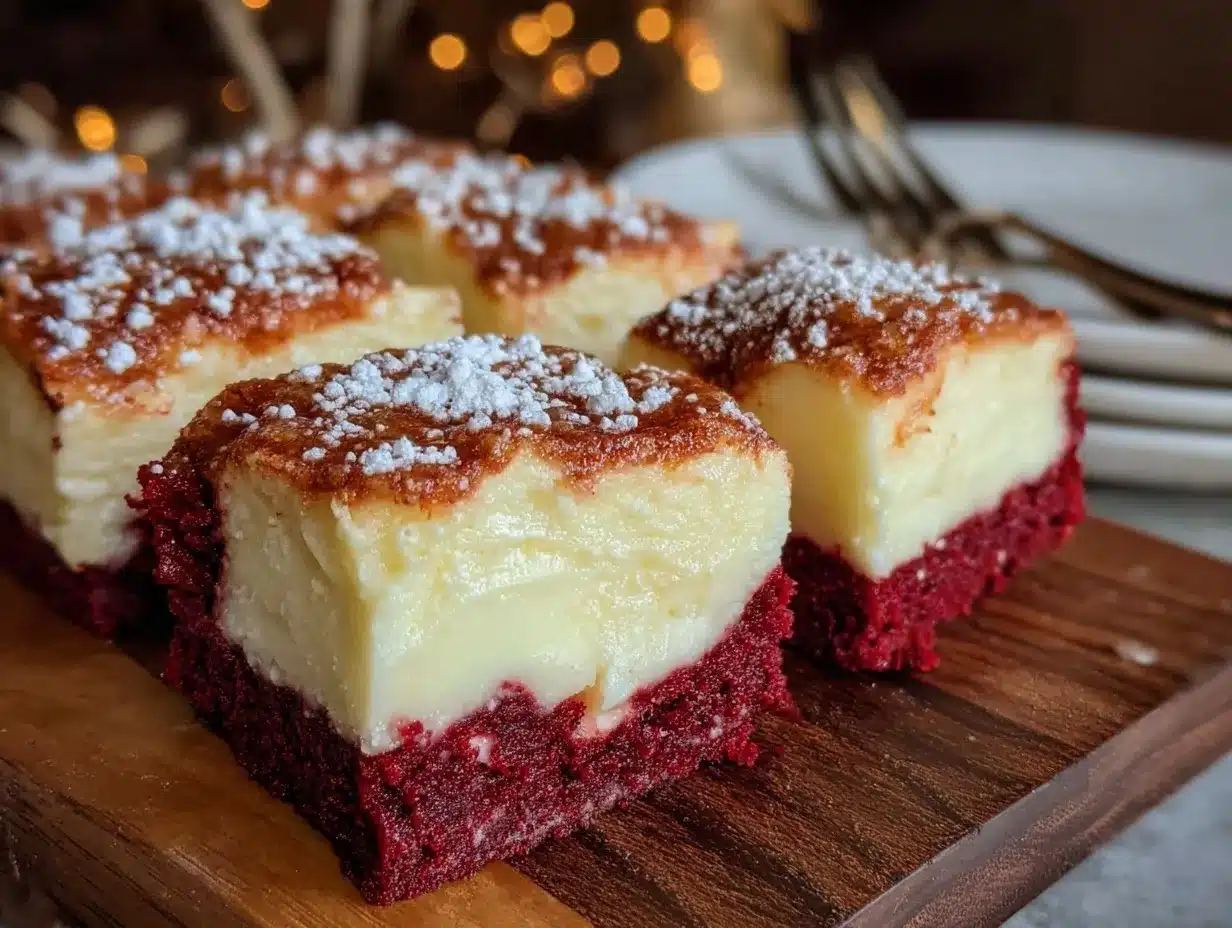
Perfect Small Batch Red Velvet Cheesecake Bars
These rich and creamy red velvet cheesecake bars combine the nostalgic flavor of red velvet cake with a smooth cheesecake layer, perfect for a quick and easy homemade dessert.
- Prep Time: 15 minutes
- Cook Time: 40 minutes
- Total Time: 4 hours 55 minutes
- Yield: 12 servings 1x
- Category: Dessert
- Cuisine: American
Ingredients
- 1 cup all-purpose flour (125 g)
- 2 tablespoons unsweetened cocoa powder (Dutch-processed recommended)
- 1/4 cup granulated sugar (50 g)
- 1/4 teaspoon salt
- 1/4 cup unsalted butter, melted (57 g)
- 8 oz cream cheese, softened (226 g)
- 1/4 cup granulated sugar (50 g)
- 1 large egg, room temperature
- 1 teaspoon vanilla extract
- 1 tablespoon buttermilk or whole milk
- 1 tablespoon all-purpose flour (optional)
- 1/2 teaspoon white vinegar
- 1/3 cup all-purpose flour (40 g)
- 1/4 cup unsweetened cocoa powder (22 g)
- 1/4 cup granulated sugar (50 g)
- 1/4 cup vegetable oil (60 ml)
- 1 large egg, room temperature
- 1 tablespoon red food coloring (gel preferred)
- 1/2 teaspoon vanilla extract
- 1/4 teaspoon baking soda
- Pinch of salt
Instructions
- Preheat oven to 325°F (163°C). Line an 8×8 inch baking pan with parchment paper, leaving an overhang on two sides.
- Make the crust: In a medium bowl, whisk together 1 cup flour, 2 tablespoons cocoa powder, 1/4 cup sugar, and 1/4 teaspoon salt. Stir in 1/4 cup melted butter until mixture resembles wet sand. Press firmly into the bottom of the pan. Bake for 12 minutes, then cool slightly.
- Prepare cheesecake layer: Beat 8 oz softened cream cheese with 1/4 cup sugar until smooth. Add 1 egg, 1 teaspoon vanilla, 1 tablespoon buttermilk, 1 tablespoon flour (optional), and 1/2 teaspoon white vinegar. Mix until combined. Pour evenly over warm crust.
- Mix red velvet batter: Whisk 1/3 cup flour, 1/4 cup cocoa powder, 1/4 cup sugar, 1/4 teaspoon baking soda, and pinch of salt. In another bowl, beat 1 egg with 1/4 cup vegetable oil, 1 tablespoon red food coloring, and 1/2 teaspoon vanilla. Combine wet and dry ingredients gently.
- Layer red velvet batter over cheesecake layer in dollops. Swirl gently with a knife or skewer to create a marbled effect.
- Bake for 35-40 minutes until edges are set but center jiggles slightly.
- Cool completely on a wire rack for at least 2 hours, then chill in fridge for 2 hours or overnight.
- Use parchment overhang to lift bars from pan. Slice into 12 squares, wiping knife clean between cuts.
Notes
Use room temperature ingredients for smooth mixing. Swirl red velvet batter gently for marbled effect. Chill bars before slicing for clean cuts. Baking at 325°F prevents cracking and ensures even cooking. Substitute almond flour for gluten-free crust and dairy-free cream cheese for vegan option. Bars freeze well up to 3 months.
Nutrition
- Serving Size: 1 bar (1/12th of rec
- Calories: 230
- Fat: 15
- Carbohydrates: 20
- Protein: 3
Keywords: red velvet, cheesecake bars, dessert, easy recipe, small batch, homemade, cocoa, cream cheese